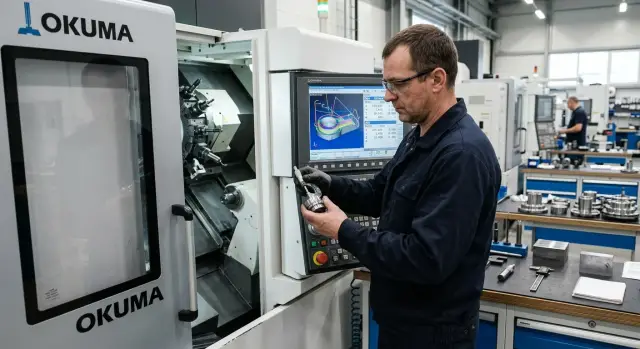
First program adjustment after a trial cut
First program adjustment after a trial cut: how to tell a CAM error from a datum/setup issue, check the machine and make a correction without unnecessary rework.
What a trial cut reveals
A trial part provides more than one size—it gives a full picture. From it you can see where to look: the part datum, the setup, the tool or the toolpath. So the first correction is better started by checking facts, not by editing the NC program.
Start by looking at the overall pattern of deviation. If the entire contour shifted by the same amount, the cause is most often the part datum, the zero point or the work offset. If one area is off while another is fine, or if radii, transitions or a pocket behave oddly, it’s less likely to be a simple shift.
It helps to split deviations into two types. A size error means the overall shape is correct but the part came out larger or smaller. A form error looks different: a surface is in the wrong place, an arc doesn’t match, a pocket is only locally offset, or an angle or pitch doesn’t follow the model.
On the first pass, record observations rather than guesses: which surfaces moved, by how much, whether the offset repeats around the contour, and whether the reference datums match the setup sheet. Then compare the part directly to the CAD model and to the setup map. The model shows the intended geometry; the setup map shows which datum was actually used and where the zero was set.
People often make the same mistake. The operator sees a dimensional shortfall and immediately edits the NC program. An hour later the program is different, but the root cause was an X or Z zero offset. The toolpath gets ruined for no reason.
It’s usually quicker to spend five minutes gathering clues: note a couple of dimensions, mark the datum used, save the current corrections and take a photo of the problem area. That pause often saves an entire shift.
What to check before editing the program
After the first part, don’t rush to change the toolpath. First lock down the machine state. Save everything that affects size: tool corrections, wear values, part zero offsets and active table entries. If you immediately enter new numbers, it becomes hard to know the original error source.
Next, take actual measurements from the referenced surfaces. Measuring from a random edge can produce a neat number but leads to the wrong conclusion. Record not only the deviation but also its sign: where it’s plus or minus, whether it repeats on multiple parts or appears only on one feature. This already helps determine whether the problem is the datum or a specific operation.
Then check the setup. The blank may not have seated against the stop, chips could be under a jaw, the tool may have been installed with different overhang, or an insert could have settled or chipped. On a lathe all of this easily produces a size shift that looks like a CAM error, even though the program is fine.
Also verify which file was actually run on the machine. Similar version names confuse people constantly: a test program, an old copy, a variant for another datum, or a file modified by hand. If several nearly identical files are in use, one wrong load breaks the entire check.
The first correction should be based on saved offsets, real measurements and a setup check. Then the choice becomes clear: shift the zero, adjust a correction or go back to CAM. You won’t rewrite the toolpath without cause.
How to tell a CAM error from a datum/setup error
The key question after a trial cut is simple: does the error repeat everywhere or only in one spot? This sign quickly narrows the search.
If every feature on the part moved by the same amount, the cause is usually not CAM. When the external contour, holes and face all shifted by the same value, the part datum, zero point or fixturing reference is most likely wrong. The program may be correct while the machine thinks the zero is somewhere else.
If the error appears only in one operation, that’s a different picture. For example, if the roughing pass is fine but the finishing pass leaves extra stock on a single radius, then look at CAM: the chain of operations, stock allowances, the side of cut, chosen geometry and operation order.
The part form also gives clues. If a slot came out wider, a chamfer faces the wrong way, or an arc looks broken, the datum is usually not to blame. Such faults arise when CAM picked the wrong surface, the tool approached from the other side, or the post-processor output the wrong correction.
A simple rule for axes helps. A uniform shift along X or Y is more often linked to part setup and work offsets. A shift only along Z means first check tool length, the length offset and the height zero. If the contour lost its shape, verify geometry and the machining strategy.
In practice this is often enough. If the whole part sits 0.15 mm high after a pass, there’s no point in rebuilding the toolpath immediately. First check how the zero was assigned and whether a wrong corrector is in the table. If the problem shows only in one transition, then open CAM and investigate that area.
Checks at the machine
Before going back to CAM, run a short check at the machine. It takes a few minutes and often shows the fault right away.
Start by stepping through the first operation in single blocks. That shows where the deviation begins: on approach, on entry, during the finish pass or on exit. Then check the active coordinate system. Make sure the expected part zero from the G54–G59 group is called and that no leftover values remain in the table from the previous setup.
After that, verify tool lengths and radius corrections. One wrong corrector number or a few tenths of a millimeter can easily cause an offset that is mistaken for a CAM error. Then confirm the touch-off point and safe heights. If the datum was taken from the wrong place or Z was referenced to a different surface, the whole operation will look wrong even if the code itself is fine.
A useful step is a dry run above the part. Raise the tool to a safe height and replay the problematic section without cutting. This run quickly shows whether the tool follows the expected line and whether there’s a risk of hitting jaws, clamps or uncut stock.
On a lathe this is especially important after the first setup. If the face is shifted consistently along the axis, first check the Z zero, the length corrector and the actual touch-off point. If the error repeats the same way across the pass, the cause is more likely the datum or a corrector than the toolpath.
If the dry run looks correct but the cut still drifts, then inspect cutting modes, tool wear and the post-processor. But until that point, it’s better not to change the working trajectory.
What to check in CAM before a new upload
When the basic machine-side causes are excluded, open CAM. Even here proceed in order rather than changing the toolpath at random.
First, compare the model zero with the zero used in the machine setup. Check not only the point but also the axis directions. For a lathe this alone is often enough to cause a consistent diameter or length shift while the toolpath looks externally correct.
Next, check the stock allowance, the side of cut and the operation order. Errors here often appear as incorrect geometry. A finishing pass may remove too much not because the contour is wrong, but because the roughing left a different allowance or an operation was executed from the wrong side of the profile. Sometimes operations are in the wrong order and the next trajectory assumes the previous cut already removed material.
Then open the original geometry. Don’t rely only on the on-screen image. If the technologist replaced the STEP file, updated a sketch or shifted the base plane, the contour may look nearly the same while the datum moved by tenths of a millimeter. For a trial cut that’s enough to cause trouble.
The final step before reloading is to compare the post-processed code with the code actually on the machine. The operator may have manually changed the start block, an offset, the corrector number, a safe retract or a single coordinate in a move. If you compare only the CAM project and not the NC program in the control’s memory, the result can be wrong.
The guideline is simple. A uniform size shift usually points to a part datum error. A local problem on one transition or one profile section is more often related to allowance, side of cut or the toolpath itself.
Example: a part machined in two setups
A clear example is a part processed in two setups. In the first setup the datum face and the outer contour were made. In the second the part was reclamped, the zero reassigned and a pocket with a group of holes was machined.
After measurement it turned out that the outer contour was correct, but the pocket and holes were shifted by 0.2 mm in X. In this case many people immediately open CAM and start editing the second setup’s toolpath. Usually that’s unnecessary.
Here the key is the deviation character. All features from the second setup shifted equally: pocket center, holes and feature clearance showed the same offset. The form remained correct and the distances between holes were preserved, so the problem was not trajectory geometry but the overall datum after reclamping.
The check took a few minutes. First they compared the contour to the drawing and confirmed it was in place. Then they measured the pocket shift and two holes. Finally they rechecked the part datum after reclamping. There they found the cause: the X zero had shifted by about the same 0.2 mm.
This can happen because of chips on the stop, a loose clamp, or a different seating of the part in the fixture. From the outside everything may look fine, but the datum is wrong. In that case correct the zero point, not the NC program. After fixing the datum and re-verifying the references, the part ran to tolerance without CAM changes.
Common mistakes
The most common mistake is going into CAM after the first dimensional shortfall. If the whole contour shifted equally, check the fixturing and work offset first. Moving the zero by 0.1–0.2 mm looks a lot like a CAM error even though the program may be perfectly correct.
The second common mistake is making corrections in two places at once. For example, the operator changes the part zero on the machine while the process engineer shifts the contour in CAM. The part may then come into tolerance, but no one understands why. On the next batch the problem returns.
The third mistake is hand-editing NC code without updating the CAM project. In the moment this is convenient: you need to quickly trim a size and a couple of lines in the file seem fastest. But afterwards the source project and the real program diverge, and the old fault resurfaces after the next upload.
Another frequent error is treating tool wear by changing the toolpath. If the first parts were fine and then size slowly drifts, the cause may be the cutting edge wear. In that case it’s more logical to add a wear correction than to repeatedly move the model or contour in CAM.
It’s useful to separate edits into temporary and permanent. Temporary changes include shifting G54, a tool correction or rechecking the setup. Permanent changes are an incorrect part datum in the project, a wrong model reference, or an extra/missing stock allowance. When that separation exists, decisions are made faster.
Quick check before the second part
Before the second blank, pause for a few minutes and check the whole chain from datum to the file on the machine. At this stage rely on measurements, not on the feeling that you already know the fault.
First re-measure dimensions tied to the reference surfaces. If several dimensions shifted by the same amount, the cause is likely the part zero or a repeatability issue in the setup. If the error affects only one feature while the datum stays within tolerance, then search for a problem in the toolpath, tool or correction.
Then reconfirm the part zero the same way you set it: with a probe, an indicator or a touch-off on the datum. After that open the correction tables and check that length, radius and wear are recorded in the correct cells with the correct signs.
Finally, match the program number and version in the control with the file that came from CAM. Mistakes here happen more often than expected. The technologist may have fixed the file, but the control still has the old version or an older subroutine block.
Don’t keep corrections only in memory. A short note on the setup sheet greatly simplifies work: what exactly was changed, wear on X, length on Z, nose radius or only the part zero. Then there’s no need to untangle the situation later between operator and programmer.
If the cause is not immediately clear
When a trial cut result looks strange, the worst action is to rewrite the entire program at once. It’s far more reliable to narrow the search to one place.
Choose one operation where the error repeats: the finishing pass on diameter, boring one hole, or facing. Checking a single transition makes it easier to find whether the fault is CAM, the part datum or tool offset.
A control part of simple material often helps. Aluminum, plastic or a cheap soft blank gives a quick answer without risk to tools or machine. On such a part it’s easier to see whether the error is stable or changes with each setup.
If the cause isn’t clear at first, collect minimum data: screenshots of the disputed operation in CAM, photos of the part and the deviation, actual measurements, values of offsets, the zero point and tool corrections. That set is usually more useful than two more trial edits in a row.
Another good trick is to repeat the run without big changes. If the size drifts by the same amount again, recheck the part datum, the setup and the zero correction. If the error changes form, appears only on an arc or behaves differently on entry and exit, then dissect the CAM and the post-processor.
Sometimes signs contradict. Measurements point to a datum error while the tool trace shows the trajectory is at fault. In that case don’t change everything at once. Bring in the process engineer or service and change one parameter at a time. The search looks slower but actually saves hours and preserves the working program.
If EAST CNC specialists installed and service the equipment, they can more easily connect to the situation when you already have measurements, photos and offsets. Then the check proceeds by facts rather than guesses.
What to record after a fix
If you eliminated the offset, don’t leave the solution in the operator’s memory. Immediately note what exactly caused the error: an incorrect part datum, an extra corrector in the control, a post-processor mistake or an imprecise blank seating.
A useful entry answers three questions: what was seen on the trial cut, what was changed and what result was obtained. For example: “X dimension was 0.18 mm low. Checked datum, shifted the part zero. Repeat pass is within tolerance.” This format helps the next shift understand the logic of the fix.
If the same problem repeats on similar parts, don’t fix it manually each time. Update the datum template, the setup map or the setup standard for that part family. That removes the source of error rather than its symptom.
When drift appears without an obvious pattern, the issue may be the machine itself. If size alternately goes off and returns with identical settings, check the machine: backlash, thermal growth, a sensor, clamp or geometry after startup. Don’t waste a shift on endless toolpath edits.
If you need an outside view, involve people responsible not only for supply but also for commissioning. EAST CNC works with CNC lathes and metalworking equipment and provides commissioning and service. In such cases they help separate setup errors from machine problems faster.
The first adjustment after a trial cut should be calm and verifiable. First look for a global shift, then a local error. First check the datum, corrections and the file on the machine, only then touch CAM. That order preserves the working toolpath and brings stable dimensions faster.
FAQ
Do I need to edit the NC program right after the first trial part?
No. First record measurements from the reference surfaces, save the current offsets and corrections, then check the part setup. If the whole contour shifted equally, the problem is usually not in the NC program.
How to tell a CAM error from a base/setup error?
Look at the pattern of deviation. If the pocket, holes and contour all shifted by the same amount, check the part zero, the base or the work offset. If the fault appears only in one operation or on one profile section, then investigate the CAM.
What should be recorded before any correction?
Save all original values: the part zero, length and radius corrections, wear offsets and the number/version of the running program. Without these, it's hard later to know what caused the size change.
From which surfaces is it better to measure the trial part?
Measure from the actual reference surfaces used in the setup. Measuring from an arbitrary edge may look convenient but often leads to the wrong conclusion.
When should tool corrections be checked first?
When the shape is correct but the size has shifted uniformly along one axis. On a lathe, first check the Z zero, tool length and the actual touch-off point rather than immediately suspecting the trajectory.
Why do a dry run before editing the CAM?
A dry run shows where the deviation starts: approach, plunge, finishing pass or exit. If the tool path above the part is correct but the cut still drifts, look at tool wear and cutting modes.
How to make sure the correct program was loaded on the machine?
Compare the name, version and the NC file contents in the control memory with the file exported from CAM. Similar filenames cause mistakes all the time, and a single old copy can ruin the verification.
What most often creates a false impression of a CAM error?
Chips on the stop, a loose clamp, a different tool overhang or a chipped insert frequently create the impression of a CAM error. From the outside it looks like a program issue, but the code may be fine.
What to check first if a part is machined in two setups?
Check the base after re-clamping first. If all elements of the second setup shifted equally while their relative distances stayed correct, adjust the part zero instead of the contour in CAM.
What should be recorded after a successful correction?
Write what you saw, what you changed and the result after the repeat pass. For example: “X dimension was 0.18 mm low. Checked base, shifted the part zero. Repeat pass is now within tolerance.” Such a note helps the next operator understand the fix.