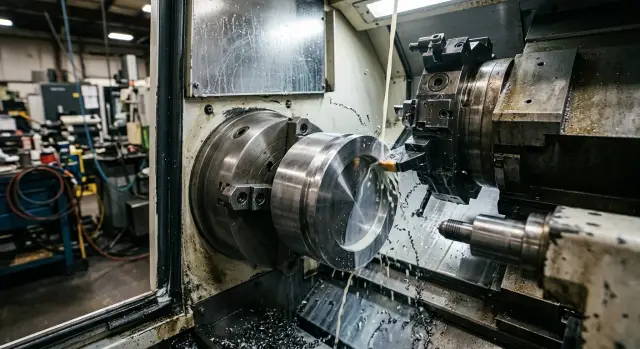
Face Groove on a Turned Part Without Bottom Taper
A face groove on a turned part needs precise feed, insert width, and tool exit settings; otherwise the bottom will taper and create scrap.
Why the bottom ends up tapering
With a face groove, this defect is easy to spot right away: the bottom is not flat, but slants instead. One side of the groove is deeper, the other sits higher. On the drawing everything is level, but on the part you get a slight taper.
It is easy to confuse this with a tool mark. A tool mark leaves a scratch or a light wave, but the bottom plane itself stays at the same level. A taper changes the groove geometry. If you measure the depth at two points, the values will be different.
Usually there is more than one cause. Under load the tool deflects a little, the insert does not cut across its full width, chip flow gets in the way of a clean pass, and on the exit the tool pulls to one side. Each of these alone may seem minor. Together, they create a slope instead of a flat bottom.
The problem is not only cosmetic. If the groove works as a seating surface, the tilt shows up quickly during assembly. The part does not sit on the full face, the ring goes in crooked, and the seal gets uneven load around the circumference.
This defect is especially troublesome where the groove sets an axial stop, holds a retaining ring, sits next to a mating face, or must hold depth very accurately.
Even the same program does not always give the same result. The first part after setup may come out almost flat, and after a few pieces the bottom starts drifting. That happens when the insert gradually wears, there is a tiny shift in the holder, chip evacuation changes, or the blank is clamped slightly differently.
There is another case as well: a batch comes out uneven even though the tool does not look obviously damaged. Then the cause is usually a mix of small things that are almost invisible on their own. Slight runout, extra tool overhang, unstable coolant flow, and even a change in blank hardness all affect cutting load. On one part the taper is barely visible, and on the next one the measurement already shows it.
How feed changes the groove bottom
On a face groove, feed affects the bottom more than many people expect. If the feed is too high, the tool starts pressing on the metal more than cutting it. The holder and insert flex slightly, and the bottom tapers.
This is usually most noticeable closer to the center of the part. There the surface speed drops, while feed per revolution stays the same. The cutting conditions get harder, chip evacuation gets worse, and even a small overload immediately ruins the geometry.
Too little feed is not helpful either. The tool starts rubbing the bottom, the metal smears in places, and instead of a clean cut you get a shiny band. By eye the surface can look neat, but inspection shows waviness or a slight slope.
You need a setting where the tool cuts, not rubs, and does not overload. If chips come off unevenly, the sound turns dull, and the mark on the bottom changes with radius, the feed is not right. This is especially noticeable in the last few millimeters toward the center.
How to compare two trial passes
Do not guess from one mark. It is better to make two short trial passes and change only the feed.
Leave speed, insert, tool overhang, and coolant flow unchanged. Make the first pass at the base feed, then the second one about 15–20% higher or lower. Watch not only the bottom, but also the sound, chip shape, and the tool’s behavior near the center.
If the lower feed makes the bottom shiny but rubbed-looking, and the chip comes off as a long ribbon, the tool is already rubbing the metal. If the higher feed creates noise, a step, or a noticeable pull of the bottom toward the center, the setting has become too rough. The working point is in the middle: the tool cuts calmly, and the mark on the bottom is the same across the full groove width.
Another good trick is not to reduce feed across the entire pass, but only right before reaching the center. Often that is enough to remove bottom taper without wasting cycle time.
What insert width changes
Insert width directly affects whether you get a flat bottom. If the insert is too wide for a given groove, it cuts harder and is more likely to rub. At first you notice heat and a shine on the bottom, and later the taper appears.
The problem is not limited to cases where the insert is wider than the groove itself. A slight centering error, low holder rigidity, or edge wear is enough. A wider insert creates a larger contact area, cutting forces rise, and the tool starts to deflect. That is why the bottom often tilts toward one side.
A tool that is too narrow is not ideal either. It cuts more easily, but it forces you to make extra passes to reach the required width. Every extra pass adds risk: the tool is shifted by fractions of a millimeter, feed changes slightly, one pass removes more than the other. In the end the bottom turns stepped or tapers, even if the tool is sharp.
The practical rule is simple. If the groove width allows it, one pass usually gives a flatter bottom than two or three finishing passes. If a finishing pass is still needed, it is better to leave a small width allowance than to machine the groove piece by piece with a narrow tool. The tighter the tolerance on width and bottom shape, the more carefully the insert has to match the finished geometry.
For a 4 mm groove, it makes sense to choose an insert close to that size right away, if the machine and holder cut calmly. If you use a 2 mm insert, you will have to widen the groove with side offsets. Formally you can reach the size, but a flat bottom becomes much harder to achieve.
Look not only at the nominal width. The edge shape, corner radius, and actual working width also matter. All of that has to match the drawing. Otherwise the insert may look suitable at first, but then you end up chasing the size with feed changes and extra passes.
Wear also deserves attention. As soon as one part of the cutting edge becomes dull faster than the other, the tool starts cutting unevenly. One side is already removing metal, while the other is mostly rubbing. After that, the bottom drifts very quickly, even at the same settings that used to work fine.
How the exit method affects the result
The last fraction of a millimeter often decides everything. If the tool exits too abruptly, the metal is no longer cut steadily. The edge starts rubbing, pulling the chip, and spoiling the last section of the groove.
A straight retract back along the same path seems logical, but in practice it often leaves an uneven mark. This is especially common when feed is already low and the tool flexes slightly at the end of the pass. At that moment the tool seems to sweep the bottom, and a taper or thin step appears at the exit.
Sometimes a very short dwell at the end of the pass helps. Not a pause of several seconds, just a barely noticeable stop without extra pressure. The system has time to settle, and the edge removes the remaining metal more evenly. But this only works when the cutting mode is already close to correct. If the insert is dull or the feed is wrong, a dwell only increases rubbing and leaves a mark.
An axial retract often changes the picture more than people expect. When the tool moves not straight back, but with a slight axial shift, it rubs less on the already machined bottom. The mark comes out cleaner because the tool leaves the cut gradually, instead of snapping off the edge all at once.
Usually three simple actions help: do not make a sharp retract immediately after reaching size, allow a very short dwell during stable cutting, and build the retract so the tool leaves the cut gradually without touching the bottom again.
A good exit is part of the whole cycle, not a separate trick. If the path is built correctly, the tool first finishes the bottom, then loses load, and only after that retracts. Then no step or obvious taper remains on the last section.
On a simple part, you can see it right away. The groove is almost done, and the depth is already on size. With a direct rapid retract, the last sector of the bottom may darken and become slightly slanted. If instead you give a short finishing move and then retract the tool gently along the axis, the bottom often comes out flatter even without changing the insert.
If a mark still remains at the exit after setup, change the exit path first. In many cases that is already enough.
How to set up the process step by step
Bottom taper usually appears not because of one setting, but because of a chain of small mistakes. If the blank runs out, the clamp pulls it to one side, and the feed is too aggressive, the groove almost always comes out with a taper.
That is why it is better to check in short steps instead of changing everything at once. It is faster to see what is actually ruining the result.
First, check the base and the clamping. The blank should sit evenly, without tilt. If there is face runout, the tool will follow the wrong path from the start.
Then set a calm feed as the starting point. At the first setup, clean geometry matters more than saving a few seconds. After the first trial pass, measure the bottom in two points: closer to the inner wall and closer to the outer wall. That difference already tells you the direction of the error.
Next, change only one parameter at a time. First the feed, then the insert width or the exit method. If you change everything at once, the cause will remain unclear. It is a good idea to write down the successful combination right away. On the next batch, that saves more time than rushing the first run.
In practice, this order is often enough. For example, after the first pass, the bottom at the outer side is deeper by 0.03 mm. Do not touch the feed, compensation, and insert all at once. Lower only the feed and repeat the pass. If the difference gets smaller, you are moving in the right direction. If not, return to the original feed and check how the tool exits the groove.
On serial CNC lathes, that kind of discipline is especially useful. Once the checking sequence is set up properly, it keeps producing stable results on every new part.
Example on a simple part
Take a flange with a face groove for a seal: 4 mm wide, 1.6 mm deep, located close to the outer diameter. After the first trial pass, the bottom tapered toward the outer diameter by about 0.04 mm. For a seal, that is already too much.
At first, the operator thought the feed was the cause. The first trial was at 0.08 mm/rev. He lowered it to 0.05 mm/rev, then to 0.04 mm/rev. The tool mark became cleaner, but the taper did not disappear. The size drift became smaller, but the geometry stayed the same.
The problem was not feed alone. The groove was being machined with a 3 mm insert, and the needed width was being reached by offsetting. On a part like this, that often creates tilt: the tool has already passed along the bottom, then widens the side, and the load on exit changes. Visually the groove looked fine, but the measurement quickly showed the slope.
After that, the operator installed an insert closer to the groove width. Instead of 3 mm, he used 4 mm, so the bottom did not have to be widened by extra side movement. That almost solved it, but the bottom was finally leveled by a different exit from the groove. Earlier, the tool was retracted immediately after reaching depth. Now it made a short finishing pass with very light feed toward the center and only then retracted.
That sequence removed the extra pressure on the outer side. The bottom stopped tapering, and the spread across the bottom dropped to about 0.01 mm. For a groove under a seal, that is already a workable result without hand finishing.
What was kept as the working setup
They did not look for a universal setting. They kept the combination that worked on that part: a 4 mm insert matched to the actual groove width, a main feed of 0.05 mm/rev, the last 0.1 mm in depth at 0.03 mm/rev, and an exit that was not immediate, but a short finishing move toward the center followed by a retract.
This example shows something simple: this defect is rarely removed by one edit in the program. If the bottom is drifting toward the outer diameter, you usually need to look at feed, insert width, and the exit path from cutting right away.
Common mistakes
When the groove bottom tapers, many people start looking for a complicated cause. In reality, the defect often appears because of a couple of simple actions done at once and without control. On the first parts, it is better to change only one factor at a time.
If the operator raises the feed and installs a different insert width at the same time, the result tells you nothing. The groove got better or worse, but why exactly is unclear. First keep the same insert and change only the feed. Then return to the original feed and compare a different insert width.
Another mistake is checking only the width dimension. The part may pass drawing requirements, while the bottom already has a slope. This is especially common where the groove works with a ring or seal: width is within tolerance, but the fit is still poor.
A small chip on the cutting edge is also often missed. The insert is still cutting, so it stays in service. But the bottom is already becoming rough, and the tool pulls material unevenly. If the taper appeared suddenly, inspect the edge first instead of changing settings blindly.
A bad habit is to remove all the allowance in one pass. On a wide or shallow groove, that cut can easily pull the tool off line, and the bottom plane is lost. Two passes are usually calmer: the first removes the bulk, the second straightens the bottom and walls. The cycle gets a little longer, but the batch scrap risk drops noticeably.
The most expensive mistake shows up at the end of the shift, when the bottom is checked only after dozens of parts. It is much smarter to stop after the first, third, and fifth parts and quickly look at the bottom shape, the exit marks, the edge condition, and repeatability. That check takes only a few minutes, but it immediately shows where to look for the problem.
Quick check before startup
Before starting, it is better to spend a couple of minutes checking than to chase taper through the whole batch later. If the groove must hold width and bottom flatness accurately, even a small issue like weak insert clamping or too aggressive feed can quickly create scrap.
The pre-start check is simple. Inspect the insert: the cutting edge should have no chips, and the insert should sit without play. Match its width to the groove size. If the gap is too small or absent, the tool will start rubbing on the sides.
Next, check the feed in the program. For the first part, it is better to choose a calm setting instead of chasing cycle time. Then look at the last section of the path. The tool should exit clearly and cleanly, without a sharp jerk out of the groove. And prepare the measurement for the first part while the machine is still running the same setup.
Usually taper does not come from one big mistake, but from two or three small ones at the same time. The insert is slightly damaged, the feed is too high, the exit is short, and the bottom already tapers. You may not always see that on the screen, but the defect appears immediately on the part.
Pay special attention to insert seating after a change. Even a new insert cuts badly if chips got under it or the screw was not tightened fully. Everything can look normal from the outside, but under load the tool shifts slightly and the size starts drifting.
It is also better not to guess at the feed. If the material is tough and the groove is shallow, an overly bold setting often ruins the bottom faster than a dull edge. It is safer to start with a moderate value, take the first part, measure the bottom, and only then speed up.
A workable sequence is simple: start the cycle, take the first part, immediately check groove width, bottom flatness, and the tool exit mark. If a slope is already visible on the bottom, it is better not to continue the batch. At that stage, the correction takes five minutes. After ten parts, it will cost much more.
What to do next
After a successful setup, do not rely on memory. It is better to record the settings in a simple table: material, part diameter, groove width, feed, speed, insert width, exit method, and the result on the bottom. After a few shifts, that record saves more time than starting over from scratch.
For narrow and wide grooves, it is better to keep different settings. A common mistake is to take one proven setting and use it everywhere. Then the narrow groove starts rubbing, while the wide one drifts at the bottom. If these operations repeat in batches, it makes sense to keep at least two separate setup cards.
The work order should also be fixed: first choose the insert for the groove width, then set the feed with some reserve for bottom finish, then check the tool exit on a short trial part, and immediately save the successful settings.
If the result is inconsistent, do not just keep changing the feed. The cause may be deeper: play in the holder, chuck runout, weak part clamping, tool height misalignment, worn guides, or poor coolant flow. When the bottom is flat one time and tapers the next on the same program, the problem is often in the machine or the setup.
It is useful to record not only successful settings, but failed ones too. A short note like “Steel 45, 4 mm insert, feed too high, bottom tapered” helps you avoid repeating the same mistake a month later.
If you are choosing a CNC lathe for these operations, it is worth looking not only at the spec sheet, but also at the rigidity of the machine, ease of setup, and service availability. For businesses in Kazakhstan and other CIS countries, EAST CNC helps with selection, delivery, commissioning, and service support for metalworking lathes.
Good results do not depend on one lucky setting, but on a clear system that can be repeated on the next part.
FAQ
How can I tell whether the groove bottom has tapered or there is just a tool mark left behind?
Measure the groove depth in at least two points: closer to the inner wall and closer to the outer wall. If the values differ, the bottom is tapering. If the depth is the same and you only see a mark or a slight wave, that is a tool mark, not a tilted bottom.
Why does bottom taper often appear closer to the center of the part?
Closer to the center, surface speed drops while feed per revolution stays the same. The tool has a harder time cutting, chip evacuation gets worse, and the tool is more likely to deflect. If the taper grows toward the center, try lowering the feed slightly on the last few millimeters and see how the bottom changes.
What feed should I start with when setting up a face groove?
For the first part, start with a calm feed and do not chase cycle time. A good starting point is a mode where the tool cuts smoothly, without a dull rumble and without a polished, rubbed-looking bottom. If the example in the article went from 0.08 to 0.05 mm/rev, that is the right logic: first find clean geometry, then speed up.
What should I do if lowering the feed makes the bottom shiny but not flatter?
That means the tool is rubbing more than it is cutting. The surface may look neat, but measurement often shows waviness or a slight slope. Bring the feed back up a little and compare two short passes, changing only that parameter. Look for the setting where chips come off smoothly and the mark on the bottom stays even across the full width.
How do I choose insert width so the groove bottom stays flat?
Choose a insert width as close as possible to the finished groove width, if the machine and holder can handle that cut stably. That way, you are more likely to get a flat bottom in one pass. Do not look only at the nominal size. Check the actual cutting width, edge shape, and corner condition, otherwise you will end up chasing the size with offsets and extra passes.
Can I machine a wide groove with a narrow insert in several passes?
You can, but the risk is higher. Every extra finishing pass adds the chance of X-axis shift, uneven edge loading, and a step on the bottom. If a narrow insert is already in use, leave a small allowance for the finishing pass and do not change several parameters at once. That way you can see more quickly what is pulling the bottom off line.
How does the tool exit affect bottom taper?
Very often, yes. When the tool leaves the groove too abruptly, it no longer cuts steadily; it drags the chip and sweeps across the last section of the bottom. Usually a softer exit helps: a short finishing move, a slight feed reduction before the center, and a withdrawal without touching the bottom again. Change the exit path before you start adjusting the whole cutting mode.
What should I check first if the same program gives different results on the bottom?
Start with the simple things: check the part clamping, face runout, insert seating, and cutting edge condition. Even a new insert cuts poorly if chip is trapped under it or the screw is not tightened fully. If all of that is fine, keep the program unchanged and change only one parameter at a time. Otherwise you will not know where the real cause is.
How can I set up the process quickly without adjusting every parameter one by one?
Work in short steps. Make the first trial pass, measure the bottom in two points, then change only the feed by about 15–20% and repeat. If the difference across the bottom gets smaller, keep going in that direction. If not, return to the original feed and check the insert width or the exit path from the groove. This order is usually faster than changing everything at once.
What should I do after a successful setup so the taper does not come back on the next batch?
Write down the working combination right after the successful part: material, groove width, insert, feed, speed, exit path, and the result on the bottom. A week later, memory will already let you down, but a note will save time and parts. If the result later starts drifting again at the same settings, look for the problem in the fixture or machine: play in the holder, chuck runout, weak clamping, unstable coolant flow, or something similar.