Enclosed or Open Loading Area: Which Is Better for the Crane
An enclosed or open loading area affects crane travel, operator visibility, and the risk of hitting the machine base. Let’s see where work is easier and what to check.
What Is the Problem When Loading a Center
When loading a machining center, what matters most is not the machine’s catalog dimensions, but the crane’s real approach and what the operator can see at the moment the part is set down. On paper, two machines may look almost identical. In the shop, one loads smoothly, while the other turns every heavy blank into a slow job with stops and extra hand signals.
The problem becomes especially noticeable when large or awkward parts go into production. The crane brings the load to the opening, the operator watches the part being set down, and the blank has to pass precisely between the door, the guard, the table, and the machine base. If the crane cannot approach in a straight line, the load is more likely to hang at an angle, twist slightly, and need extra time to line up. Even a few extra centimeters quickly turn into minutes on every load.
The loading area affects this more than it seems. If the opening is narrow or part of the access is blocked by a guard, the operator can see the lower edge of the part and the landing point less clearly. Then the work is no longer based on a clear picture, but on fragments of visibility and short signals to the crane operator. Movement becomes more cautious, but not necessarily more accurate.
Usually, awkward layouts hurt several things at once. The crane takes longer to position the blank, the operator has less control over the gap to the base and the guard, the part has to be stopped and repositioned more often, and each load takes longer than planned.
Poor visibility slows down even a simple operation. While the operator walks around the door, crouches, looks from the side, and gives another signal, the load is hanging in the air. At that moment, the shop is not cutting metal; it is waiting. If this happens several times per shift, the lost time becomes noticeable.
The worst-case scenario is a случайный contact with the machine base, table, or guard. Sometimes it is a light knock, after which everything still has to be stopped and the fixture, part, and safety elements checked. Sometimes the blank itself is damaged, especially if it already has machined surfaces. In any case, that means downtime, repeat checks, and extra costs that could have been avoided at the layout stage.
How the Two Layouts Differ
When a center is loaded by crane, the difference between an open and an enclosed layout is felt right away. It shows up in the load path, the operator’s visibility, and the amount of room available for maneuvering.
An open layout usually gives a straighter path into the work area. The load moves almost along the opening’s axis, the hook is easier to bring over the table, and the operator can see more clearly how the part is entering. This is especially convenient for long or awkward blanks, such as housings or shafts with large fixtures.
In an enclosed layout, the path is often more complicated. The load is first lifted above the base or front guard, then moved through the door opening, and only then lowered onto the table. As a result, the crane operator and the operator make more small corrections, and each one takes time.
How the Load Moves into the Work Area
In an open layout, the part usually passes closer to the center of the opening and reaches the position above the table faster. There are fewer blind spots because the door, posts, and body panels block the view less.
In an enclosed layout, the load often travels in an arc or at a slight angle. Part of the blank may be hidden behind the door frame or side panel, so the operator does not see the full outline at once. If the blank is tall, the margin at the top disappears even faster: you have to account for the load itself, the slings, the hook, and the safe path above the machine body.
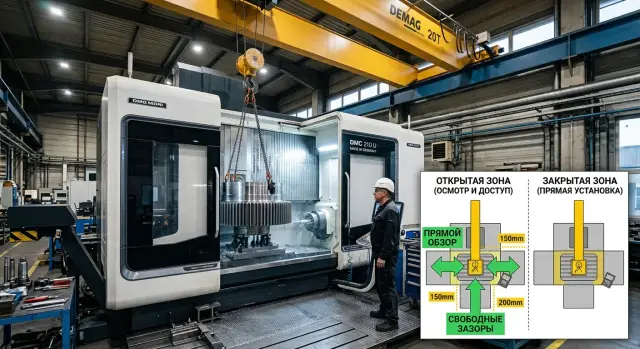
What Changes in Width and Height
An open layout usually offers more usable width at the entry point. That does not mean the catalog opening is always wider, but there are fewer protrusions nearby that interfere with bringing in the load.
In an enclosed layout, part of the space is taken up by the base, the guard, and the shape of the body. The height margin is often smaller too, because the load has to be carried higher over obstacles. In a tight shop, this quickly becomes a problem: the crane is already positioned correctly, but the part still cannot be brought in safely.
If you are choosing a machine for regular crane loading, the question “enclosed or open loading area” is not about comfort on paper. It is about how freely the load reaches the table, how many movements the crane makes, and how much room for error the operator has.
How the Crane Approaches the Machine
For the crane, the difference between the two layouts starts even before entering the work area. The hook moves from the storage point for the blank to the machine door, and then to the table or the part setting point. The straighter that route is, the calmer the load is and the fewer small corrections the crane operator needs to make.
With an open loading area, the path is usually shorter and cleaner. The hook approaches almost in a straight line, the part makes one turn or no turn at all if the rack and machine are positioned well, and the operator and slinger can see the load for most of the route, which makes it easier to stop in time and give a precise command.
With an enclosed loading area, the hook is more often brought through a narrower opening. The part has to be moved up to the door first, then turned and lowered slowly inside. If there is a guard, column, or protruding base nearby, there may be not one but several careful turns before the part is seated.
The sling length has a big effect on the trajectory. Long slings create more swing and require more height clearance. That is inconvenient if the crane passes under lights, ducts, or the upper part of the guard. Short slings make the suspension more compact, but they require more accurate hook placement.
Before choosing a layout, it is useful to check four simple things:
- where the crane picks up the blank: from the floor, a pallet, or a rack;
- how many times the part has to be turned before it is seated;
- whether there is enough height for the hook and slings;
- where the slinger will stand when the load reaches the machine door.
The space for the slinger next to the machine is often underestimated. In an open layout, the person can stand to the side of the load and guide it by hand over the last few centimeters. In an enclosed layout, they are often squeezed between the door, the guard, and the machine base, so they let go earlier. After that, the crane operator is working almost blind.
Put simply, an open layout is usually more convenient for loading a machining center by crane. It is more forgiving of small errors in approach. An enclosed layout also works, but it requires a cleaner route, the right sling length, and free space around the machine.
What the Operator Sees During Loading
During loading, visibility decides almost everything. The operator needs to see not only the blank itself, but also the table, chuck or fixture, and the edges of the opening. If even one reference point is lost, the seating process becomes slower and more stressful.
An open layout usually gives a simpler view. From the load entry side, the operator can often see the entire work area: where the part is going, how much is left before it reaches the table, and whether the blank is drifting sideways. This is especially helpful when the load has to be not only lowered, but also turned a few degrees before being seated.
In an enclosed layout, part of the view is taken away by the door, post, guard, and guides. A blind spot often appears in the corner of the opening or where the door frame gets in the way. As a result, the operator can see the front edge of the table but has poorer control over the far corner, the back of the fixture, or the edge of the chuck. And mistakes usually happen in the last few centimeters.
Because of that, the operator often has to walk around the machine. They give a stop command, change position, check the seating again, and only then allow the load to be lowered further. In a tight shop, this walk takes time and adds tension: the load is hanging, the view is broken up, and people start rushing.
It is also a problem when the operator and the crane operator see different things. One thinks the blank is already centered, while the other notices an offset but is not sure which way to move it. That is why the commands should be short and the same for everyone: “up,” “down,” “toward me,” “away,” “stop,” “slow.”
Only one person should give commands. Usually that is the machine operator, because they understand best where the part needs to sit. If the crane operator loses sight of the operator, it is better to stop immediately rather than guess.
In practice, the difference is especially visible when loading a large part. In an open area, the operator often controls the seating from one position. In an enclosed area, they have to change position to check the far edge and avoid hitting the base or the guard. That is why, when choosing a CNC machine layout, it is important to look not only at the catalog dimensions, but also at the real visibility of the person at the machine.
Where the Risk of Hitting the Base and Guard Is Higher
The biggest problems are caused not by the part’s overall size itself, but by its path in the air. A long blank moves in an arc, not in a straight line. A heavy part also responds to turning more slowly, so the lower corners of the machine base, pallet ends, and guard posts are the most likely contact points.
In an enclosed loading area, the risk is usually higher. The opening is narrower, there are posts nearby, and the door itself leaves less room to turn the part. If the operator brings in a shaft, plate, or housing at an angle, one end is already inside while the other is still swinging outside and can easily touch the base or the door frame.
An open layout is more convenient for long and heavy blanks. The crane approaches more freely, and the operator can change the hanging angle more easily. But it still has a weak point: if the load is lowered almost blindly above the table, the lower part of the blank or fixture can scrape the machine base, especially when the center of gravity is shifted.
A load does not stop swinging the moment the crane stops. It still moves by inertia. Add sling stretch, suspension play, and an uneven center of gravity, and even 2–3 centimeters of side movement may be enough for a long part to hit the guard or the corner of the base.
The door is another separate obstacle. With a swing door, the leaf can reduce the useful turning angle. A sliding door creates fewer problems, but the frame still limits the path. In practice, it looks simple: the part fits by size, but turning it into the working position without extra motions is already difficult.
You need to calculate clearance not only for the part. In real loading, the suspension dimensions are often more important than they seem:
- the part’s length, width, and height;
- slings, chains, or grippers;
- the hook and its turning radius;
- a spreader beam, if used;
- allowance for swing and turning.
A typical small-shop mistake is the same every time: people look at the catalog opening and forget to account for the suspension. If a 500 mm-high part is hanging from slings and a hook, the real package may already take up 900–1100 mm. With a machine that has an enclosed loading area, that quickly turns into extra maneuvers and a risk of impact.
How to Choose the Layout Step by Step
It is better to choose between an enclosed and an open loading area based on your actual work, not just the catalog. A common mistake is simple: the shop looks only at the largest part, even though most of the shift the crane is delivering completely different blanks. As a result, the layout looks fine on paper, but every day the operator wastes extra time on awkward seating.
Start with a short check on the shop floor or from the layout plan. Measure not only the largest blank, but also a few parts you load most often. Look not just at length and diameter, but at sling points, suspension height, and how the part turns in the air.
Then draw the crane’s real path to the lowering point. Not a straight line, but the whole route: approach, turn, alignment, and sling removal. Mark separately where the operator stands at that moment. They need a clear view of the part, the chuck, and the edges, not a narrow angle from the side.
It is useful to compare the time of one loading cycle in both layouts. Even a 30–40 second difference per cycle quickly turns into a noticeable loss over a shift. And one more thing that is often missed: check in advance how you will remove chips and how service access to the machine components will work. Sometimes convenient loading later turns into cramped maintenance access.
After that check, run a simple test scenario. Take the most common part, mark the lift height, the entry point, and the place where the operator gives commands to the crane operator. If, in the enclosed layout, the load has to be brought in at an awkward angle and the operator loses visibility at the moment of seating, the open area usually provides calmer and faster work. If the part is compact and the shop needs a more enclosed machine perimeter, the enclosed layout can still be a good solution.
You should also consider operator fatigue. When the operator has to stretch, go around the guard, or look almost blindly every time, mistakes happen faster. For CNC machines, that is not a small thing: one awkward load can hit the base, the door, or the fixture.
If you are choosing a new center, ask the supplier not only for the outline drawing, but also for a real crane loading diagram. It makes it much easier to understand how the machine will perform not on paper, but during an actual shift.
Example for a Small Shop
In a small shop, the difference between the two layouts becomes obvious very quickly. Imagine a work area where housings are loaded onto a machining center several times per shift. The parts are not flowing continuously, but coming in batches of 2–5 pieces. The operator and the crane operator have to work in a tight rhythm: unload the finished part, bring in the next one, check the seating, clamp it, and start the machine again.
With a short housing, both layouts are usually acceptable. The crane operator brings in the blank with almost no extra movement, and the operator can easily correct the last few centimeters. The problems start when a long part arrives. It has to be turned, its angle has to be caught, and the load has to be watched so it does not drift sideways as it enters the work area.
In that kind of work, an open layout often wins on simplicity. The crane path is shorter and straighter. The load makes less of an arc, and the operator can see more clearly how the part approaches the table or fixture. As a result, loading is calmer, especially when there are only a few people on the shift and nobody wants to spend 10 minutes on every correction.
In an enclosed layout, the load path is usually more complicated. The crane operator more often brings the part in indirectly, with a detour. Because of that, the operator asks to adjust the sling, lift the load a little, turn it, or pull it back again. Each command seems minor, but over a shift they eat up time and tire people out.
If you reduce it to a simple picture, a short part usually goes in without major issues in either layout. A long part in an enclosed area often has to be turned more. In an open area, the operator notices the skew earlier. In an enclosed area, the chance of accidentally hitting the machine base or the edge of the guard is higher.
For a small shop, this is not an argument about a pretty layout. It is about extra idle minutes, more communication between people, and a higher risk of mistakes at the end of the shift.
Mistakes That Get Expensive
The most expensive mistake starts before the purchase. People compare the price, power, and axis travel, and leave the crane path to the loading area for later. Then it turns out that the hook can only approach at an angle, the blank has to be carried over the table, and the operator loses visibility at the worst possible moment.
If you are choosing between an enclosed and an open loading area, you need to look not only at the machine itself, but also at the shop around it. One cabinet, column, or wall next to the side changes the whole process. The crane operator has to maneuver longer, and every extra correction increases the risk of hitting the base, door, or guard.
Typical mistakes are usually these:
- placing the center too close to the wall and leaving a passage that is still fine for people, but already awkward for the crane;
- calculating only the machine dimensions and forgetting the length of the spreader beam, the blank, and the sling angle;
- buying a machine without a trial loading layout on the shop plan, or at least without marking it on the floor;
- having several people give commands during the lift, so the crane operator receives mixed signals.
Even a small calculation error quickly affects the budget. If the spreader beam is longer than expected, the load travels higher or farther from the center. If the slings sit at a sharp angle, the blank swings more and comes closer to the machine base.
The problem is that these mistakes rarely look dangerous on the first day. People get used to “turn it a little,” “move it back a bit,” and work almost at the limit. Then one bad movement leaves a dent in the cover, hits the base, or disrupts part setup.
The right sequence is simple: before purchasing, draw the crane path, hook height, and the blank’s position at several points of movement. After that, assign one person to give commands to the crane operator. Usually it should be the person who can see both the load and the machine well.
What to Check Before Buying and Starting Up
Before placing an order, do not look only at the catalog dimensions. For this topic, a more important question is: how exactly will the longest and most awkward blank enter the machine? If it has to be turned in the air, the crane loses accuracy and the operator loses a clear view.
Ask to show the blank’s path not in isolation, but using the actual dimensions of your shop area. You need the part length, sling height, hook travel, and the angle at which the load approaches the door. Sometimes the machine fits the catalog, but the part can only be brought in with an extra maneuver. That is already a bad sign.
The operator should be able to see the seating point from their usual position. If they have to step aside, stretch, or look through a post, loading will be slow and tense. It is better when, with the door open, you can see the slings, the edge of the fixture, and the exact place where the part will sit.
Do not forget the people around the machine. The slinger and the cart need a proper passage, not a narrow gap between the guard and the wall. If loading happens several times per shift, an extra 30–40 cm matters more than it seems.
Also check the clearance to the machine base. On paper, the load may pass almost flush, but in the shop it rarely hangs completely still. Even a small swing immediately increases the risk of hitting the base or the lower part of the guard. If the gap is only a few centimeters, it is better not to rely on the crane operator’s precision and to look for a more convenient layout right away.
Before startup, it helps to set a few things in advance:
- the route of the longest blank to the setting point;
- the place from which the operator can see the seating without extra movement;
- a passage for the slinger, cart, and removed packaging;
- the minimum clearance to the base and guard during light swing;
- who is responsible for the first trial loading.
The last point is often forgotten. Who will direct the first trial loading after installation: the setup technician, the shop supervisor, the crane operator, or the supplier’s representative? It is better to agree on that in advance so that on the first day nobody argues about who gives commands and who stops the operation if the load path looks unsafe.
What to Do Next
The question of which loading area is better should be decided not by the machine photo, but by your part and your crane. The same center can be convenient for a compact blank and inconvenient for a long part with a spreader beam.
First, gather exact starting data: the part’s length, width, height, and weight, the dimensions of the gripper or slings, the hook height in the upper position, and the vertical clearance available when the load turns. If the load does not move strictly vertically, that should be included too.
Then draw the load’s path from storage to the work area. A simple hand sketch is enough. Mark where the crane picks up the part, the angle at which it approaches the machine, where the operator stands during loading, and the point where the load comes closest to the base or guard.
That sketch quickly shows the weak spots. If the part has to be turned in a narrow passage, an open loading area often gives more freedom. If the crane can only approach from one side, an enclosed layout may immediately add extra movement and worsen visibility.
The shop layout is better discussed before ordering the machine, not after. The plan should include the machine itself, the electrical cabinet, the chip conveyor, the service area, the cart path, and a safe place for the operator. Otherwise it is easy to buy a model that fits the specifications but is awkward to load every day.
If the issue is not only the model, but the real loading scenario, it should be discussed with the supplier in advance. At EAST CNC, the official representative of Taizhou Eastern CNC Technology Co., Ltd. in Kazakhstan, the process includes consultation, selection, delivery, commissioning, and service support. This is useful when you need to evaluate not only the machine itself, but also how it will fit into a specific shop and work with your crane.
A good final test is simple: take not the most typical part, but the most awkward one, and check its route to the work area step by step. If a tight spot is already visible on paper, it will not disappear after the machine is installed.