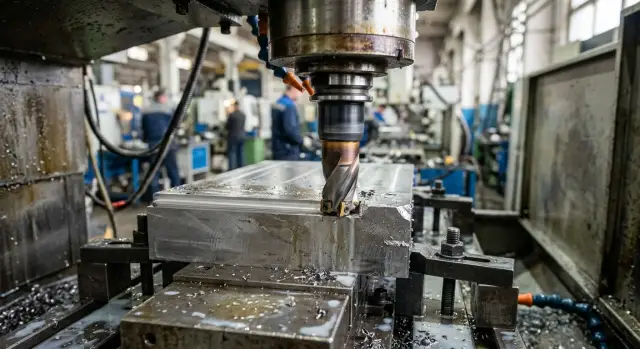
Edge Chipping During Machining: Tool Entry and Exit
Edge chipping during machining often appears at tool entry and exit. We look at how feed, angle, and the order of finishing passes change the result.
Why the edge chips exactly where it shows most
An edge is almost always weaker than the middle of a surface. In the center of a part, the metal is supported on all sides during cutting. At the edge, that support is gone. What remains is a thin section that handles impact, vibration, and a sudden increase in load much less well.
That is why edge chipping during machining often appears not where a lot of material is removed, but where very little is left. A part may behave calmly across the whole face, yet the edge reacts differently. This is especially noticeable on chamfers, ends, thin flanges, and at the exit into a groove.
The problem starts at the first contact. The tool has not yet settled into a steady cut, but the force has already reached a small area. If the tool entry is too abrupt, the cutting edge strikes the thin section instead of removing the layer smoothly. On a CNC lathe, this often looks frustrating: the surface farther along is clean, but there is already chipping at the start of the pass.
The picture changes at tool exit, but the result is the same. By the end of the pass, the edge is already weakened because some of the surrounding metal has been removed. The tool loses even support and may not cut the remaining material cleanly, but tear it away instead. That creates a small metal breakout. It may be very small, but the eye catches it immediately.
Because of this, the edge spoils the look of the part more than feed marks on a large flat surface. Even a tiny chip is easy to see, especially on an outer edge, chamfer, or end face. For a housing, bushing, or locating part, that is not a minor issue: the dimensions may still be within tolerance, but the appearance and the way the assembly works raise questions.
In practice, this is often seen on production parts for mechanical engineering, where the whole pass runs normally and scrap appears in two places: at entry and at exit. Machine power does not solve it. The edge chips because the metal simply has less strength reserve there.
What the tool does at entry and exit
Entry and exit are two short sections where the part edge takes the hardest hit. In the middle of the pass, cutting is usually smoother: the chip is already formed, the load is stable, and the machine is holding the cutting mode. At entry, that reserve is not there yet.
If the tool plunges in too abruptly, the cutting force rises suddenly. The insert does not have time to enter the metal gently, and the first contact becomes impact-like. On the part, this often shows up as a small chipped mark at the start of the pass, especially on a sharp edge, chamfer, or thin wall.
Edge chipping during machining often happens not because of one big mistake, but because of a poor combination of conditions. The operator uses a normal feed rate, the tool approaches with almost no lead-in, the part is not clamped very rigidly, and the insert is already worn. Each factor alone may still be acceptable, but together they quickly damage the edge.
At exit, the picture changes. While the tool moves through the body of the part, the metal supports the edge. At the end of the pass, that support disappears. The last millimeters are held less firmly, and the cutting edge no longer shears the chip as calmly. It can pull the thin edge with it and tear off a small chip.
A dull insert makes the situation much worse. A sharp one cuts the metal and leaves a predictable mark. A worn one pushes and tears more than it cuts. That is why it hits the edge harder at entry and is more likely to break off the edge at exit instead of trimming it cleanly.
Weak clamping shows up quickly in these moments too. When the tool is just entering or already leaving, the load changes suddenly. If the part, chuck, or fixture allows vibration, the edge takes a series of small blows instead of one smooth cut. After that, the part shows not only chips, but also a torn, rough sheen along the edge.
On turning operations, this is easy to see at the end face and at a shoulder. The tool approaches confidently, but at the very end of the pass the edge suddenly crumbles, even though the middle of the surface looks clean. That almost always means the problem is not in the material itself, but in the entry or exit moment.
How feed rate changes the edge after a pass
Feed rate often damages the edge more quietly than a wrong tool. It sets the chip thickness and the force with which the cutter pulls the metal along. Because of that, edge chipping during machining often appears even when the cut itself looks smooth.
If the feed rate is too high, the cutter does not trim the edge gently. It seems to tear it away at the end of the move. The part is left with a rough mark, and a small break or burr can easily appear at exit. This is especially noticeable on a thin wall, a chamfer, or near an already weakened rib.
Too little feed does not help either. In that mode, the tool starts rubbing more than cutting. The metal heats up, the edge softens, and then breaks in small fragments. After the pass, the edge may not look torn, but compressed instead, and that often misleads the operator.
For a finishing pass, it is better to change feed by section rather than keep one value for the whole path. At entry and exit, it makes sense to reduce it slightly to remove the impact on the edge. Even a small reduction at the last few millimeters often gives a cleaner edge than trying to “force” quality with one slow pass along the whole length.
One setting does not fit every edge on the part. Different areas behave differently:
- an outer edge is more likely to suffer at tool exit;
- a thin flange dents and chips faster;
- an area near a hole handles load worse;
- an interrupted surface hits the tool harder.
In practice, this is easy to see on a simple part with a chamfer. If the whole edge is cut with the same feed, the start may look clean, but the end will crumble. If the same depth is kept but feed is lowered before exit, the edge usually holds up better.
A good rule of thumb is simple: look not only at surface roughness, but also at the shape of the edge after the pass. If the edge pulls, dents, or chips, change the feed first, and only then look for a problem in the insert, clamping, or material.
How the entry angle adds or removes impact
Edge chipping during machining often appears not because of the overall cutting conditions, but in that short moment when the tool first touches the part or leaves it. That is where the load changes sharply, and the edge takes the most unpleasant hit.
If the tool goes into the material almost straight, the first contact point takes everything at once. The feed has not yet spread across an arc or a cutting length, but the cutting edge is already pressing into one area. On a sharp outer edge, that quickly creates a microchip that is easy to see even on a clean part.
A smooth entry works more gently. When the tool approaches at an angle, it engages gradually, and the load grows step by step rather than all at once. The machine, holder, and the insert itself handle that entry more calmly, and the first contact point does not take an extra удар.
The same logic applies at exit. The safest option is when the tool leaves into free space. Then the chip thickness falls naturally, and the cut ends without tearing off the last bit of metal.
It is worse when the tool exits across an already finished edge. At that point, support under the metal ends, and the insert can rip off a small piece from the edge. On the part, this looks like a chip, dent, or burr, even though the rest of the pass may have been clean.
Simple methods usually help:
- use a smooth lead-in instead of a straight plunge to the surface
- move the tool out past the contour instead of stopping on a finished edge
- leave a small chamfer or a process allowance for the exit
- remove that allowance in a separate light finishing pass
A small chamfer often saves the edge better than trying to machine the whole contour in one go. It gives the exit point a little more metal, and the tool does not tear the thin edge away in the last split second.
On a part with an outer edge, this is easy to see right away. If the finishing pass starts directly on a sharp corner, the entry mark is almost always rougher. If the same pass starts with a smooth approach or from an area that already has a chamfer, the edge looks noticeably more even after machining.
When the edge starts to crumble, the first thing to change is not the insert grade, but the entry and exit path. Often that is already enough to remove the chip without increasing cycle time.
How to set up finishing passes step by step
A finishing pass should not be expected to fix everything left by rough machining. It should remove a thin allowance calmly, without hitting the finished edge. If edge chipping during machining appears mainly at the final stage, look first at the sequence of operations, not at the insert grade.
Usually the issue is easy to spot: the edge chips either when the tool is entering or when it is exiting the material. Those two points create different patterns. At entry, there is usually a small breakout from impact. At exit, the edge often breaks right at the end, when chip thickness changes suddenly.
A workable setup is simple:
- First, find the same defect location on several parts. If the chip repeats at entry, adjust the start of the path. If it happens at exit, look at the last millimeters of the pass.
- Leave a small, even allowance for the finishing pass. When the allowance varies, the tool alternates between easy cutting and impact, and the edge shows it immediately.
- If the part geometry allows it, move the plunge point away from the finished edge to an area that will be removed later anyway, or to a chamfer.
- Reduce feed at the start and end of the path. Not along the whole length, only where the edge is especially vulnerable.
- After each change, check one part and change only one parameter at a time. Otherwise, it becomes impossible to tell what actually helped.
A common mistake is to lower feed, change the entry angle, and move the start point all at once. The part comes out better, but the real reason stays unclear. On the next batch, the chip comes back, and the search starts over.
On a part with a chamfer, this is especially clear. If the tool enters directly into the finished sharp edge, even a careful cutting mode can leave chipping. If the pass starts a little earlier, with a thin allowance left and a lower feed at the start, the edge usually comes out cleaner.
On CNC lathes used for production metalworking, this order gives more value than sudden changes in cutting conditions. First remove the impact at entry and exit, then adjust everything else. It saves parts, time, and stress on the shop floor.
Mistakes that make the edge crumble
Edge chipping during machining often appears not because of one major cause, but because of a couple of simple mistakes in the program and setup. The edge breaks at the moment the tool takes an impact, the part vibrates, or the cut is already being made with a worn-out insert.
Where people most often go wrong
The most common mistake is plunging the tool directly into a finished corner without a small buffer. At that moment, the load rises sharply, especially if the allowance is small and the entry angle is aggressive. Instead of a smooth touch, the edge gets hit, and a chip appears immediately.
Another bad habit is setting one feed rate for the whole tool path. On a straight section, that feed may still work fine, but near the edge, chamfer, or tool exit, it is too rough. The edge is not cut calmly; it is broken off in small pieces. For the finishing zone, feed usually should be reduced separately, at least at entry and over the last millimeters of the pass.
One more mistake appears after a heavy roughing cut. The operator goes straight into finishing passes, even though the part, chuck, or long tool overhang are still causing slight vibration. Everything looks fine on screen, but the finished surface already has a crumbly edge. If the machine, clamping, and part have not settled after roughing, the finishing pass almost always turns out worse than expected.
What is often underestimated
A worn insert damages the edge faster than it seems. It is still cutting metal, so it stays in service, but tool entry and exit are already happening with extra force. As a result, tiny chips appear on the edge, and they are hard to explain by feed alone.
Clamping play and part vibration are also often overlooked. This is especially noticeable on thin-wall blanks, long parts, and weak clamping. The tool comes to the edge, the part moves slightly, then returns, and the edge gets hit again. Even a good cutting setup will not save that situation.
In practice, a simple rule helps: do not run the finishing pass under the same conditions as roughing. Leave room for entry, give the tool a gentle exit, check the insert, and see whether the part is moving in the fixture. These small things often decide the fate of the most visible edge.
A simple example on a chamfered part
On a shaft with a chamfer, the chip usually appears not in the middle of the cut, but right at the end, at the shoulder. That was the case here: the diameter was correct, the surface was smooth, and the edge near tool exit crumbled after every finishing pass.
The reason turned out to be simple. The cutter started the finishing pass too close to an almost finished edge and left the material too abruptly. Over the last few millimeters, the load changed too quickly, and the thin chamfer edge could not hold it. These kinds of edge chips during machining often look random, although they are usually caused by the same thing: poor tool entry, feed that is too high before exit, and a finishing pass with no preparation.
The operator did not change everything at once. First, he moved the start of the finishing pass to an area where a small allowance still remained. The cutter entered the material earlier and had time to run steadily before reaching the chamfer and shoulder. The edge stopped taking the first hit.
Then he did not lower the feed along the entire path, but only over the last few millimeters before tool exit. It is a small adjustment, but it often helps more than changing the entire cutting mode. When the tool leaves the part more gently, the chamfer chips less, and the shoulder does not trigger a breakout at the most visible spot.
One more step gave a clear result. Before the final pass, the operator made a light semi-finishing cut and evened out the remaining allowance. After that, the last pass was no longer correcting the shape, but only bringing the size and surface to final condition. In that sequence, finishing passes run more calmly, and the edge does not crumble.
The dimensions stayed intact. Many people worry that an extra pass or lower feed will hurt accuracy. In practice, the opposite usually happens if a small and even allowance is left for the finish. Then the cutter removes a thin layer of metal without a jolt, and the edge stays clean.
On chamfered parts, it helps to look not only at the cutting conditions, but also at the order of operations. If the chip appears at the shoulder, check where the finishing pass starts, what happens before exit, and how much allowance is left before the final cut. Often that is enough to get a clean edge without reworking the whole program.
A quick check before starting
Edge chipping during machining often appears not because of one big mistake, but because of a few small issues before the first start. The tool enters too close to a finished edge, the blank vibrates slightly, and the feed at exit stays the same as in the middle of the pass. That is already enough to make the edge start to crumble.
Start with the insert. It should not just be new, but suitable for your material. The same insert behaves differently on mild steel, stainless steel, and hard alloy. If the cutting edge is already shiny or is pushing the metal instead of cutting cleanly, the part edge will suffer first.
Then look at how the blank sits in the chuck or fixture. If the part is held loosely, the tool does not cut evenly; it taps the edge with short impacts. You may not always see this by eye. Often the sound gives it away: instead of a smooth hiss, there is vibration or a ringing tone.
Before starting, it helps to run through a short checklist:
- Make sure the insert geometry suits the material and the finishing mode.
- Check the clamping: the blank should not shift under light force.
- Move the entry point into the allowance, not into the finished edge.
- Set a gentler exit than the main feed in the middle of the path.
- After a test cut, check not only the size, but also the edge condition.
The entry point often matters more than it seems. If the tool goes straight into a finished edge, it hits the weakest spot. It is much calmer to enter the allowance, a groove, or an area that will be removed by the next pass.
The same applies to exit. In the middle of the pass, the metal still supports the tool, but at the edge that support becomes weaker. That is why feed at exit is usually worth reducing a little. Even a small reduction often removes metal breakout over the last few millimeters.
On a trial part, do not stop at a caliper or micrometer. The size may be within tolerance while the edge already has microchipping. Look at the edge in side light. If you see a dull tear, a tiny notch, or a burr only at the exit point, the cause is almost always the path or the cutting mode at the end of the pass.
A simple example: during finishing on a chamfered shaft, the tool enters right at the shoulder, and the size comes out exact. But a tiny chip remains on the edge. If you shift the entry by 1–2 mm into the allowance and slightly reduce feed before exit, the edge is usually much cleaner on the very next part.
What to do next on the shop floor
If edge chipping during machining has already appeared, do not change everything at once. That only hides the real cause. It is much more useful to keep one mode as the baseline and then change one parameter at a time: feed, entry angle, allowance for the finishing pass, or the exit point.
Good settings should be recorded for each group of similar parts. Note the material, blank, tool, feed, spindle speed, depth of cut, allowance, and how the tool enters and exits the cut. In a month, that note will save more time than any operator’s memory.
Photos also help, if you take them the same way every time. Photograph the chip at entry and exit from the same distance, under the same light, and next to a ruler or gauge. Then compare not only the appearance, but also the size: chip width, mark length, and where it appears most often.
These images make the difference easy to spot. If the edge breaks at the start of the pass, the usual suspects are a hard plunge, too much feed, or the wrong entry angle. If the edge crumbles at the end, people usually look at tool exit, remaining allowance, and how the finishing pass ends.
When the problem keeps repeating, go in order:
- First check the tool: insert wear, radius, runout, and actual sharpness.
- Then look at clamping: does the part hold the edge without vibration, and does it move under load?
- After that, open the tool path: where the cut starts, how the finishing pass runs, and at what point the tool exits.
This order makes troubleshooting more disciplined. If you start by rewriting the program and changing the insert right away, it is easy to lose half a shift and still not understand anything.
On complex parts, the cause can be deeper. Then the machine itself matters: its rigidity, drive margin, and how precisely it repeats tool entry and exit. In such cases, it can be worth discussing machine selection, commissioning, and service with EAST CNC specialists. That is especially helpful when the part is made in series and even a small chip creates a noticeable scrap rate.