Dry Machining or Cutting Fluid: Which Is More Cost-Effective on the Shop Floor
Dry machining or cutting fluid: we analyse where each option wins on tool life, cleaning, part cleanliness and machine maintenance costs.
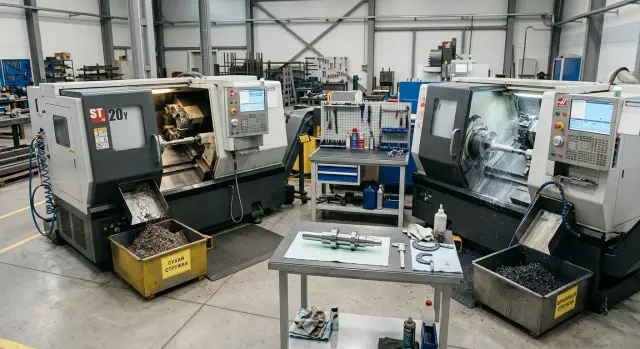
What the debate is on the shop floor
The argument usually starts from a simple thought: coolant costs money, so dry machining should be cheaper. In practice it’s more complicated. The price of fluid is only one line in the expenses. Alongside it sit tool wear, cleaning, part cleanliness, downtime and the condition of machine components after a few months of work.
The workpiece material quickly changes the picture. Aluminium, cast iron, stainless steel and heat-resistant alloys behave differently. Where one batch runs fine dry, another can overheat the edge, form build-up on the tool or spoil the surface. So the question “dry machining or cutting fluid” can’t be decided from a single part or one successful run.
A mistake on the shop floor costs more than it looks on day one. If the regime was chosen poorly, tools live shorter, the operator stops more often to clean, and parts go back for rework. Losses often hide in small details: chips cling in the cutting zone, sensors get dirty, the chuck and guides need more attention. Each small issue eats time.
Most often the shop loses money in four places:
- unplanned tool changes
- chip and work area cleaning
- scrap due to surface or dimensional problems
- machine and feed system maintenance
One single answer doesn’t fit all machines. A new machining centre with good chip evacuation and stable speeds handles dry mode differently than an older machine with worn guards. Even two similar CNC lathes can give different results if one delivers coolant to the cutting zone better, and the other’s spindle heats more.
So the debate isn’t about what’s cheaper in general. It’s about a specific combination: material, tool, cutting regime, machine type and part requirements. For companies that run different series and materials, as is common in CNC machining, there is almost no universal answer. The winning option is the one that gives predictable results on your shift, not someone else’s example.
Where dry machining gives an advantage
On some operations dry machining wins not on the control screen but in everyday work around the machine. If cutting is stable and the material doesn’t require constant cooling, the shop removes a major source of dirt and routine: the tank, emulsion, filters and everything tied to them.
Dry chips are usually easier to clean. They don’t turn into a sticky mass, don’t mix with oil and don’t smear across the tray and floor. The operator clears the work area faster, and the chip container is easier to transport without drips and odour. This is especially noticeable where chips break short and a conveyor takes them away without delays.
The part itself is often easier to handle. When there’s no film of coolant on the surface, the workpiece is simpler to pass to inspection, marking or the next operation. In many cases a blow-off and quick wipe are enough and a separate wash is unnecessary. For a small shop this is a real time saving: the part doesn’t wait to be washed and dried.
There’s another benefit — less machine maintenance. Staff spend less time topping up, checking concentration, cleaning the tank, replacing filters and removing sludge. If one operator watches several machines in a shift, that small task quickly turns into noticeable hours per month.
Dry mode often works well where batches are short, passes are not long, chips break short and parts need to move quickly after the operation. But this mode has an unpleasant side: chips run hotter. If an operator frequently opens the door, picks chips with a hook or grabs the part right after the cycle, the burn risk rises. Hot chips can scratch the surface, lodge in tight places or scatter if they fall badly.
So dry machining doesn’t win everywhere — it wins where the shop already controls chip evacuation and doesn’t force constant human intervention. A simple example is a turning operation with short chips. The part can be quickly blown off, checked and sent on. If the operator doesn’t handle a tank or wash the tray from emulsion, the benefit becomes visible within a week.
When cutting fluid works better
Coolant often wins where cutting generates a lot of heat in the tool and the part. If the cutting zone heats up quickly, the edge loses life and the size starts to “float.” A flow of fluid removes some heat and reduces that effect.
This is particularly clear in heavy cutting. With large metal removal, deep cuts and high load, a dry regime quickly drives the insert to overheating. Coolant doesn’t work miracles, but it often gives a steadier tool life.
On long passes the difference is also noticeable. When the tool runs for a long stretch without pause, heat accumulates not just in the edge but in the workpiece itself. That increases the risk of dimensional drift, burns and uneven surface. Coolant helps keep temperature steadier and steers chips away from the cutting zone.
Coolant is usually more useful in cases such as:
- rough turning with large allowances
- long passes along shafts and bushings
- boring where chips don’t evacuate well on their own
- machining sticky materials that cling to the edge
With sticky materials the gap becomes even more obvious. Stainless steel, ductile steels and some aluminium alloys like to build up on the cutting edge. Without coolant or lubrication that build-up forms faster, then breaks off and damages both the edge and the surface. Coolant reduces friction and helps keep the cut cleaner for longer.
For surface quality, coolant often gives a more even result on semi-finish and finish passes. The reason is simple: less overheating, less build-up, fewer random marks from recutting chips. If the shop makes parts with tight fits, a smoother surface can be more important than saving on fluid.
A good example is a long stainless shaft. In a dry pass the insert may start to “smear” the surface halfway along the part. With coolant the cut runs calmer, the surface mark is more uniform, and the operator stops less often to change the insert and clean off built-up chips.
If you compare dry machining and coolant on heavy, long and sticky work, fluid usually wins — not on every point, but often on process stability.
How tool life changes
Tool life rarely changes smoothly. The same insert may make 30 parts in one batch and only 18 in the next if allowance, workpiece rigidity or chip evacuation change.
The problem is that choices are often made on one good part. That’s almost always a mistake. For an honest comparison you need the same insert, same material, same cutting regime and the same pass length. If you changed feed or depth even slightly, the test is no longer clean.
Don’t look at the record; look at repeatability. The shop benefits more from a regime where an insert reliably holds, say, 25 parts without chipping than from a regime where one edge lasted 40 and the following two failed on the 15th part. Production values predictability. It makes tool changes simpler and reduces scrap risk.
Treat roughing and finishing passes separately. On roughing the edge suffers more from heat, impact and heavy chips. On finishing the surface condition, build-up and small edge chipping matter more. Sometimes roughing dry quickly “eats” the edge, while on a short finishing pass the difference nearly disappears. Mixing these results into one number leads to a wrong conclusion.
Keep a short log for each test: which insert and holder were used, the cutting regime, whether it was roughing or finishing, after how many parts noticeable wear appeared and exactly where on the edge you measured it.
One last point is often underestimated. Today the operator inspects wear at the tip, tomorrow near the flank, and the figures are no longer comparable. Choose one control point and one replacement limit. For example, change the insert when wear at this point reaches the accepted value or when the part leaves tolerance.
A small example: if in dry cutting an insert on steel makes between 12 and 28 parts, while with coolant it consistently gives 20–22, the second option is usually calmer for the shop. The average is about the same, but planning with it is easier.
What happens with cleaning and part cleanliness
The difference on the floor and on the part is visible almost immediately. With coolant small chips evacuate better from the cutting zone. That helps where grooves are narrow and the tool works close to a surface where any debris can leave a mark.
But there’s a downside. Parts coming off the machine aren’t dirty — they’re wet and oily. Before measurement, packing or the next operation they often need washing and drying. If you skip that, emulsion will remain in holes, slots and threads.
Dry machining changes that picture. Chips don’t mix with emulsion, don’t become sticky and don’t smear across trays, conveyors and guards. Collecting dry chips is usually easier: they’re simpler to gather, sort and hand in without dealing with settling and contaminated fluid.
Dry mode can also benefit the part surface. There’s no coolant film after the machine, and the operator sees the real surface immediately. That’s convenient for simple turning operations where you need to check a dimension and pass the part on without washing.
But dry machining doesn’t automatically make the shop cleaner. Hot chips and fine particles fly more actively, especially at high speeds. So you need proper screens, an enclosed work area and clear cleaning rules. Otherwise chips will end up not in the tray but on guides, doors and next to the machine.
This is clear in a simple example. If a shop turns small steel bushings with coolant, parts come off cooler and fine chips scratch the surface less. But that batch then goes to washing and drying before inspection. With dry machining the wash may be unnecessary, but the operator cleans the work area of hot particles more often.
In practice the choice usually comes down to four questions: do you need a dry part immediately off the machine; is there a risk that fine chips will scratch the surface; is the shop ready to wash and dry every batch; and is the machine protected enough against flying hot chips?
If the part is complex, with small pockets, thin grooves or blind holes, coolant often gives a calmer process. If the operation is simple and you want to avoid washing, dry mode often wins in everyday shop work.
How to calculate real costs
You must calculate not the price per litre of coolant or the price of an insert alone, but the cost of one good part or one machine-hour. Otherwise the comparison quickly becomes guesswork. The easiest way is to take one typical part and compare the two regimes on identical batches.
First collect direct costs. Then add what is usually forgotten: people’s time, downtime and quality losses. That’s where the difference that decides the choice often hides.
Include tooling, coolant and consumables, labour for topping up and maintenance, time for chip cleaning and washing the work area, downtime from clogged filters or pump stops, as well as scrap and re-measurements. If an operator spends 20 minutes per shift topping up and checking concentration, that’s as much a cost as a new insert. If a machine stops for 15 minutes because a filter clogs, that downtime must be in the table.
The working scheme is simple: total costs for a period divided by the number of good parts. For comparison keep two columns. One column for coolant operation and one for dry mode. Don’t mix batches of different materials or geometries — the numbers will be misleading.
A small example. The shop makes 200 parts per shift. With coolant tool life is higher, but every day you pay for concentrate, filters, topping up and part washing. With dry machining those items disappear, but inserts live shorter and chips and dust demand more frequent cleaning. If you add one random downtime from a dirty tank and 2% scrap from a contaminated surface before inspection, the picture can flip completely.
Practically it helps to track three numbers: cost per part, minutes of downtime per shift and percentage of good parts. If one option is slightly cheaper by tooling but causes more scrap and stops, it rarely wins on the shop floor. A good calculation usually fits into one table and shows where the shop loses money every day.
How to test the option on your shop floor
The question “dry machining or cutting fluid” is best decided not by advertising or others’ experience but by a short test on your machine. The same regime on different shops gives different outcomes: somewhere dry removes unnecessary dirt, somewhere it quickly kills the tool.
For a test pick one part you produce regularly and one material from a stable batch. Don’t take a new geometry, rare alloy or rush order. If input conditions fluctuate, the numbers will say nothing.
Next remove extra variables. Use one machine, one tool, one holder and one program. One operator is also desirable. If during the test you change feed, compensation or brand of insert, the comparison breaks.
A short series is usually enough to see the difference. That can be 15–30 parts or one hour of work in each mode. Run two passes in similar conditions: first with coolant, then dry, or vice versa, but in the same shift and on the same batch of blanks.
Record not only what you see on the first part. Log dimension at the start and at the end of the series, surface roughness, cutting-edge wear, time to clean chips and the area, as well as machine stoppages and operator actions.
The first blank often deceives. It may be within tolerance and clean in both modes. The real difference appears nearer the end of the series when temperature rises, chip form changes and the tool begins to tire.
Count the result for the shift. Suppose with dry machining you saved 20 minutes on maintenance and don’t spend on coolant, but lost two inserts earlier. Or the opposite: with coolant the tool lives longer but the operator spends more time washing parts and cleaning the machine. The decision usually lies in that balance.
If you have a CNC lathe and a standard production part, this test can be done without long preparation. After two fair runs it becomes clear what the shop gives in real work, not on paper.
Where people often go wrong when switching
The most common mistake is simple: the shop changes everything at once. They switch to dry machining, install a different insert, raise speed and also adjust feed. If the result worsens, no one knows what actually broke the process.
It’s much wiser to change one parameter at a time. Keep the same tool and regimes initially, then watch temperature, chips, dimensions and edge condition. Otherwise the discussion quickly turns into talk without facts.
Hasty conclusions also hurt. From the first two parts it’s easy to decide everything works fine, while on the tenth part dimensions drift, chips start to build up and the edge fails much earlier. A transition should be validated on a small series where you see not only the start but the process behaviour over time.
A good minimum for a trial is:
- don’t change insert, regimes and feed on the same day
- look at a series, not just the first part
- record tool wear at identical intervals
- separately track time for cleaning and washing
Another mistake is forgetting that the part still needs finishing after the cut. With dry machining small chips and dust often remain on the part. With coolant you get a film that later must be washed off. If the shop doesn’t account for washing, the comparison is skewed: cutting was counted but the cleaning time and cost were omitted.
Ventilation is another common oversight. With coolant the operator deals with mist and splashes, especially at high speeds. With dry machining the risk of hot chips and fine dust increases. If guards, extraction and operator protection are weak, the savings lose their meaning quickly.
A simple routine often helps. Take one part, one material and one CNC machine. Run a short series in the old mode and then in the new. Compare numbers, not impressions: how many parts each insert lasts, minutes spent cleaning, scrap rate and how the part looks coming off the machine. Then the decision will be sober, not “by feel.”
Example for a small shop
A small turning shop runs a regular order for short steel bushings. The part is simple but the batch is regular, so even 20 minutes extra work per shift quickly becomes noticeable money.
Initially the shop ran the whole cycle with coolant. That was convenient on the rough pass: chips evacuate calmer, the edge heats less and removing allowance is less risky. But on the finish pass another problem appeared. Bushings came off wet, and people spent time washing and drying them before the next stage.
After several trials they split the scheme. They kept coolant for roughing because that’s where most heat and heaviest cut occur. The finish pass was moved to dry: allowance is small, the pass is short, and parts came off noticeably cleaner.
During a week the shop tracked not only tooling. They counted five simple things: number of good parts, frequency of insert changes, time for washing and drying, time for cleaning the work area and coolant maintenance costs.
The picture became clear. For roughing coolant really helped: the insert lasted longer and chips didn’t interfere. For finishing tool life was almost unchanged, but some parts no longer needed washing.
On a 400-bushing shift even a small time saving becomes noticeable. Suppose the new scheme saves only 10–15 seconds per part because of cleaner output. Over a shift that gives 66 to 100 minutes. For a small shop that’s not trivial — it’s almost another useful operation per day.
This example shows how decisions are usually made in practice. A single extreme rarely wins on a small shop. A mixed approach often works better: coolant where you must remove heat and control chips, and dry finishing where it removes unnecessary washing and doesn’t harm dimensions.
Short checklist and next steps
A quick choice rarely works. To decide whether dry machining or coolant suits you better, look not at general advice but at your part, material and shift regime.
Start by answering a few questions. Which material do you run most often? Cast iron is often easier dry, while stainless, ductile steels and heavy-heating operations more often work better with coolant. Do you need a dry part right off the machine? If it goes immediately to inspection, assembly or packing, residual emulsion and washing significantly affect time and costs. What costs more in your shop: an insert, washing or downtime? One shop loses money on tooling, another on maintenance and cleaning, a third on lost hours from stops. And finally, who will support the change if the test succeeds? A new regime often requires not only different speed or feed but a different approach to tooling, chip evacuation and maintenance.
A good test doesn’t have to be big. Record four numbers in advance: tool life, cycle time, cleaning time and number of stops per shift. After that the decision usually becomes much clearer.
If you run a small shop, don’t try to change everything at once. One successful test is more useful than a week of arguing beside the machine.
If at this stage you need an outside view, EAST CNC can help with machine selection, machining strategy, start-up and service. For shops where the choice hinges on real equipment capability, that kind of analysis is often more useful than any general internet advice.
FAQ
What is cheaper in the end: dry machining or cutting fluid?
Usually the winner isn’t the mode with the cheapest consumable, but the one with the lower overall cost per part. Look at tooling, cleaning, washing, downtime and scrap together — otherwise the conclusion will be misleading.
When is dry machining really advantageous?
Dry mode often pays off on short passes, simple parts and short-breaking chips. It’s especially convenient where the part must go straight from the machine to inspection or the next process without washing.
In which cases should you not give up cutting fluid?
Keep coolant for heavy cutting, long passes, boring and sticky materials. Fluid helps control temperature, reduces build-up on the cutting edge and helps maintain dimensions.
Which materials are more suitable for dry machining?
Grey cast iron often machines well dry if chip evacuation is good. Stainless steel, ductile steels and some aluminium alloys more often need coolant because they build up on the edge and heat the tool faster.
How do you tell that dry mode is wearing out the tool too quickly?
Don’t judge by a single good part — watch a series. If the edge overheats, the surface smears, dimensions drift by the end of the batch or tool life swings wildly (e.g. 12 parts one run, 28 the next), the dry mode does not give reliable repeatability.
Which is better for part cleanliness and shop cleaning?
If you need a dry part right off the machine, dry machining is often more convenient. If fine chips can scratch the surface or the part has pockets and blind holes, coolant usually gives a calmer result but requires washing and drying afterward.
How to correctly calculate the real costs?
Take one typical part and calculate the cost of a good part, not the price per litre of coolant or one insert. Include tooling, fluid, filters, topping up, cleaning, washing, downtime and scrap — then the difference becomes clear.
How to quickly test both options on my shop floor?
Run a short test on one machine, one batch of material, with one tool and one program. Compare 15–30 parts in each mode and record start and end dimensions, edge wear, cleaning time and number of stops.
What mistakes are most often made when switching to dry or coolant?
The most common mistake is changing everything at once: insert, speed, feed and the mode. Then no one knows what caused the worse result. Change one parameter at a time and judge by a series, not by the first part.
Can dry machining and cutting fluid be combined in one process?
Yes — and in practice that’s often the most sensible approach. Keep coolant for the roughing pass to remove heat and control chips, and use dry finishing where it doesn’t harm dimensions and saves washing time.