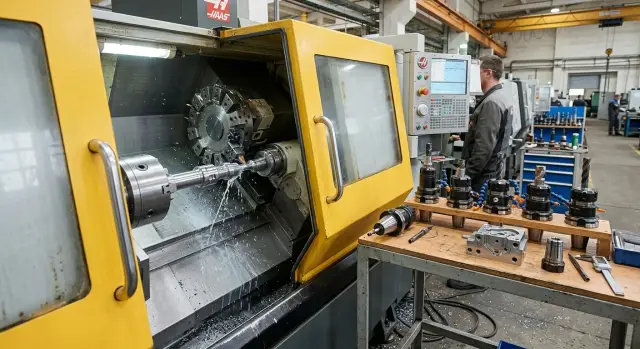
Driven tool for a turning center: how to choose
Choose driven tooling for a turning center by matching torque, RPM and actual operations. Learn how to avoid overpaying and pick the right holder for real work.
Why a generously rated holder is often unnecessary
Buyers often play it safe and choose a holder "with a margin" so they won’t hit its limits next month. On paper that seems sensible. In practice, the extra capacity frequently sits idle and eats the budget.
People usually focus on one number — maximum RPM. It’s easy to compare in a catalog, so it looks like the main spec. But if your shop mainly drills, taps threads, makes cross holes or does light milling on small parts, a high RPM limit alone brings little benefit. For a driven tool the important thing is the combination of parameters: what operations are performed daily, how much torque is needed and how long the unit runs under load.
There’s another logic: "let’s get a stronger one, it might be useful." Small shops with varying batches and little time for reselection often think this way. But you usually pay twice for that universality — first at purchase, then in operation when a bulkier holder interferes with the working zone or makes it harder to place the tool where needed.
Errors are rarely single-factor. People look only at the top RPM, ignore the working range, don’t compare the choice with actual parts and materials, repeat an old purchase "like everyone else," and forget to check turret size, the mounting and clearance near the chuck.
Numbers show this quickly: the shop buys an expensive holder but uses only 30–40% of its capacity, while a simpler option would have done the job for much less. If the machine performs repetitive operations on one family of parts, the extra margin rarely pays off.
Experience shows a simple truth: selection accuracy improves when the supplier is given not only the machine model but real parts or at least drawings. Then the decision is made for the work, not just in case.
Which operations actually matter
Selection starts with the part, not the catalog. If the shop every day drills the face, mills a slot and occasionally taps, the range of suitable options narrows quickly. Buying an expensive unit for a rare job that appears once every few months rarely makes sense.
First divide operations into two groups: daily and rare. Include in the daily group only what the machine does constantly and what fills a shift. Mark rare tasks separately so they don’t inflate the budget.
Usually it’s enough to look at four things:
- drilling along the part axis
- drilling or machining from the side
- milling slots, flats and small surfaces
- cutting threads with taps or thread mills
This list quickly shows which tooling is needed regularly and which will sit in a drawer. A common mistake is including both everyday drilling and a rare complex operation in one set — the latter can be done on another machine or in a different setup.
Next, understand exactly where the operation takes place. Axial tooling is for work on the part center: drilling, countersinking, reaming. Radial tooling is for side holes, slots, pockets and other outer-surface machining. If the shop makes shafts with cross holes, a radial holder is regularly needed. If it mostly works on bushings and face-machined parts, an axial unit may cover almost everything.
It helps to take the last 20–30 jobs and mark which operations actually repeated. The picture usually sobers you up fast. A small shop might believe it needs tooling for all kinds of milling, while in reality 80% of parts require only axial drilling and occasional threading.
That way the holder choice is based on real workload, not an imagined maximum. Almost always it’s both cheaper and more convenient in practice.
How to read torque and RPM
In a driven unit spec sheet people most often look at two numbers: torque and maximum RPM. By themselves they say little. You need to read them together with tool diameter, workpiece material and the operation.
High torque isn’t always necessary. If you drill small holes or use a small cutter, higher RPM is often more important. But if you remove metal with a larger-diameter cutter, machine a slot or cut threads in tough material, load rises sharply and a weak unit will start to "struggle."
Tool diameter changes the picture more than many expect. A 6 mm cutter and a 16 mm cutter at the same depth of cut load the holder very differently. The larger the diameter, the higher the cutting resistance and the more torque is required.
Material affects the load no less than mode. You can run faster and easier in aluminum. In stainless, heat-resistant alloys or tough steels the holder sees a very different load even at the same RPM and tool diameter.
Keep a few simple rules in mind:
- for small drilling and small cutters, high RPM is usually more important
- for large-diameter cutters, reserve for torque is more critical
- for hand taps, smooth operation without jerks matters more than record RPM
- for tough steels you need more margin than for aluminum
In practice this looks like: if the shop regularly drills 3–5 mm holes in aluminum or steel blanks, there’s no point overpaying for the most "powerful" unit. But if the turning center mills slots with 12–16 mm cutters or cuts threads in tough steels, a weak holder heats up, becomes noisy and loses accuracy faster.
At first this may not be obvious. Temperature rises, then runout appears, the tool begins to cut rougher and dimensions "wander." A model with attractive RPM numbers can end up worse for your work than a calmer unit with better torque and normal rigidity.
If in doubt, don’t jump to the catalog maximum. First assess your usual operation: what tool diameter you use most often, what material you cut and how much metal you remove per pass. This approach gives a more honest choice than buying a margin "just in case."
What to check on the machine and turret
Before ordering open the machine and turret manual. Don’t rely on memory. Even similar models differ in mounting, allowable dimensions and coolant supply. Because of that a tool might simply not fit or will work with limitations.
First verify the mounting type and output interface. One machine may require one mounting standard, another a different one — and an error here is costly. Also check what tool interface is needed: collet chuck, Weldon, cylindrical shank or another type. If the mounting matches but the tool interface doesn’t, the holder won’t solve the task.
Then decide on orientation. Axial holders are usually chosen for drilling and tapping along the part axis. Radial holders are needed for side drilling, milling flats, slots or off-axis holes.
A repeated mistake: ordering a radial holder "just in case" and using it only a few times a month. If most work is on the face and center, an axial variant is often simpler and cheaper.
After that check the clearance near the chuck and jaws. In the catalog a holder may look compact, but in the real work area the body, collet nut or the tool itself sometimes hits the jaws. This often appears on short parts and when working close to the chuck.
Before purchase check five things:
- turret type and mounting size
- output interface for the tool
- axial or radial format
- reach and clearance near the chuck
- coolant supply method
Also clarify coolant supply in advance. For deep drilling and some serial operations through-the-tool coolant simplifies the job. If the machine only has external coolant, a holder with internal channels won’t deliver the expected effect.
A simple example: a shop buys a radial holder for a side hole but doesn’t check jaw clearance. In idle rotation everything looks fine, but during turret indexing the body passes too close to the chuck. This error is easier to catch with the manual and drawings than after delivery.
Spending 15 minutes with the machine manual is usually cheaper than reworking an order later.
How to choose a holder step by step
Buying a holder "with margin for every case" is usually uneconomical. For most shops that’s wasted spending, and some tooling then lies unused. It’s much wiser to assemble a set for real parts and real shifts.
If you need a driven tool for a turning center, start with your orders from the last months. Look at which operations repeat most often and what currently brings money to the shop.
Selection procedure
-
Take 5–7 most common operations. That may be face drilling, cross drilling, slot milling, removing a flat, tapping. Put rare jobs that happen once every six months aside for now.
-
For each operation write down tool diameter and workpiece material. The same holder behaves differently on aluminum and stainless. If you work with both steel and tougher materials, size for the heavier case.
-
Note working RPM and required torque. For a small cutter RPM is often more important; for a large drill or tap you need pull at low speeds. If a holder offers high speed but falls short on torque, it won’t cover some tasks.
-
Combine similar items. Often the list contains nearly identical holders that differ in minor details. If one option covers two close scenarios without overload, the second is usually unnecessary.
-
Keep the set that covers the current job flow. Not future plans or rare experiments, but what brings work every month. This approach is easier to explain to the foreman and the shop owner.
A small example. A shop constantly turns steel bushings and flanges that need cross holes, threads M6–M10 and simple slotting. In that case it’s more sensible to buy a few holders for those operations than one expensive universal unit with large margins that will never be fully used.
If after this filtering too many positions remain, the choice is still too broad. Narrow it down to a set that covers current orders without downtime and without overpaying.
Example for a small shop
A small shop rarely runs long series of identical parts. Today a shaft, tomorrow a flange, then another shaft with different length and a couple of holes. In such work tooling must cover frequent tasks, not rare cases that appear once every few months.
Imagine a cell where parts come in batches of 20–80 pieces. Main operations are simple: face drilling, cross drilling, slotting and threads M8–M12. For that workload two turret positions are usually enough: one axial holder and one radial. The axial covers drilling and taps on the axis; the radial is for side holes and simple slots.
Looking at the numbers without optimism, a holder with very high RPM rarely brings noticeable benefit here. For small and medium drills, M8–M12 taps and typical slot cutters the shop usually hits limits in rigidity, setup accuracy and proper cutting mode rather than RPM. Paying extra for a model with maximum RPM looks good in the catalog but is barely felt in daily work.
A sensible set for such a shop typically looks like:
- axial holder for drilling and tapping
- radial holder for side holes and slots
- a set of collets or adapter sleeves for common tools
- torque margin without large excess
This choice covers most orders without unnecessary expense. If the shop doesn’t mill large slots daily and doesn’t run tiny cutters at extreme speeds, an expensive model with "maximum everything" simply freezes money.
It’s far more useful to keep some budget for cutting tools, good taps and timely maintenance. A quality drill, a decent tap and a regularly checked holder give more benefit than extra numbers on a datasheet. The same applies to machine and turret service: if the mounting runs with play or the drive has backlash, an expensive holder won’t fix that.
Rule for a small shop: buy what runs every day on shafts and flanges, not what might be useful someday.
Where mistakes happen most often
Money is most often wasted not on the holder price itself but on choosing the wrong tool for routine tasks. Many buy the most powerful driven unit thinking "let’s have a margin." In practice such a holder is heavier, costlier and doesn’t help if the shop mostly drills small holes, deburrs and does light milling.
The second common mistake is about accuracy. If the operator looks only at torque and RPM, they may miss runout, clamp quality and assembly rigidity. The result is shorter tool life, holes drifting out of tolerance and poorer surface finish. On small diameters this is especially noticeable.
Problems also start where nobody accounts for setup time. Suppose the shop runs short batches of different parts. If each operation requires its own rare holder, changeovers eat a shift faster than cutting. On paper this choice looks fine, but in real work the machine simply stands idle more often.
Sometimes the error hides in the standard. A buyer picks a rare format because it matched a catalog, then struggles to find collets, adapters or spare parts. After a year the holder can still be used, but servicing it becomes inconvenient and expensive. For regular production a common standard that’s easy to buy and replace usually wins.
Another miss is not asking about service and consumables in advance — bearings, seals, collets, nuts and lead times. If the supplier supports the project from selection to maintenance, it’s better to settle those questions before ordering, not after startup.
To avoid most mistakes answer five questions in advance:
- which operations occupy most of the shift
- do you need power for heavy cutting or will a compact unit do
- what runout is acceptable for your diameters
- how much time is spent changing tooling between batches
- are consumables and service available for the chosen standard
If these questions aren’t clearly answered, the holder will almost certainly be chosen where margin isn’t really needed, and then you’ll pay extra not only on the invoice but on every changeover.
Final check before ordering
Even a good driven tool can be selected wrongly if you order it only by catalog numbers. Before ordering compile a simple work map: which operations you do, material, tool diameter, and how long the tool runs without pause.
Steel, stainless and aluminum load the unit differently. Drilling a cross hole in aluminum has one set of requirements; milling a slot in steel needs different torque and rigidity. One holder rarely fits both well.
Then verify compatibility with the machine. Check not only the mounting type but the turret drive, rotation direction, coolant supply, allowable reach and neighboring station limits. A holder may physically fit but still be unable to work correctly.
On one page it’s useful to collect five items:
- list of operations per part
- workpiece material and tool sizes
- mounting type and turret drive
- allowable RPM and required torque
- clearance near the chuck and neighboring stations
Tool diameter cannot be chosen separately from torque and RPM. Large diameter isn’t always convenient. At high speeds a small cutter runs smoother, while a big tool can hit unit limits on torque, mass or balance. If numbers are close to the maximum, margin is needed — but a reasonable one, not double for no reason.
Also check geometry. On paper everything looks easy, but in the machine the holder can hit the chuck, jaws or an adjacent block. This happens often with angled heads and long tools. Better to check reach and run a quick clearance test using drawings or a 3D model.
The last practical question: who will commission and maintain the unit. If the shop has no person who can set the tool, check runout and keep lubrication, a complex setup will quickly cause problems. So assign responsibility for startup and service when ordering.
What to do next
Start with your parts, not the catalog. Take orders from the last 3–6 months and write down what you actually do on the turning center: drilling, slot milling, threading, side holes. Next to each note where the shop loses time: lacking RPM, tool overheating, holder blocking access, or setups adding 15–20 minutes.
That list quickly restores a realistic picture. Often you’ll see that you need two or three positions for repeated operations rather than one big universal set. Then it’s easier to compare catalog models and judge where torque is needed, where RPM matters, and where a compact body and easy access win.
If you select tooling with a supplier, immediately provide machine model, turret type, part drawings, material and tool sizes. That’s enough to filter out extra options before the quote. For companies like EAST CNC this information is especially useful: it helps match the holder to real operations and link delivery with commissioning and service.
A good choice usually looks boring. It won’t top the catalog charts, but it will run every day without unnecessary cost or surprises at the chuck.
FAQ
Do I need a holder with a large RPM margin?
Not always. If you mainly drill, tap threads and do light milling on small parts, a high RPM rating often won’t help you much. Start by looking at your usual operations, tool diameters and the workpiece material. In many shops a simpler holder covers the same tasks without pulling extra money out of the budget.
Which is more important: torque or RPM?
Look at the pair of values, not a single number. For small drills and cutters RPM is usually more important, while for large cutters, slots and threading in tough steels torque matters more. A simple rule: the larger the tool diameter and the tougher the material, the more you need torque at working speeds.
When should I choose an axial holder and when a radial one?
An axial holder is used for centerline operations: drilling, countersinking, reaming and tapping. A radial holder is for side drilling, slots and machining along the outer surface. Decide based on what the shop does every day. If most work is on the face of the part, a radial holder may be unnecessary.
What data should I give the supplier for an accurate selection?
Provide the machine model, turret type, a drawing of the part or at least photos with dimensions, material and tool diameters. That’s usually enough to eliminate unsuitable options. It’s also helpful to say which operations repeat most often and how long the tool runs under load. That lets the supplier size the tooling for real work, not just the catalog specs.
What should I check on the machine before ordering?
Open the machine manual and check mounting, turret type, the tool interface, reach, clearance near the chuck and coolant supply. Don’t rely on memory. A common issue: a holder fits the mounting, but interferes with the jaws or doesn’t allow the tool to reach the intended position.
How do I tell that an expensive holder won’t pay off?
A simple sign is when the holder is used far below its capacity and usual operations don’t become faster or more accurate. That happens when a shop buys a powerful unit for rare orders that seldom repeat. Check the last 20–30 jobs: if 80% of parts would be covered by a simpler option, the extra cost is unlikely to pay back.
Will one universal holder cover all operations?
Usually not. A single universal holder almost always forces you to pay for capabilities you use a few times a year. It’s far more practical to assemble a small set of holders for frequent operations. That makes setups faster and tooling easier to maintain.
Why are runout and rigidity more important than catalog numbers?
Because runout and rigidity have a stronger effect on size, surface finish and tool life than catalog figures. High RPM numbers won’t save you if the unit clamps the tool with play or the assembly lacks stiffness. On small diameters this shows immediately: holes drift, the tool gets noisy and results vary part to part.
What set of holders usually suffices for a small shop?
For many small cells, one axial and one radial holder plus a set of collets or adapter sleeves is enough. That covers drilling, threading, cross holes and simple slots. Then adjust according to your orders. If heavy milling is rare, don’t build the whole kit around it.
What if operations change from batch to batch?
Don’t try to cover every future case at once. Take orders from recent months and separate daily from rare operations. Choose tooling for daily tasks now and leave rare jobs for later. This preserves budget and keeps the turret from filling with items that barely get used.
Where do shops most often go wrong?
Many mistakes come from choosing the most powerful driven tool thinking “let’s have a margin.” In practice that holder is heavier, pricier and often doesn’t help when the shop mostly drills small holes, deburrs and does light milling. Another common error is ignoring accuracy: focusing only on torque and RPM may miss runout, clamping quality and stiffness. That shortens tool life and worsens size and finish.
What should I do next?
Start with your parts, not the catalog. List orders for the last 3–6 months and note what you actually do on the turning center: drilling, slot milling, threading, side-hole work. Mark where the shop loses time: lacking RPM, the tool heats, the holder gets in the way, or setups take an extra 15–20 minutes. This list usually shows that you need two or three positions for repeat operations rather than one expensive universal unit. Then compare catalog models for torque, RPM and compactness where it matters. If you work with a supplier, give machine model, turret type, part drawings, material and tool sizes. That’s enough to eliminate unsuitable options and tie the delivery to commissioning and service. A good choice usually looks boring in the catalog: it won’t break records, but it will work every day without unnecessary cost or surprises at the chuck.