Drilling Stainless Steel with Small Diameters Without Breakage
Drilling small holes in stainless steel often fails not because of the drill brand, but because of feed, runout, and poor chip evacuation.
Where the Small Drill Really Breaks
A small drill for stainless steel usually does not "die from wear." It breaks in the first seconds of cutting: at entry, after a couple of holes, or somewhere in the middle of a batch. The operator installs a new drill, starts the cycle, gets one good pass, and decides the setting is right. On a long run, things change quickly.
That is the trap. One good pass proves nothing. What matters is not a nice-looking first part, but repeatability: 10, 50, or 100 holes in a row without chipping, squealing, or a sudden break.
People usually blame the drill brand first. That is understandable: replacing the tool is easier than finding a mistake in the cycle. But even an expensive drill will not fix chuck misalignment, too much feed, or chips that clog the hole after just a few diameters.
Most breakages come from three things:
- the feed loads the cutting edges more than the table suggests;
- runout makes one edge do the work of two;
- chips do not evacuate and jam the tool in the hole.
At a small diameter, every little issue quickly becomes a big problem. If a 1.2 mm drill has noticeable runout, one side cuts almost all the metal while the other only rubs. The metal heats up, the drill walks off line, then it catches the chips and breaks in a jerk. From the outside it looks random, even though the cause was already there in the first millimeters.
Stainless steel adds its own risk: it does not forgive friction. If the drill does not cut right away and starts sliding on the metal, the cutting zone hardens, the temperature rises, and every next revolution gets harder. That is why two cycles that look identical can give very different results: one goes smoothly, the other snaps the tool on the eighth hole.
Usually, tool life is decided not by the catalog or the coating, but by process setup. It is better to analyze breakages in a clear order: first feed, then runout, then chip evacuation.
What Stainless Steel Does to a Thin Drill
Stainless steel behaves differently from ordinary steel. It is tough, it stretches, and it likes to weld itself onto the cutting edge. For a thin drill, that is a bad combination: cutting gets worse, friction rises, and the load jumps already in the first millimeters.
The problem rarely starts with the drill brand. Much more often, the material quickly builds up a burr on the edge, and the tool starts rubbing instead of cutting. Then everything follows the same chain: temperature rises, the edge chips, or the drill breaks outright.
In a narrow hole, heat escapes poorly. Chips are cramped, coolant has a harder time reaching the tip, and the hole walls start pressing on the tool almost immediately. At 1.5–2 mm diameter, a few extra seconds of friction are already noticeable: the drill dulls, cuts harder, and starts drifting sideways.
A thin drill does not like side load. It stays on axis only while it moves perfectly straight. Give it a little deflection, runout, or packed chips, and it starts acting like a spring. First there is a slight bend, then one edge takes more metal, and after that the safety margin disappears very quickly.
At a small diameter, an error that is barely visible on a 6 mm drill is critical on a 1 mm drill. The same goes for the cutting mode: feed that is too low causes rubbing and work hardening, while feed that is too aggressive overloads the tip. A large drill has some reserve. A small one barely has any.
That is why stainless steel rarely punishes just one major mistake. Usually, the tool is ruined by a sum of small issues: runout increased a little, chips became longer, feed became unstable. In shops that run many small holes in series on CNC machines, this is especially noticeable. If the spindle holds axis, the chuck does not add extra runout, and the cycle clears chips on time, even difficult stainless steel behaves much more calmly.
How Feed Changes the Load
A small drill does not break only because of the steel or the coating. Very often, the feed itself tears it apart. In stainless steel, this is especially easy to see: the material is tough, it heats the edge quickly, and it hardens if the drill rubs instead of cutting.
Too little feed may seem safe, but in practice it is often worse. The edge does not bite into the metal properly and just slides over it. Temperature rises, the material hardens, and after a few millimeters the drill already has a harder time entering. After that, the operator often adds speed or pushes harder, and the thin drill simply cannot take it.
Too much feed hits the tool in a different way. The load rises sharply, the chip gets thicker, and the force on the drill core jumps. At a small diameter there is not much stiffness, so overload quickly pulls the drill off line and then chips the edge or breaks the tool completely.
The mistake is usually visible at entry. If you apply full feed right away, the web hits the surface and the edge gets a sudden shock. In stainless steel, that kind of start can leave a microchip in the first seconds. After that, tool life drops even if the rest of the mode looks normal.
It is better to change feed in small steps rather than in big jumps. Usually, a 5–10% adjustment at a time is enough. That makes it easier to find the point where the drill is actually cutting instead of rubbing or choking.
Do not look only at the number in the program, but also at the process itself:
- chips come out evenly, without dust or long torn ribbons;
- the sound stays stable, without squealing or impacts;
- there is no hard jerk at entry;
- after several holes, the edge does not dull or crumble.
A typical shop-floor situation looks like this: a small-diameter drill is run "carefully" with reduced feed, and it breaks on the tenth part. After a small feed increase, the cut becomes cleaner, the temperature drops, and tool life improves. That is why feed often affects the result more than switching to another drill brand.
Where Runout Comes From
A small drill has very little safety margin. If the tool rotates off axis, one edge cuts almost all the metal while the other only scrapes the wall. The drill heats up fast, pulls the hole off center, and breaks before it even has time to become noticeably dull.
The problem usually starts not in the cutting part, but in the clamping system. Even hundredths of a millimeter already change the load on a thin tool. You may not see it by eye, but the sound and the mark in the hole make it obvious: the drill enters hard, pulls to one side, and the chips come out unevenly.
The most common causes are a worn or dirty collet, a chuck with off-center clamping, too much tool stick-out, a dirty seat, and spindle play. Long stick-out is especially tricky. The tool may look clamped properly, but an extra 10–15 mm dramatically increases deviation at the drill tip. For a small diameter, that is already a lot.
It is better to check with a short stick-out. First look at runout near the holder, then at the working length. If the collet looks fine but the value rises sharply at the tip, the cause is usually the stick-out itself, tool rigidity, or the shank. If the deviation is already visible near the holder, clean the seat first, change the collet, check the chuck, and only then touch the cutting mode.
The spindle condition also matters. Worn bearings, dirt on the taper, or a tiny burr on the shank can all create misalignment right away. On the shop floor, this looks like random breakages: one drill gets through a batch, the next breaks on the third hole. But the reason is often the same - the tool sat in the holder just a little worse.
A useful habit is simple: before starting a batch, wipe the seat, check the collet, clamp the drill as short as possible, and measure runout with a dial indicator. Those few minutes usually save far more time than searching for a "bad" batch of drills.
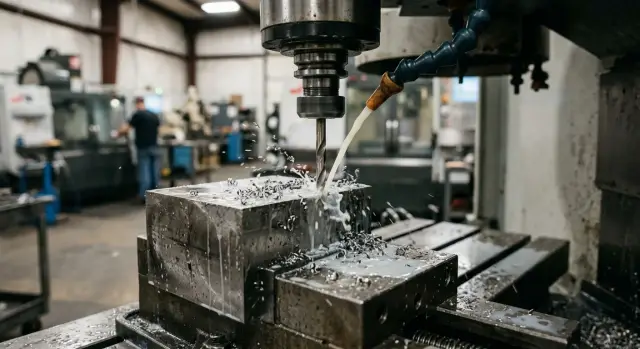
Why Chips Jam the Hole
At small diameters, the problem often starts not with the drill, but with the chip. Stainless steel makes long, tough chips, and a 1–3 mm drill has flutes that are too small to clear that volume comfortably. Then things move fast: chips clog the flute, rub the hole wall, temperature rises, and the drill sees a sudden jump in load.
The most dangerous case is a long pass without chip clearing. The deeper the drill goes, the longer the chip becomes and the harder it is for coolant to reach the cutting edge. If you try to reach full depth in one shot, the chip often coils into a tight spring inside the flute. The drill keeps cutting for a bit, then jams and breaks.
On small diameters, the difference between methods is very noticeable. One-pass drilling only looks faster in the program. In practice, frequent short chip clearing usually gives less heat, a steadier sound, and better tool life. Losing half a second on a retract is cheaper than stopping the machine because of a broken piece in the hole.
A simple rule of thumb: the smaller the diameter and the tougher the material, the more often you need to clear chips. For example, if a 2 mm hole in stainless steel goes to a depth of 10–12 mm, it is safer to break the cycle into short steps than to try to go the full depth in one feed.
Signs that chips are no longer evacuating properly usually include a squealing sound, long shiny chips on the flutes, a noticeable rise in spindle load, and the edge darkening quickly. Coolant matters a lot here too. If the emulsion is dirty or the stream misses the cutting zone, chips stay in the hole and act like a wedge.
Feed should not be set too low either. When the drill does not cut and only rubs, it makes thin, stringy chips that are even harder to remove. Stable feed and clean coolant delivery to the cutting zone matter more here than they may seem.
How to Set Up the Cycle Step by Step
A small drill in stainless steel breaks where a larger tool would still forgive a mistake. Extra stick-out, weak clamping, runout, and poor chip evacuation all combine into one overload. That is why the cycle is better set up in order instead of changing everything at once.
-
First remove unnecessary stick-out. Leave only the length needed for the hole depth and a safe approach. If the drill sticks out more than needed, it starts to flex and the load on the edge rises.
-
Then check clamping and measure runout close to the cutting edge. At 2–3 mm diameter, even a small deviation quickly pulls the drill off line. If runout is visible on the indicator, no cutting mode will fix it.
-
After that, set a short peck depth. In stainless steel, it is better to retract the drill more often and clear chips than to try to reach depth in one pass. If the hole is deep, the retract should be complete so chips actually leave the flutes.
-
Next, fine-tune the feed based on chip shape and sound. Feed that is too low only heats the edge and rubs the material. A normal setting gives a steady sound without squealing and chips without hard clumps. If the chips come out like dust, the feed usually needs a small increase. If the flutes clog quickly, reduce the peck depth and retract more often.
-
Once you find a working combination, write it down right away. You need not only speed and feed, but also stick-out, clamping type, depth per pass, retract length, and the number of repeats in the cycle.
A typical example: a 2 mm drill runs steadily for the first ten holes, then starts squealing. Often the reason is not the brand, but the fact that chips stopped clearing or runout increased after a re-clamp. If the working mode is recorded, finding the problem becomes much easier.
Example With a Batch of Small Holes
A batch of small holes makes it especially clear that the drill is usually ruined by the mode, not the brand. Take a simple part with no complex geometry: a stainless steel plate 12 mm thick, 18 holes with a diameter of 2.2 mm and a depth of 8 mm.
This kind of batch often destroys a tool faster than expected. The operator wants to play it safe, sets very gentle feed, clears chips too rarely, and gets the opposite result.
In the original setup, the shop ran the same solid-carbide drill. The program used a feed of 0.012 mm/rev, the cycle cleared chips in long moves, and the tool overhang had about 0.03 mm of runout. In operation, it looked familiar: the first holes went reasonably well, then the drill started squealing, heating the metal, and breaking after 2–3 parts, most often in the middle of the next batch.
Then only three things were changed: runout was reduced to 0.008 mm, feed was raised to 0.028 mm/rev, and the chip-clearing step was shortened to 0.6–0.8 mm with a full retract out of the hole. The drill brand was not changed. The machine, workpiece, and hole depth stayed the same.
After that, the tool started running much more smoothly. The sound evened out, chips stopped clogging the flutes, and the edge no longer darkened after the first holes. The same drill brand lasted 18–22 parts instead of 2–3. In practice, tool life increased about sixfold without switching to a more expensive tool.
The hole quality changed right away too. There was less burr at entry, the size moved closer to target, and variation across the batch dropped. For a small diameter, that is not a minor detail anymore, but direct savings in scrap and restart time.
This example shows the order of causes very well. Too little feed does not save a thin drill; it makes it rub and work-harden the metal. Runout adds side load. Poor chip evacuation finishes the tool in seconds. If you first clean up those three points, tool life usually improves faster than from changing the brand.
Mistakes That Quickly Tear Up the Tool
A small drill rarely breaks for just one reason. Usually it is finished off by a chain of mistakes: weak clamping, extra stick-out, poor chip evacuation, and trying to "push through" by increasing speed.
One of the most common mistakes is to put a new drill into a dirty or worn holder. Tiny chips, dirty oil, and wear marks remain on the taper, collet, or chuck. Runout appears, and the thin tool gets side load from the first seconds.
Another typical mistake is raising speed when the chips are already coming out in long ribbons. That does not make cutting easier. The drill heats more, the stainless steel smears onto the edge, and chip evacuation gets even worse.
Many people also drill with a long stick-out just for convenience. The cutting zone is easier to see and the tool is easier to approach, but stiffness drops. The drill flexes, leaves the axis, and breaks at the first jam.
Another expensive habit is starting a new batch of material without a test hole. On paper it is the same stainless steel, but in cutting the difference can be very noticeable. One test hole can often save several drills and an hour of downtime.
And perhaps the most expensive mistake is blaming every breakage on a bad drill. If the mode, clamping, and chip evacuation are poor, a new brand will give the same result, only at a higher price.
In practice, the picture is usually simple. A new batch of blanks arrives, the operator installs a fresh 2 mm drill, keeps the old overhang and the old speeds. The first part goes reasonably well, on the second the chips string out, on the third the drill breaks at the edge. The cause is not a "weak" tool, but runout, heat, and a clogged hole.
If breakages repeat, it is more useful to check the tool seat, actual overhang, chip shape, and behavior on a test hole. Very often it turns out that the cutting mode is still acceptable, but the process is being ruined by small losses in stiffness and poor chip evacuation.
A Quick Check Before Starting
Before a batch of small holes, it is better to spend a couple of minutes checking than to later replace broken drills and pull fragments out of the part. Small details decide almost everything here: hundredths of a millimeter of runout, extra stick-out, and too long a gap between chip clears quickly eat tool life.
First check runout with the installed tool, not just on the chuck. If there is noticeable deviation at the tip, one edge cuts more than the other, the drill walks off line, and then it breaks with no long warning. On a batch, this is often visible already in the first 3–5 holes.
Then look at the stick-out. A common mistake is simple: the drill is clamped with extra length "just in case." But an extra 5–10 mm makes the tool more flexible, and it starts to vibrate even at a normal feed. Leave only the stick-out needed for the hole depth and a safe approach.
Next, check the chip-clearing step in the program. For stainless steel, this is not a formality. If the cycle retracts the drill too rarely, chips pack into the flutes, rub the walls, and heat the tip. From the outside, the mode may seem calm, while inside the hole a jam has already started.
It also helps to look at the chips after the first holes:
- short and even usually means the process is stable;
- long tangled chips start wrapping around and interfering with cutting;
- dark or blue chips indicate excess heat;
- dust and fine crumbs often mean the drill is no longer cutting properly.
At the end, compare the actual feed on the control with the value recorded on the sheet. After a previous job, the operator may have left a correction percentage, and then the real mode will be far from the calculated one. For a small diameter, even a small deviation changes the load noticeably.
If, after the first two holes, the chips get darker and the cutting sound becomes harsher, it is better to stop the batch. Check runout, shorten the stick-out, and reduce the step between chip clears. Such a pause often saves an entire shift.
What to Do Next on the Shop Floor
After every breakage, it is worth recording not only the drill brand, but the full set of conditions. That is more useful than arguing about the coating or the brand. After 10–15 runs, it usually becomes clear where the problem repeats: in feed, runout, depth, or chip evacuation.
The easiest way is to keep one shared table for failures. Not for reporting, but for real work at the machine. It is enough to note the drill diameter and hole depth, the part material and the number of holes in the batch, speed, feed and cycle type, tool overhang, chuck, visible runout, and which hole saw the chip, drift, or break.
That kind of record is very eye-opening. Usually it turns out that the drill does not break "on its own," but almost always at the same depth or after a similar number of holes.
Then change only one parameter at a time. If you lower speed, reduce feed, change the chuck, and add retract steps all at once, you will not know what actually helped. It is much more useful to make a few short runs: check feed separately, the retract cycle separately, and the tooling separately.
A small example: in a series of 1.8 mm holes, the drill consistently breaks on part 12–15. If you first reduce feed by 10% and get the same failure, then the cause is probably not load. At that point, it makes sense to look at runout, stick-out, and whether chips are packing into the flute.
If the failure returns even after careful mode adjustments, check the stiffness of the whole chain. Look not only at the spindle, but also at the chuck, collet, drill overhang, part clamping, and the setup itself. The weak point is often hidden in a small detail: long stick-out, a tired collet, or a thin part without proper support.
When the problem is bigger than one tool and starts to involve the machine itself, line start-up, or tooling selection for a batch, those tasks are better discussed together with the equipment supplier. EAST CNC handles selection, delivery, commissioning, and service of metalworking machines, so it makes sense to contact them if your shop regularly works with stainless steel and small holes.
The next practical goal is simple: collect your own data, pick one repeated failure, and remove it with one check. That approach usually gives more than buying yet another "more durable" drill.
FAQ
Why does a thin drill for stainless steel break almost immediately?
Most often the drill does not fail from wear, but from overload in the first seconds. The usual causes are feed that is too high or too low, runout, and chips getting stuck in the hole.
Can too little feed break a drill?
Yes, and it happens often. When the feed is too low, the drill does not cut the metal; it rubs it instead, heats the cutting edge, and quickly work-hardens the cutting zone.
How dangerous is a small amount of runout?
For a small diameter, even hundredths of a millimeter matter. If the tip shows clear deviation, one cutting edge starts doing the work of two, and tool life drops sharply.
How often should chips be cleared when drilling small diameters?
It is better not to drill a deep hole in one pass. In stainless steel, shorter pecks with full retraction are safer so the chips can leave the flutes.
How can you tell that chips are already jamming the hole?
Watch the chips, the sound, and the color of the edge. If the chips come out as long ribbons, the machine starts to squeal, and the drill darkens after only a few holes, the cycle needs adjustment.
Should extra drill overhang be removed?
Almost always, yes. Extra 5–10 mm greatly reduce stiffness, and the drill starts to flex even at a normal feed.
What should be checked before starting a batch?
First clean the holder seat, check the collet or chuck, clamp the drill as short as possible, and measure runout at the working length. Then verify the feed on the machine and the chip-clearing step in the program.
Should the drill brand be changed immediately after a breakage?
Do not rush to change the drill brand. If you have not removed runout, extra overhang, and poor chip evacuation, a new drill will give the same result, only at a higher cost.
What should be done if squealing appears after a couple of holes?
Stop the batch and do not wait for a full break. Usually it is enough to check runout again, reduce overhang, and clear chips more often; only then should you adjust the feed.
What data is useful to record after a breakage?
Record not only the speed and feed, but also overhang, clamping type, peck depth, retract length, and the hole number where the failure happened. This quickly shows where the process keeps breaking down.