Demonstration machining before buying a machine: what to check
A demo run before buying a machine helps you evaluate not only part size but cycle time, chips, access to components and ease of setup.
Why one part is not enough
One successful part tells almost nothing about a machine. During a demo it's easy to get a good result if the program is already checked, the tool is mounted, and the operator knows every step. For a purchase, the important questions are different: how many such parts will the machine make in 8–12 hours, how consistently will it hold dimensions, and how much time will be lost to stops, setups and cleaning.
Even a clean surface and neat geometry don't show how the machine behaves under load. During the cycle you need to watch the chips, coolant, tool changes, rapid moves and pauses. Sometimes the part is acceptable, but the process itself is difficult: chips wrap around, the operator intervenes too often, and seconds are lost at each transition.
There is another trap: a demo with a pre-prepared setup. The blank is positioned, the modes are tweaked, the tool is already in place. In that situation it's easy to miss how long a normal setup in your shop will take and how comfortable it will be to work at the machine every day.
A good demonstration should not leave you with the phrase "the machine works fine," but with clear answers. How long is the cycle, where does the operator lose time, how does the machine behave on the 3rd, 10th and 50th part. Decisions are better based on numbers and observation, not on the impression from one pretty part.
What to prepare before the demo
A demo makes sense only when the machine runs your task, not a convenient blank for the seller. Bring your drawing, material data and blank dimensions. If the part has weak spots—thin walls, deep grooves, long overhangs, tight tolerances—mark them in advance.
If EAST CNC is conducting the demo, it's better to send the drawing and requirements before the visit. That makes it easier to pick tools, fixturing and cutting modes for the real part, not for a "similar" blank.
A minimum kit for the demo:
- an up-to-date drawing with dimensions and tolerances
- exact material specification or a sample
- surface finish requirements
- desired cycle time and batch size
Agree ahead of time which numbers you'll use to judge the result. You're interested not only in the dimension after machining, but also in cycle length, toolset composition, number of operator interventions and tolerance stability.
Ask to see the whole operation: loading the blank, locating, starting the program, tool changes, the machining itself, measuring the part and preparing for the next cycle. A short fragment often looks impressive, but doesn't show where time is lost and where the operator is uncomfortable.
Write down questions in advance so you don't have to remember them on site. People usually forget small but important details: where regular access is needed, how tools are changed, what the operator does alone, when a service engineer is required and which consumables are used in a normal shift.
How to run the demo step by step
Watch the whole process, not just the finish. If the start is already prepared, half the useful information disappears.
- Ask them to start from a clear baseline: mounting the blank, locating, calling the tool and starting the cycle.
- Time from the "start" button to the finished part. Note machine cutting time separately and any pauses where the operator intervenes.
- Don't step away mid-cycle. That's usually where you see how chips behave, whether noise increases, whether coolant obstructs the view and whether there are unnecessary rapid moves.
- After the stop, compare the part to the drawing and immediately ask for the next one. One part almost always looks better than a series.
Write notes briefly and clearly: "chips wrapping," "long tool change," "hard to reach chuck." These notes are more useful later than general impressions.
If the machine is offered for series work, ask for at least two consecutive parts, preferably several. That's the best way to learn how to check a CNC machine before buying without guessing. On the second part you often see what the first hides: extra time for re-fixturing, unstable dimensions, difficult access or chip evacuation problems.
What to ask about the finished part
Look at more than whether the dimension is within tolerance. It's far more important to understand how the machine holds size over a short run. Compare the 1st, 3rd and 5th parts. If variation appears early, ask plainly whether that's normal for the operation or if the machine has not reached a stable mode.
Ask specifically where dimensions shift after warm-up. Problems often appear not across the whole part but at a particular diameter, face or seating surface. If the seller says things stabilize after warm-up, have them state how long that takes and how the operator monitors it in a regular shift.
Surface finish follows the same logic. A part might look good because an extra finishing pass was added, feed was reduced, or a different tool was used specifically for the demo. That's not necessarily bad, but you need the real working mode, not a demonstration version.
Ask directly which dimension is checked on every part and which are checked selectively; how long full inspection takes; whether re-measurement after warm-up is needed; if additional passes were added for finish or accuracy; and whether any of those passes can be removed without losing the result. If inspection time approaches machining time, the effective productivity will be lower than the demo suggests.
A good sign is when the supplier calmly explains why the part turned out as it did, where there is tolerance margin and what will need daily attention in the shop.
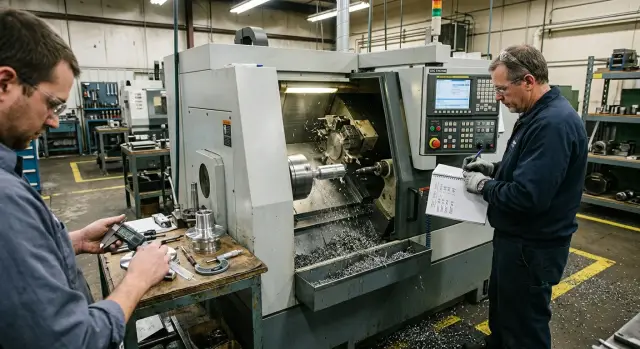
What to check during the cycle
You see more during cutting than after stopping. Immediately divide the cycle into parts: cutting time, tool change time and rapid moves. The difference between 38 and 52 seconds per part seems small until you calculate output per shift.
Watch the chips. They should evacuate from the cutting zone, not wrap around the part or tool. Listen to the sound: a steady cut is obvious, while rattling, ringing or sudden changes often indicate vibration. After stopping, check how much chip is left by the chuck, guides and enclosure, and how quickly it can be removed.
Also assess visibility. Stand in the operator's spot and see if the cutting zone is visible without awkward bending. If you have to peer inside, issues will be noticed later than they should.
Tool changes should be smooth and without unnecessary delay. If the machine spends noticeable time on auxiliary moves rather than cutting, that will quickly affect output on real orders.
Noise by itself isn't always a problem. But if the sound changes on the same pass and waves or ripples appear on the part, ask whether it's a cutting mode issue, a tool issue or machine behavior under load.
How to evaluate access to components
A machine may make a part accurately, but poor access to components will become annoying fast. Extra 10–15 minutes for tool change, cleaning or simple inspection add up every day.
At the demo ask them to open all doors and service areas used in normal work. Check not only that they open, but whether you can reach in with a hand and a tool. If you must reach through an awkward opening to the tool holder or tool magazine, that's a minus.
Check access to the spindle, clamping unit and measuring points. On a lathe it's important to see whether the chuck is easy to clean, jaws are simple to change and a measuring instrument can be brought in without unnecessary motion. If this takes a long time even on a clean floor, it will be worse in the shop.
Ask them to show routine end-of-shift cleaning: where chips accumulate, how coolant drains and how long cleanup takes. This shows how comfortable the machine will be in daily use.
Don't miss lubrication points, filters and service elements. If they're hard to reach or a simple replacement requires disassembling half the enclosure, a small problem quickly becomes a constant one.
Finally look at the space around the machine. Is there enough room to open doors, roll in a tool cart, remove chips and perform service. For a company in Kazakhstan this is especially important when equipment is installed not in an empty new hall but in an already busy area.
How convenient is it for the setup technician and operator
A good machine shouldn't tire a person before the first cut. If a setup technician loses an extra 10 minutes on simple actions, that becomes a noticeable loss over a month.
Watch the steps to first start. How many actions are needed to clamp the blank, call a tool, enter offsets, check zeros, turn on coolant and start the program. The fewer unnecessary menu steps and repeats, the smoother the shift.
Ask to see manual tool feeding. The operator should be able to feed the tool without fuss, see the cutting zone and make a trial pass. If they constantly change position, reach for a handwheel and then return to the screen, that's a bad sign.
The screen and buttons should be visible from the working position, not only close to the console. Check the emergency stop too: can it be hit immediately if the operator stands at the door watching the first pass?
After the cycle, ask for the usual cleanup. If chips clog corners, snag on covers and block access to the chuck or table, that becomes a problem in the first weeks.
Ask direct questions: how many actions to first start without pre-prepared settings, is a trial pass comfortable at low feed, is the screen and E-stop visible from the workplace, how long does chip cleanup and basic surface wiping take. When the operator works calmly, you'll notice it immediately.
Example of a simple one-part test
A complex test isn't always necessary. Often one steel part with two fits, a groove and a thread is enough. That set quickly shows how the machine holds dimensions, how chips behave and how long the cycle takes.
Imagine two machines running the same blank. The first hits the required sizes on both fits but loses time on rapid moves: the carriage travels a long route, tool change takes extra seconds, and the operator waits more than he cuts. On paper the result looks fine, but in production such differences become hours per shift.
The second machine delivers the same size but runs more smoothly. Chips break shorter and more predictably, don't wrap on the tool or block visibility. The operator doesn't need to stop often to remove chips or check the surface.
To make the comparison fair, let both machines run for about an hour on the same program and material. Record four things only: cycle time at the start and end of the run, dimensions of two seats on several consecutive parts, chip behavior on rough and finish passes, and the number of operator interventions. After an hour you see much more than after one demo part.
Demo mistakes
The most common mistake is looking only at the finished geometry. The dimension may be correct even if the cycle is too long, chips wrap, and the operator struggles to change tools and clean the workspace.
The second mistake is taking processing time on faith. Always use a stopwatch. One extra pass, a pause to remove chips or an awkward tool change will add minutes to every part.
The third mistake is agreeing to someone else's blank. If the demo runs on a different material or on an already well-prepared blank, the picture changes. For an honest assessment you need your part, your allowance and conditions close to real work.
Another common oversight is not asking what was prepared in advance. Before the demo they may have positioned the tool, tweaked modes and removed small annoyances your setup technician will face later. Ask right away what was changed before start and how long that preparation normally takes.
Finally, don't ignore access. If chips clog the cutting zone and it's hard to reach a needed spot, the operator will lose time every day. At the demo this looks like a small detail; in the shop it won't be.
Short checklist before deciding
Before buying, double-check five simple points:
- ask for the part to be made at least twice in a row and compare results
- verify actual cycle time against your calculations
- check how chips leave the area and how long cleanup takes
- let your operator perform a normal setup without a pre-prepared scenario
- clarify who is responsible for start-up, training and service
If cycle time differs from your plan by 15–20 seconds, the difference over a batch will be noticeable. If the operator is uncomfortable reaching components or spends a long time setting the tool, changeover time will be lost immediately after launch.
For a company in Kazakhstan this is also about post-purchase support. It's important not only how the machine cuts in the demo, but who will come for start-up, how training is organized and what to do if the equipment stops.
What to do after the demo
Right after the demo don't rely on memory. The same day collect your observations into one table. It's convenient to split it into three blocks: finished part, cycle and setup. In the first block record dimensions, surface finish and repeatability. In the second—total time, pauses, tool changes and chip behavior. In the third—access to the chuck and tools, ease of measurement, workspace cleaning and clarity of the control panel.
If you watched several models, compare them only on the same task: one part, one material, similar tooling and identical dimensional requirements. Otherwise the numbers will look good but be useless.
Before deciding, clarify who is responsible for the entire path after purchase. Who handles delivery, who does on-site start-up, who trains operators, who comes for service and how to submit a request if the machine stops. If answers are vague, that's a bad sign.
If you work with EAST CNC, it makes sense to check this whole route: from selecting equipment to delivery, start-up and service. The company covers the full cycle, which is more convenient for such a purchase than assembling contractors piece by piece.
Keep the table, photos, measurements and a list of open questions. Revisit them the next day and make the decision based on facts.