Deep pockets in aluminum: how to stop whistling and built-up material
Deep pockets in aluminum often cause whistling and built-up material. Learn how to choose step-over, stickout, and blow-off so the wall stays clean.
Why the pocket whistles and smears the wall
In a deep pocket, the cutter has a harder job than it does on an open surface. Chips have less room, air has a harder time reaching the bottom, and a long stickout makes the tool less rigid. That is why whistling appears first, and then the wall loses its clean cut and starts to look shiny from rubbing.
A single sound proves nothing. Sometimes the noise comes from the pocket itself: air and chips swirl inside, but the size is still holding. It is much worse when the cutter starts to wander. Each tooth pushes it slightly to the side, and instead of cutting you get a mix of cutting and rubbing. On the wall, that shows up sooner than it does in the spindle sound.
If the surface is only shiny without a noticeable wave, the usual cause is friction, chip re-cutting, or built-up material. If a regular ripple appears, the size starts drifting, and the tone changes with depth, the tool is already bouncing. When aluminum residue stays on the cutting edge, the process has almost always moved into heat: the chip did not leave, the edge got dirty, and the wall started to smear.
In a deep pocket, these problems often come together. Long stickout adds vibration, chips stay inside, the temperature rises, and aluminum sticks to the cutting edge. That is why you need to look at three things at once: the wall trace, chip shape, and tool condition.
What to check before the first adjustment
Before changing the program, check the mechanics of the process. Whistling and a dirty wall are most often caused by runout, a dull or dirty edge, too much stickout, and poor chip evacuation from the bottom.
Start with the tool. Even a small amount of runout can quickly ruin the result: one edge cuts under heavy load while the other is already rubbing. That is where both whistling and wall buildup come from. If the cutter has a chip, a dull rubbing mark, or stuck aluminum on it, do not touch the cutting data yet. Clean the tool first, check the collet, and make sure the clamping is even.
Then compare the actual stickout with what is truly needed. In the shop, people often leave extra length just in case, and then wonder why the tool is noisy. For a pocket 35 mm deep, there is usually no reason to keep 50 mm of stickout if the job can be done with 38–40 mm. The difference may seem small, but it matters a lot for rigidity.
After a test pass, look not only at the wall but also at the bottom of the pocket. If chips are sitting in the corners, collecting at the bottom, or swirling along one wall, air is not reaching the cutting zone. Then the cutter is no longer cutting metal — it is cutting its own chips. In aluminum, that quickly ends in built-up material.
You can also read a lot from the cutting data without complex calculations. A high whistle and a shiny, smeared wall often mean the feed is too low for the chosen spindle speed. A heavy, rough sound usually appears when the depth of cut or the side step-over is too large. If the tone changes as the cut gets deeper, check the stickout and air first, then adjust speed.
How step-over affects the sound and wall finish
Step-over in a pocket is the side movement of the cutter between passes. It changes the contact width between the tool and the metal, as well as chip thickness. That is why the sound and the wall trace almost always change together.
A step-over that is too small can seem safe, but in aluminum it easily turns cutting into rubbing. The chip becomes too thin, the edge heats the metal more, and the wall starts to get polished. A steady whistle appears, and the surface comes out shiny and smeared. A common mistake is simple: the operator reduces step-over to calm the pocket down and ends up with built-up material.
A step-over that is too large creates a different picture. The load on each tooth increases, the cutter is pushed away more strongly, and the sound becomes harsher. In a deep pocket, you hear it right away: instead of a smooth hiss, you get a trembling tone, and waves and matte streaks remain on the wall.
It is better to search for the working point without sudden changes. Adjust the step-over in small increments, about 5–10 percent, and after each change check three signs: sound, chips, and the wall trace. If the whistle gets softer and the chips come out cleanly, you are moving in the right direction. If the sound gets heavier and a wave appears on the wall, the step-over is already too large.
In practice, it looks simple. If the pocket cuts calmly at the top but whistling and a shiny wall appear deeper down, first increase the step-over slightly to reduce rubbing. If the surface becomes cleaner but the sound gets rougher, you are near the limit. Usually it is best to step back a little and lock in that setting.
Deep pockets rarely like extremes. A middle step-over usually works best: the chips are still formed properly, but the side load is not shaking the tool yet.
When stickout starts to interfere with cutting
Extra cutter stickout often ruins the result more than a feed or speed mistake. Outside the machine, the difference between 32 and 38 mm may seem small, but in a deep pocket the tool bends much more, and the wall shows it immediately.
Every extra millimeter acts like a lever. The cutter is pushed away from the wall more strongly, the edge cuts worse, and chips have a harder time leaving the bottom. That is why extra length is almost always harmful. If the pocket can be machined with 30 mm of stickout, do not leave 36 mm without a reason.
A long tool is only needed where a short one physically cannot reach the bottom or the holder may hit the top of the pocket. In all other cases, it is better to change the strategy first. Often it helps to split the machining by levels, do the roughing with a short cutter, and keep the long one only for the lower zone or the finishing pass. Another useful move is to leave a small allowance on the wall and remove it with a separate quiet pass.
How to quickly find the stickout limit
The check takes only a few minutes. Set the minimum stickout that safely reaches the depth and make a short pass along a straight wall at working depth. Do not take a heavy cut. You want a light pass with the same spindle speed and feed you plan to use in production.
If the sound is even, chips leave the pocket, and the wall stays clean and wave-free, you still have some margin in the stickout. If a whistle appears, the surface becomes shiny, or a ripple shows up, you are already close to the limit. In that situation, it is more useful to reduce stickout by 2–3 mm or soften the machining strategy than to choke the feed right away.
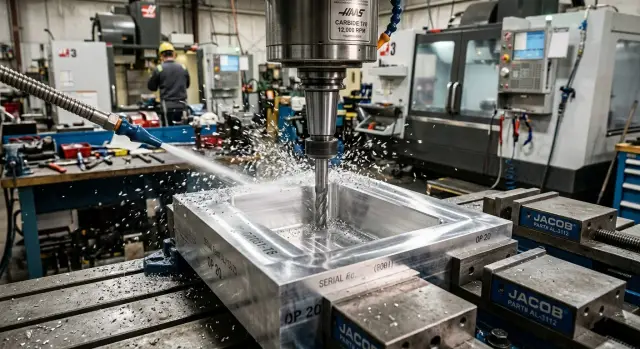
How chip blow-off clears chips from the pocket
In a deep pocket, air is not for noise or appearance. Its job is simple: carry chips away from the cutting zone immediately, before they return under the tooth. If chips swirl near the edge, they get cut again, rub the wall, and heat the aluminum quickly.
The most common mistake is blowing air straight down into the pocket from above. Then the air moves around the upper area, while chips stay at the bottom where the cutter is working. It is better to aim the stream where the tooth leaves the material and throws the chips away. At that moment, the airflow can catch them and prevent them from settling on the bottom.
If the pocket is deep, the nozzle should be brought as close as possible to the cutting zone, but without any risk of hitting the tool or holder. A distant air stream almost always loses effectiveness. From above, it may look like there is enough blow-off, but at the bottom there is already a sludge of fine chips.
What the wall tells you
Poor chip evacuation is easy to spot from the trace. Random scratches, matte streaks, and a gray smear appear on the wall. At the same time, the sound becomes unstable: the cutter is sometimes cutting metal and sometimes rubbing already cut chips.
Too much air pressure does not always help either. If the stream hits across the cutting zone, it can start swirling the chips inside the pocket. Then the fine chips fly in a circle, touch the wall, and come back under the tool.
When blow-off works properly, the picture changes quickly. Chips leave at once, the tone becomes smoother, and the wall comes out cleaner. This is especially noticeable with a large stickout: the tool is already less rigid, and extra chips at the bottom shake it even more.
Setup order at the machine
If the pocket starts whistling and aluminum smears on the wall, do not change everything at once. Otherwise, you will not know what actually helped. At the machine, it is better to follow a short sequence.
First, remove extra stickout. Keep only the length needed to safely reach the depth. Even 5–10 mm less stickout often changes the result more than any cutting data adjustment.
Then check the side step-over. For a deep pocket, this is usually safer than immediately changing spindle speed. Make a short test pass on one section and see how the sound and the wall change.
After that, move the blow-off closer to the chip exit point. Often it is enough to turn the nozzle by a few degrees. If the air misses the working zone, chips will keep swirling inside the pocket, and any good setup will quickly fall apart.
Only then should you look at feed and speed. If the mechanics of the process are already right, a small change in the cutting data becomes clear and predictable. If not, you are only hiding the problem for a few parts.
When to change feed and speed
It makes sense to adjust feed and speed only after three checks: the tool does not stick out too far, the step-over is not overloading the wall, and chips are leaving the pocket. Then one small change and a short test are enough.
If the whistle appears only in the lower third of the pocket, the order is almost always the same: shorten the stickout, check the step-over, move the air closer, and only then change the feed slightly. This path is usually faster than trying to silence the cut with spindle speed alone.
A good setup is easy to recognize. The machine cuts smoothly, chips do not stay in the pocket, and the wall after the finishing pass looks the same through the full depth.
Mistakes that most often ruin a pocket
The most common mistake is trying to fix whistling only with cutting data. If the stickout is too large, the tool is already working at the limit, and feed only changes the character of the noise. The wall still stays dirty.
The second common problem is air being aimed away from the cutting zone. The nozzle blows into the pocket, but not where the cutter is throwing chips at that moment. As a result, the chips swirl inside, heat up, and return under the edge.
The third mistake is changing everything at once. Speed up the spindle, reduce feed, change the step-over, add pressure, and also change the depth. After that kind of adjustment, there is a result, but no clear reason. It is much more useful to change one parameter at a time and check the sound, chips, and wall each time.
Another trap is sending a finishing pass over a wall that is already warm and dirty. After roughing, the pocket often contains fine chips, and the edge may already have a light buildup. If you go straight into finishing, the cutter starts smearing instead of cutting.
And finally, do not try to remove too much in one pass at a large depth. From the top everything may look calm, but at the bottom the long stickout, large step-over, and heavy cut quickly add up to vibration and built-up material.
Quick check before a production run
Before a production run, make one test pocket and check five things. That is enough to keep a weak setup out of production.
- Wall trace. The cutter should cut, not polish sideways. If shiny smearing appears, the process has moved into rubbing.
- Actual stickout. Keep only the length needed for the bottom and safe travel.
- Chip flow. Chips should leave the pocket, not swirl inside.
- Sound at working depth. A steady hiss is better than a high-pitched screech.
- Condition after the test pass. If a fingernail catches on a sticky trace or a gray smear is visible, built-up material has already started.
After that, it helps to go through a simple order once more: first stickout, then blow-off, then step-over, and only at the end feed and speed. One extra test pocket is almost always cheaper than a whole batch of parts with damaged walls.
Example from the shop
A pocket measuring 120 x 70 mm and 24 mm deep was machined in a 30 mm aluminum plate. A 10 mm end mill for aluminum was used. The first 10–12 mm went smoothly, then a squeal appeared, and a gray trace remained on the wall, as if the metal had been slightly smeared.
The machine load looked normal, so instead of changing speed, the mechanics were checked first. It turned out the cutter had been set with 38 mm of stickout, although about 30 mm with a small margin would have been enough for this depth. The radial step-over was also too large — about a quarter of the diameter.
For the sake of a clean check, feed and speed were left unchanged. First, the extra stickout was removed. The whistling became quieter, especially at the bottom, where the sound had been most unpleasant before. The wall improved, but the gray residue was still there.
Then the side step-over was reduced. The side load dropped, the sound leveled out, and the cutter stopped singing in the corners. After that, proper blow-off was aimed not just from above, but toward the area where chips were collecting near the wall. Before the change, some chips were swirling inside the pocket and getting under the edge again.
After these three changes, the result was different: stickout was reduced by about 8 mm, step-over was cut almost in half, and air was directed deeper into the pocket where the chips were leaving. The wall became brighter and more even, and the chips started leaving without being recut.
The two fastest improvements were shorter stickout and proper blow-off. Step-over then completed the result. That is a typical deep-pocket story: first remove the mechanical cause, then fine-tune the cutting data.
What to do next
If you find a setup where the pocket runs quietly and the wall stays clean, don’t keep it only in your memory. Write down the material, depth, cutter, stickout, step-over, feed, speed, and blow-off position in the setup sheet right away. In a month, that note will save more time than any argument at the machine.
For similar parts, you still need a short repeat test. With a deep pocket, even small differences change the picture quickly: slightly different depth, slightly longer stickout, weaker air flow, and the sound becomes different again.
If the problem keeps coming back even with a fresh cutter, short stickout, and proper blow-off, look broader. The cause may be in the tool geometry, the holder, runout, clamping rigidity, or the machine itself. In such cases, it helps to evaluate not only the cutting data but also the equipment’s capabilities. EAST CNC, the official representative of Taizhou Eastern CNC Technology Co., Ltd. in Kazakhstan, runs a blog with practical metalworking materials and helps with equipment selection, commissioning, and service. That becomes relevant when the task is no longer about one problematic pocket, but about stable production.
The short rule is simple: first remove extra stickout, then get the chips out of the pocket, then choose the step-over, and only after that touch the cutting data. In most cases, that is enough to stop the whistling and prevent the wall from smearing.
FAQ
Why does the pocket start whistling only at the bottom, not from the beginning?
Usually, three things come together at the bottom: chips have less room, air reaches the cutting zone more poorly, and the long stickout bends the cutter more. Friction increases first, then the tool starts to wander. In most cases, shortening the stickout and moving the air lower helps.
How can I tell whether the wall is being smeared by friction or by vibration?
Look at the surface trace. If the wall is only shiny and leaves a gray smear without a regular wave, the cutter is rubbing more than cutting. If you see a regular ripple and the sound changes with depth, the tool is already vibrating.
What should I check first if whistling and a dirty wall appear?
Start with the tool itself. Clean the cutting edge, remove any built-up aluminum, check the collet and runout. Then shorten the stickout to the minimum safe value. Only after that should you touch the step-over, feed, or spindle speed.
Can a small step-over really damage the wall finish?
Yes, it can. If the step-over is too small, the chip becomes too thin, the edge heats the metal, and the wall starts to polish. In aluminum, that quickly leads to whistling and built-up material.
How do I know the side step-over is already too large?
You’ll hear and see it right away. The sound becomes rougher, the cutter is pushed away from the wall more strongly, and waves or matte streaks appear on the surface. In that case, back off slightly on the step-over instead of trying to silence it with feed alone.
What stickout should be considered normal for a deep pocket?
Leave only the extra length needed to reach the bottom and avoid hitting the holder on the top edge of the pocket. Even an extra 5–8 mm noticeably reduces rigidity. If in doubt, make a short test pass at working depth with the minimum safe stickout.
Where should the air be directed so chips don’t swirl inside?
Don’t blow air straight into the center of the pocket from above. Aim the stream closer to the point where the tooth exits the material and throws the chip away. Bring the nozzle as close as possible, but don’t risk the tool or holder.
Should I change spindle speed and feed right away?
Usually not. If the cutter sticks out too far or chips stay at the bottom, changing the cutting data only changes the character of the noise. It’s safer to first remove extra stickout, improve chip evacuation, and adjust the step-over, then make a small feed or speed correction.
What should I do if the wall still smears after roughing and finishing?
It’s better not to go straight into finishing. Clear the chips from the pocket, check the edge for built-up material, and leave a small allowance on the wall. Then make a calm finishing pass with a clean tool.
How can I quickly test the setup before a production run?
Make one test pocket and evaluate it through the full depth. Check the wall trace, listen to the sound at the bottom, see whether chips are leaving the pocket, and measure the real stickout again. If the pocket cuts evenly and the wall stays clean, write the settings down right away.