Deburring in the Flow Without Unnecessary Manual Work
Deburring in the flow: how to choose which edges to include in the process, what can be removed at the machine and how to avoid slowing down part production.
Where the operation starts to slow the flow
The delay usually appears not during cutting, but right after it. The machine has already produced the part, the next program is ready, and finished blanks sit in the tray waiting for the operator to remove the burr by hand. If there are 8–10 such parts, the area already works to the pace of the finishing, not the machine.
The pile-up most often happens between three points: the machine output, a quick inspection spot, and the bench for manual finishing. The part is moved there, then back, then taken again for checking. Each movement seems small, but a couple of extra touches, turning the part in the hand and searching for the right abrasive easily add 20–40 seconds per piece.
For one part this is almost unnoticeable. For a batch of 200 it's over an hour that isn't cutting metal or moving the order forward. If the operator also changes tools, blows chips, or measures dimensions in parallel, the manual operation begins to set the pace for the whole area.
Piece-by-piece finishing and flow work by different logic. In a piece setup the operator decides each part’s fate individually: where a sharp edge remains, how to remove the burr fastest, how to reach it most easily. In a flow that’s hard to maintain. You need the same sequence of actions, the same spot for finishing, and a clear edge tolerance. Otherwise each part gets its own small improvisation and the cycle time varies.
The bottleneck becomes obvious quickly. After the machine a queue for finishing grows, the operator spends more time at the bench than at the control panel, actual cycle time exceeds the planned time and fluctuates noticeably from part to part. Another sign is identical parts coming out with different edge conditions, and some of the batch awaiting inspection only because a small burr hasn't been removed.
It’s a bad sign when the manual operation is considered a "trifle" and not included in the standard process. Then no one measures it, no tooling is prepared, and it grows on its own. Such places often lose more time than during a changeover.
Which edges to include in the process
If you leave all sharp edges for manual finishing, the area quickly gets extra work. The operator decides where to remove more or less, and parts start to differ from one another. That's bad for a flow.
It's easier to split edges into two groups in advance. The first affects assembly, fit and function. The second is mainly for safe handling so the part doesn't cut hands or snag during transfer. This simple division immediately removes unnecessary actions.
In the routing sheet mark edges at fits, holes and mating areas where a burr interferes with assembly. That includes drill and milling exits, sharp outer corners where the operator grips the part, and secondary edges where a light break is enough without a precise size.
On the drawing specify a chamfer only where it is really needed. If the edge participates in a fit or helps insert the part into an assembly, indicate a chamfer size, for example 0.2 x 45° or R0.5. If an exact size isn't needed, a short note like "remove sharp edges" is enough. Then shop personnel won't be tempted to grind away more than necessary.
Do not mix functional surfaces and safety edges. A seating face, datum plane or bearing edge control geometry and should not be rounded by eye. A neighboring sharp edge can often be given a small chamfer during machining without touching the functional surface.
The rule is simple: don't remove more than required for the part's function and safe handling. An overly large chamfer spoils the dimension, alters appearance and adds unnecessary minutes per piece. In a batch that quickly becomes hours.
A small chamfer often solves the problem right at the machine. On CNC lathes and machining centers one short pass along the edge after finishing is usually cheaper than a separate manual operation later. This is especially noticeable at hole exits, on faces after cutoff and at slot edges where the burr repeats from part to part.
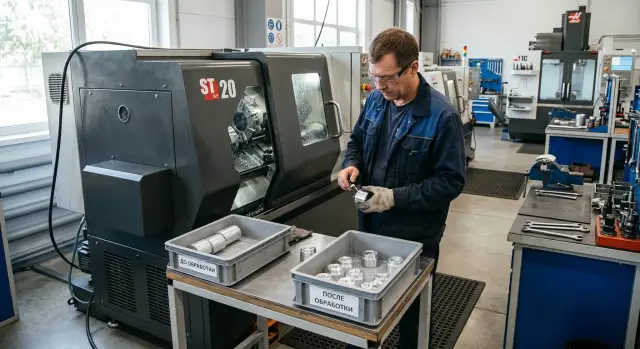
What can be removed right at the machine
Not every burr requires a separate post with a brush, vise and grinder. Some work the operator can do next to the machine if the burr is small, the part geometry is simple and the action takes only seconds.
Typically it's convenient at the machine to remove what appears after turning, drilling and thread cutting. This is not a long manual finishing, but a short clean-up that doesn't break the production rhythm. It can be a sharp edge after external or internal turning, a small burr at a drill exit, a slight edge at a cross hole, a burr at a thread entry or a fine fringe after milling a face or slot.
Such finishing isn't suitable everywhere. If the drawing requires a simple safety edge of 0.2–0.5 mm without strict surface requirements, the operator usually handles it quickly. A good example is a turned part with a hole and an outer diameter where you need to remove sharpness after drilling and slightly dull the face.
Deburring in the flow only works when the action is shorter than the pause in the cycle. If the machine processes the next part for 40–70 seconds and there's a small bench nearby, the operator can take the previous part, run a scraper, brush or abrasive block along the edge and return it to the tray. On many turning lines small edges are removed this way without a separate operation.
Beyond that boundary it's better not to go further. If the burr is thick, threads out like a string, hangs inside a channel, catches with a fingernail or interferes with assembly, it's no longer a light removal. The same goes for sealing surfaces, fits, intersecting holes and places where it's easy to change a dimension. Here manual cleaning at the machine almost always eats time and gives inconsistent results.
A simple guideline helps. If the operator removes the edge with one tool in 5–15 seconds and doesn't rotate the part ten times, the operation can stay in the flow. If they search for the burr, change tools, hold the part a long time and recheck the surface, the work is better moved to a separate step or eliminated at the machine by adjusting cutting mode, tool or adding a chamfer in the program.
How to build the work in steps
If the operator decides each time where and how to remove a burr, manual finishing quickly eats the area’s tempo. It's much better to close this question before starting a batch: open the drawing and route, mark edges that affect assembly, safety and fits, and remove everything else up front.
In practice it’s enough to divide edges into three groups. First — always remove. These are hole entrances, faces after cutoff and sharp external edges that hinder assembly or cut hands. Second — remove only after inspection or in a separate step if there is a strict requirement for chamfer, radius or surface finish. Third — don't touch to avoid wasting time and altering the size. Often only two or three mandatory edges are enough to make the operation predictable.
Next you need a simple order. The routing card should list the specific edges and briefly state what to do: blunt, chamfer, remove burr after drilling. At the machine fix one place where the required tool, brush, abrasive and a tray for parts are kept. Set a time norm per part, even if it's only 15–20 seconds. Before the series run a trial batch and measure not only the deburring itself but all small actions around it.
A trial batch quickly reveals the truth. Planned deburring at the machine might take 20 seconds, but in reality the operator spends almost a minute: picks up the part, walks to a bench, changes the tool, blows chips, checks the edge again. Then the problem is not the person but the workplace organization.
Keep a separate operation only where machine work takes too long or there's a risk of damaging the surface. It is needed for deep internal channels, thin walls, difficult access or strict uniform chamfer requirements. In other cases it's better to integrate burr removal into the flow and make it short, clear and consistent across shifts.
How to choose tools and the workstation
Choose the tool by the burr shape and edge tolerance, not by the operator's habit. For a fine fringe after drilling one method gives a clean result in a couple of seconds. For a dense buildup after a cut you need a different tool.
A hand knife suits single sharp burrs on an outer edge and in hard-to-reach places. It's precise but tires the hand quickly in a series. A brush is good for light cleaning after cutting and for fine edges when dimensions are almost ready — it removes little metal. An abrasive block or wheel is convenient when you need to blunt an edge quickly on a batch, but on soft material it removes too much. A chamfering tool is useful where a uniform chamfer is required: holes, faces and external edges.
Coarse tools more often damage dimensions than appearance. This is clear on fits, sealing planes, thin walls and hole entries. Example: on a 10 mm hole a hard abrasive can remove a few hundredths together with the burr. The part may look cleaner but now the fit has play.
The workstation matters more than it seems. On turning lines extra steps eat time almost invisibly, so set the zone around a short chain: take the part, remove the burr, check, place in the finished tray.
The simplest layout usually works best. A "before" tray on the left, an "after" tray on the right, and a pad or soft mat between for finishing. If disputable parts occur, keep a small third container "for rework". This prevents mixing and saves sorting time.
Keep tools within arm's reach. Fix the knife, brush and chamferer on the panel or a magnetic strip, and place the gauge or edge template in front of the operator, not on a neighboring bench. Directional light is needed — under low illumination fine burrs are often noticed too late.
For a flow, the winning tool is not the most aggressive but the one that removes exactly the amount needed. If the operator constantly reaches for a rough abrasive, check the process itself. Maybe some edges should be removed in the machine cycle.
Example for a small batch of parts
Take a batch of 40 steel bushings. The part has a transverse 8 mm hole and two outer edges on the faces. Such parts are often produced in series without long changeovers, and manual finishing quickly disrupts the shop rhythm.
Initially the route was simple but inconvenient. The machine turns the OD, cuts faces, drills the cross hole, and the whole batch goes to a separate table for deburring. There the operator manually runs both outer edges, the hole entry and exit, then checks by touch whether the edge snags a glove.
This scheme wastes time not only on finishing itself. Parts pile up in the tray, wait for a free person, mix with other batches, and the area gets an unnecessary queue that could be avoided.
After adjusting the process the two outer edges were added to the machining cycle: a 0.3–0.5 mm chamfer on the faces was made in the same setup. If the cross hole is drilled on the same machine, the entrance edge is lightly countersunk right away. After this only a short manual action remains at the machine for the hole exit, which is usually the most stubborn burr.
Manual finishing was reduced to one action. The operator uses a scraper or compact deburring tool, makes 2–3 light passes on the hole exit and immediately places the part in the finished tray. There's no need to return to the part a second time.
In time terms the difference is simple. Before the change a separate manual finishing took on average 3 minutes 10 seconds per part. After the change the cycle lengthened by 18 seconds due to chamfers and countersinking, and the manual finishing at the machine took 35–40 seconds. As a result, instead of 3 minutes 10 seconds it became about 55–58 seconds per piece.
For a batch of 40 parts the saving is noticeable: previously more than two hours of pure time were spent on edges, after the process fix it’s about 40 minutes. More importantly, the batch flows more evenly: the machine produces a part, the operator quickly removes the remaining burr and the part is immediately considered finished for that operation. No separate queue and lower risk of scratching the edge during extra handling.
Where time is most often lost and parts get damaged
Most time is lost where all edges are removed "just in case." That approach turns work quickly into a separate manual operation, although some edges do not affect assembly, safety, or function. Usually it's enough to divide edges into three groups: dangerous for hands, interfering with fits, and secondary. The first two groups are always processed. The third is touched only when explicitly required by the drawing or process.
A second common mistake is using the same tool for everything. An abrasive block, mounted wheel or knife behave differently on steel, aluminum and small holes. If the operator uses one tool for outer edges, slots and threads, they almost inevitably remove too much somewhere. The part then goes to scrap or requires rework.
There are also more mundane losses. The operator searches for a way to reach a narrow edge instead of grabbing the right tool immediately. Parts before and after finishing lie in the same container and work must be rechecked. The machinist first runs the cycle then is distracted by long manual cleaning. The supervisor judges by eye but doesn't know how many seconds each part takes.
Mixed containers spoil not just rhythm but the parts themselves. Finished surfaces rub together, edges get new dents, and work loops back. Two separate labeled receptacles solve this at once.
Another bad habit is giving long manual cleaning to the same person who loads and monitors the machine. For a busy machinist such work is always fragmented: a bit here, a bit there, then back to size, then more cleaning. If manual finishing takes longer than a short cycle pause, move it to a separate place or shorten it at the machining stage.
Finally, the feeling "it’s probably fast" almost always deceives. Measuring time on 20 parts once is enough to see where the area loses an entire shift.
Quick check before starting a batch
Before a series, 10–15 minutes is often enough to understand whether deburring will become an extra manual operation. It's better to catch the problem at the start than to sort a box of parts that are already queued for finishing.
First, compare the drawing and route. Not all edges need equal treatment. Somewhere a light break is enough, somewhere a radius or chamfer affects assembly. If the operator removes everything by eye the dimension drifts and time per part increases without benefit.
Then check tools. The workstation should have one clear set for this batch: for example a scraper, an abrasive block, a brush or a countersink of the right size. When the operator searches for tooling at neighboring benches, time losses start from the first part. If a simple operation requires too many tools, the process is already overloaded.
Measure finishing time on the first 10 parts, not only the dimension. This gives an honest picture. If deburring takes 20–30 seconds per part, the flow usually holds. If a minute or more, a queue will almost always form after the machine. This is especially visible on turning lines where the machine outputs parts faster than they can be hand-finished.
The check is short: mark mandatory edges on the drawing, prepare one toolset without extra items, measure deburring time on the first 10 parts, check dimensions before and after removing the edge, and watch whether parts pile up at the machine or move on without delay.
Check dimensions immediately after deburring, not at the end of the shift. On small diameters and thin collars even careful manual finishing can remove more than planned. A typical case is removing a chamfer and taking away part of the fit at the hole edge.
If a queue is already visible on the first ten parts, don't hope it will improve. In that situation change the way edges are handled rather than telling the operator to work faster. It's cheaper than sorting and reworking part of the batch later.
What to do next on your shop floor
Start not with a complete route overhaul but with one spot where the area loses time every day. Take one part and one recurring edge where the operator almost always slows down. This narrow fragment is easier to measure, compare and quickly fix without long debates.
If manual finishing eats a noticeable part of the shift, treat it as a separate loss, not a "small thing." Often the problem isn't the operation itself but that it's scheduled too late, no edge tolerance is fixed, or the supervisor and operator are left to decide locally. As a result one person removes a burr in 20 seconds and another spends two minutes on the same part.
It helps to gather the supervisor, setter and operator at the machine and walk the route. Usually in that conversation it's clear that some edges can be removed in the machine cycle by adjusting tool, feed, cutter exit or sequence. The rest should be a separate operation but short, uniform and clear for the whole shift.
For the first step five actions are enough: choose one recurring edge, measure finishing time on one part, check if the burr can be removed at the machine without risking the size, fix which edge requires manual work, and after trial recalculate losses for the whole shift rather than per piece.
Deburring in the flow only works when the rule is the same for everyone. If today an operator removes chamfers by eye and tomorrow another leaves a sharp edge, the flow won't stabilize. You need a simple note in the routing: what to remove, which tool to use, and when exactly.
In practice such bottlenecks often appear after equipment start-up. EAST CNC encounters this when selecting and commissioning CNC lathes: the problem is often not the machine itself but actions around it. If some edges can be removed in the cycle and the manual step is shortened to a clear, quick action, the area runs noticeably smoother.