Drilling Cross Holes Without Drift or Burrs
Cross-hole drilling often causes axis drift and torn edges on housing parts. We break down the route, cutting conditions, and simple shop-floor techniques.
Why the problem starts at the hole intersection
While the drill is moving through solid metal, both cutting edges work almost equally. At the intersection, that balance disappears. One edge exits into the finished channel first, stops cutting, and loses support. The other is still in the metal and pulls the tool toward its side.
That is why drift often starts not at the beginning of the pass, but in the last few millimeters. From the outside it looks like everything is going straight, but in the intersection zone the drill is already working unevenly. The longer the stickout and the weaker the clamping, the more noticeable the deviation.
The problem is usually worse on housing parts. Near the channel there are often thin walls, cavities, casting skin, or different metal thicknesses. The drill cuts normally for a moment, then drops into a void, then catches metal again. That leads to vibration, runout, and an uneven path.
A torn edge and burr form for the same reason. At the intersection boundary, the metal no longer supports the cutting edge around the full circumference. Instead of shearing the material cleanly, the tool starts tearing it away in pieces. First you see a small chip-out, then a burr appears, and sometimes the edge simply breaks away.
Chip evacuation adds another problem. In a normal through hole, chips come out more predictably, but here the flow breaks up. Some chips get stuck at the intersection window, and some get pulled back under the cutting edge. The wall gets scored, and the exit looks rough even with a new drill.
Operators often notice this too late. The diameter is still within tolerance, but the axis has already shifted by several hundredths or more, and the neighboring hole no longer matches position. Then manual rework starts: deburr it, correct the chamfer, and sometimes scrap the part.
That is why the machining route in these areas cannot be built like a normal through pass. First, you need to remove the root causes of drift: loss of support, uneven cutting load on the edges, and poor chip evacuation.
What features of the part throw the drill off
A drill rarely drifts on its own. Usually the part geometry or weak support during entry and exit throws it off. With intersecting channels, this is especially clear: the tool first cuts solid metal, then enters the void of the adjacent hole, loses part of its support around the circumference, and pulls to the side.
A thin wall near the intersection zone creates the biggest trouble. If there is little metal left, the drill no longer stays guided across the full cutting edge. One side is cutting, the other is hanging over a cavity. At that point the axis starts to move, and a torn edge often appears at the exit.
A large cross-channel diameter is also risky. The wider the existing hole, the longer the drill travels without proper support. On housing parts this is common: the longitudinal channel goes smoothly, but when it meets a wide cross-channel, the tool starts breaking its path. Add a long stickout, and the risk grows even more.
Where the part itself causes defects
A short locating base and weak clamping can spoil the result even with a good tool. The part shifts slightly, vibration increases, and the drill starts looking for the softer path. This often happens on small housings, where it is hard to get a rigid support without blocking the machining area.
The surface itself can also cause trouble. Casting skin, a hard spot after blanking, or uneven stock allowance on each side makes the drill enter unevenly. One edge cuts harder, the other easier, and the axis shifts within the first few millimeters. After that, it is almost impossible to correct.
Long stickout seems like a small issue, but it quickly magnifies everything else. Even a good drill with extra length deflects more easily, especially when a channel intersection is ahead. On a hydraulic block housing, it looks simple: the first hole goes straight, and the second, after meeting the cross-channel, shifts by several tenths and leaves a burr inside.
If a thin wall, a wide cross-channel, and less-than-rigid clamping all come together on one part, it is better to treat the problem as expected, not accidental. In that case, the route and entry method are chosen for the specific part, not by habit.
Preparation before the first pass
With intersecting holes, the mistake often starts before cutting even begins. If the housing part is not seated properly on its locating surface or the clamp pulls it sideways, the drill enters off-axis from the start. Later you see it as a shift at the exit and a torn edge in the intersection zone.
First, check the setup. The part should rest on clean, clear locating points, with no chips, scale, or burrs under the supports. Place the clamp so it does not twist the wall near the hole. On a thin wall, this is a common story: clamp it a little harder, and the axis moves before the spindle even starts.
Also check tool runout. The chuck, collet, and arbor must hold the drill straight, without noticeable side movement. If the tool describes a circle at idle, changing the cutting conditions will not save it. It is better to spend a few minutes with an indicator than to chase scrap across the whole batch.
Before the main drilling, it helps to mark the entry with a short center drill. It gives a firm start and keeps a long tool from wandering on the surface. If the wall thickness allows it, you can make a shallow pilot hole after centering. A smaller diameter is easier to keep on path, and the main drill enters more calmly afterward.
Before the intersection zone, always clear the channel of chips. If they build up inside, the drill will hit them, start rubbing, and pull to the side. In practice, before the first pass, it is enough to check five things: clean locating surfaces and supports, tool runout, centering quality, the need for a pilot hole, and channel cleanliness before the intersection.
How to build the machining route
The usual mistake is simple: go in at full diameter right away and keep one feed all the way through. On housing parts, that approach rarely forgives haste. A short, clear route works much better.
- Start from the side where the part is held more rigidly. If the housing has a wide base, a thick wall, or you can shorten the tool stickout, enter from there.
- Do not open to full size in one pass. First make a pilot or roughing hole with a smaller diameter. That helps the tool hold direction more easily before it meets the cross-channel.
- Reduce feed in advance, not at the moment it drops into the void. If you lower it a few millimeters before the web, the cutting edge works more smoothly and tears the edge less.
- Pass through the intersection with short steps if the depth and material call for it. A short pass, chip removal, and re-entry is slower, but more reliable in deep channels.
- Bring the size in after the roughing pass. The roughing stage sets the direction, and the finishing stage removes drift marks and cleans up the surface. For a tight tolerance, a finishing drill, boring tool, or reamer is appropriate here.
On a gearbox housing, this usually looks like this: first entry from the thick-wall side, then a pilot, then a roughing pass, a gentle passage through the cross-channel, and only then size correction. This route almost always gives a cleaner edge and holds the axis better than trying to do everything with one drill and one pass.
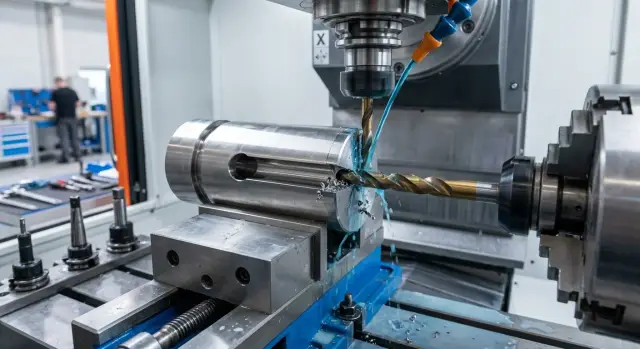
How to choose the tool and cutting conditions
When a drill exits into an existing channel, it loses support. At that moment, a long and flexible tool is more likely to drift, and a dull cutting edge tears the exit. That is why it is safer to start with the drill selection, not with the cutting conditions.
What to look for in the drill
For such holes, it is better to use a short drill with a rigid shank. The less stickout there is, the less the tool bends when it enters the void. If you can choose between a long and a short series, the short one almost always runs more calmly.
Also look at the point geometry. A point that is too aggressive pushes the material sideways more strongly, and a thick web increases axial force. For a ductile material, a drill with good chip flow and a relieved web is usually better. It cuts more evenly and pulls the tool less to the side.
Do not leave a worn drill for the finishing pass, even if it still cuts. On a normal hole, that sometimes works. At an intersection, wear immediately shows all the problems: drift, vibration, burrs, and a rough edge.
How to control feed
One feed rate across the whole depth rarely gives a good result. At the solid entry, the drill needs a proper load so it does not rub the material. When the cutting part approaches the intersection, it is better to reduce the feed. After passing the void, you can return to the working value, and in the last few millimeters, go calmer again.
Apply coolant so it not only cools but also carries chips out of the channel. If chips pack into the intersection zone, the drill starts rubbing, heating up, and wandering. In deep channels and with side exit, this becomes obvious very quickly.
If the machine allows it, it helps to stop after the first parts and inspect the chips. Short, even chips and a steady sound usually mean the conditions are right. Torn chips, squealing, or sudden jerks are already a reason to check the feed, stickout, and rigidity of the setup.
Example on a housing part
A hydraulic block housing shows well why a drill drifts off-axis at channel intersections. Imagine a part with a long longitudinal channel and a short cross-channel that must hit it accurately from the side. While the drill is cutting solid metal, it holds direction. As soon as one cutting edge exits into the open channel, support disappears, and the tool pulls sideways.
If you make the cross-hole first, the longitudinal pass almost always becomes more unstable. The drill goes straight, then enters the side void, one edge is still cutting, and the other is already hanging in the air. At that moment the axis shifts, and a rough edge appears at the intersection line.
On housing parts this shows up very quickly because the channel is often long and the walls are not the same everywhere. Even a small drift at the start creates a noticeable shift by the end of the pass. After that, the part is hard to save with chamfering alone.
A high setup adds another problem. The operator places the housing on tall spacers to reach the side surface, and the part gets extra leverage. Under load, it may barely rock or rotate. You cannot see it by eye, but the hole axis already reflects it.
For the first part, it is better to work more calmly. First, locate the housing on the firmest and widest face, lower the clamping point as much as possible, and bring the support closer to the drilling area. If possible, make the longitudinal channel first, before there is a side void along the path. After that, drill the cross-channel with a lower feed before breaking into the longitudinal one, and immediately after the intersection, remove a small chamfer or deburr the edge.
If the tolerance on the longitudinal channel is tight, you can leave a small allowance for the finishing pass and remove it after the cross-hole is made. That usually leaves a cleaner edge at the intersection.
In real work, on the first part it helps to stop briefly right before the intersection and check the position. It takes little time, but it quickly shows where the part is misbehaving: in the clamp, in the feed, or in the route itself. If the axis still drifts, I would first change the setup, not the drill. A setup that is too high ruins the result more often than it seems.
Mistakes that ruin the axis and edge
Defects at the intersection rarely start at the exit itself. Usually the problem appears earlier, and the torn edge is only the last visible sign.
A common mistake is to go to full diameter right away. When the drill meets the void in the intersection zone, it lacks stability, and the cutting edges start working unevenly. On housing parts, that quickly causes drift and burrs.
The other extreme is no better: keeping one feed rate until the very end. While the drill is moving through solid metal, that may work. But before the intersection and at the exit, the load changes sharply, and the old feed starts tearing the edge. A slight reduction in the last few millimeters almost always pays off.
Many people look only at the cutting conditions, even though runout should be checked first. If the spindle, chuck, or the drill itself has noticeable deviation, you will not get a straight hole even on a good machine. On a normal hole this may go unnoticed, but here it quickly turns into scrap.
A dull drill is also kept in production longer than it should be. The tool still cuts, but it pushes harder, heats the material, pulls the axis, and leaves a rough edge, especially when exiting into a side channel.
There is also a very simple mistake: not removing chips between passes. At the intersection they build up easily, then the drill goes in again and starts not cutting, but crushing the material and throwing chips through the channel. From the outside the hole may look fine, but inside the edge is already damaged.
If the axis shifts left on one part and right on the next, and the edge does not tear every time, there is usually more than one cause. Most often several factors combine: full diameter from the first pass, too much feed on exit, and a tool that should already be replaced.
Quick check before a batch
Before starting a batch, it is better to spend 10 minutes checking than to chase drift on ten parts later. With these holes, a small mistake quickly becomes scrap.
- Compare the setup with the drawing and the setup sheet. If the part is located from a convenient surface instead of the working datum, the offset builds up before the first pass.
- Judge the clamping by hand and by the marks after a trial setup. The part should not spring back, especially if the hole runs near a cavity, rib, or thin wall.
- Look at how much metal remains at the channel intersection. If the wall allowance is small, the drill drops into the adjacent hole too early and loses support.
- Check the program: does the feed drop before entering the intersected channel and before exiting the part? That is exactly when the edge tears most often.
- After the first part, measure more than the diameter. Check the axis position, the edge condition at the exit, and any chip-out at the intersection. If you see drift or tearing, it is better to correct the base, clamp, or cutting conditions right away.
This kind of check looks simple, but it is often what saves the process from repeated defects.
What to do next on your shop floor
After you have dialed it in, do not keep the route only in your head. Write it down on the operation sheet: how you center, which drill enters first, at what depth you reduce feed, when you remove the chamfer, and how you check the size. If the operator changes from shift to shift, this record works better than any verbal handoff.
At the start of the batch, do not rush to run the full quantity. Take the first three parts and measure the same things on each one: axis position, exit size, edge condition at the intersection, and the spread between parts. One part may come out right by chance, but three already show whether the process is holding the route.
For housing parts, it is useful to keep a short control sheet. Usually it is enough to note the tool number and actual stickout, the feed at entry and in the intersection zone, drift on the first three parts, exit edge condition, and comments on clamping. That makes it faster to see where the deviation starts: in the cutting conditions, in the setup, or in the order of passes.
If the problem repeats even with the same route, check more than the drill. Look at machine geometry, tool runout, spindle condition, setup perpendicularity, fixture rigidity, and the cleanliness of the locating surfaces. With intersecting holes, a small setup error quickly becomes a visible drift and an uneven edge.
A useful rule is simple: first remove the repeating cause, then change the cutting conditions. If you start changing feed, speed, and tool all at once, the picture only gets more confusing.
If the task is already limited by machine capabilities or setup, it is easier to break it down case by case. EAST CNC specialists work with machine tools and machining centers for metalworking, and help with selection, commissioning, and service. The company also has its own blog at east-cnc.kz with equipment reviews and practical advice. For this kind of review, it is best to prepare the part material, the hole layout, stickout length, current route, photos of the edge, and measurements from the first parts. With that data, the solution is found much faster.
FAQ
Why does the drill drift right at the intersection of holes?
Because at the intersection one cutting edge exits into the open channel earlier and stops cutting properly. The other edge is still working in the metal and pulls the drill to the side. This becomes much more noticeable with long stickout, weak clamping, and a thin wall near the channel.
Where should I start if the edge is tearing?
First check how the part is set up. Clean the locating surfaces, remove chips from under the supports, and make sure the clamp is not pulling the wall near the hole. Then check tool runout and the condition of the drill. If the tool already wanders at idle or the cutting edge is worn, you will not get a clean exit.
Can I drill the full diameter right away?
No, on housing parts this often causes drift and burrs. A pilot hole or a roughing pass with a smaller diameter works much more calmly, and the final size is brought in later. That way the drill holds the axis more easily before it meets the cross channel.
When should I reduce the feed before the intersection?
It is better to reduce the feed ahead of time, a few millimeters before the intersection zone. If you wait until the drill has already dropped into the void, the edge tears more often. After the intersection, you can return to the working feed, then slow down again before the exit.
Do I need centering or a pilot hole?
Yes, usually it helps. A short center drill gives a straight start, and a shallow pilot hole reduces the risk of drift for the main drill. This is especially useful if the wall is uneven, there is casting skin, or the drill has noticeable stickout.
Which drill is best for intersecting holes?
Use a short, rigid drill if the part and depth allow it. The shorter the stickout, the harder it is for the tool to move sideways. Also pay attention to sharp cutting edges and good chip flow. A dull drill at an intersection quickly causes vibration and a torn edge.
What usually hurts the axis more: the cutting conditions or the setup?
Most often the setup is to blame. High clamping, short locating surfaces, dirty supports, and tool runout can ruin the axis even with a good cutting condition. If the drift changes from left to right, I would look at the setup and rigidity first, not the spindle speed.
What should I do with chips in the intersection zone?
Do not let chips build up in the channel. Before the intersection zone and between passes, it is better to clear them out, otherwise the drill starts rubbing and crushing the metal. If you have coolant supply, direct it so it carries chips out of the hole instead of only cooling the tool.
What pass order is better on a housing part?
Usually it is better to drill the channel where the part is held more rigidly and the stickout can be kept shorter first. On a housing, that is often the pass from the thick wall side or the wide base. If the longitudinal channel must stay accurate, it is often made first, before there is a side void along the path.
What should I check before starting a batch?
After the first part, do not look only at the diameter. Check the axis position, the edge at the exit, the chip at the intersection, and the spread on the next two parts. If the problem repeats, change the setup and the route first. Adjust the cutting conditions after that.