Cp and Cpk on a machine: when to calculate, and when not to waste time
Cp and Cpk on a machine: let’s break down which dimensions the index is useful for, how many measurements you need, and when calculations only distract operators and QA.
Why some calculations help, and others only waste time
The shop floor gets overloaded fast if you calculate Cp and Cpk for every dimension on every part. On paper, it looks neat. In real work, the operator spends more time measuring, recording, and recalculating than watching the cut, tool wear, and machine condition.
If a part has 15–20 dimensions, not all of them affect assembly, noise, service life, or the customer’s scrap risk. When every dimension gets the same attention, the important points get lost in the flood of numbers. That is when statistics start living separately from the real work of the line.
Most of the time is wasted on the same things: unnecessary checks on secondary dimensions, manual notes, data transfer, sorting out random spikes that do not affect the part, and arguments about the formula instead of finding why the size drifted.
Cp and Cpk make sense where the process repeats and where deviation really costs money. The index shows not only whether you are inside tolerance, but also how the process behaves over time. That is where its practical value lies.
A single good part does not mean the process is under control. You can catch a size in the middle of the tolerance after an adjustment, and ten parts later it may drift because of heat, play, or a worn insert. And if the size stays steadily around one point and barely moves, the index already gives a useful signal.
But the index itself does not fix anything. It does not replace proper setup, a sound tool, a clear inspection plan, or the experience of the setter. If the chuck runs out, the insert is worn, or the operator measures differently each time, a nice Cpk number only hides the problem.
The practical approach is simple: first get the process in order, then calculate only where the result helps make a decision. For example, whether to change inspection frequency, shift the setting, or look for the source of variation. Otherwise the calculation quickly turns into a report for the sake of a report.
When the calculation is tied to a real risk, it saves time. When it is done out of habit and for every size in a row, it only adds more load to the shop floor.
Which dimensions are worth using for Cp and Cpk
The index should not be calculated for every dimension in a row. It is useful where the size directly affects assembly, part fit, or scrap risk. If a shaft has to fit into a bearing with no play and no extra tightness, that size is a good candidate. If a dimension barely affects anything and is only there for general control, the index will not tell you much.
A good candidate is a dimension with a tight tolerance. Especially if it has already caused comments at inspection: the part passes one time and fails the next, and each time it is unclear whether it was random or the process is already drifting. At that point, Cp and Cpk help you speak in numbers, not impressions.
There is also a simple limit: only calculate it for what comes from one and the same process. If the size is produced on one machine, with one tool, and with a clear setup, the index is usually useful. If the part is then hand-fitted, lapped, selectively finished, or heavily influenced by the operator, the number looks good only on paper. It describes not the process, but a mix of different actions.
Usually the calculation is used for:
- dimensions that affect fit and assembly
- dimensions with a tight tolerance and frequent QA comments
- dimensions where scrap creates noticeable losses
- dimensions consistently made on one machine without manual touch-up
Reference and secondary dimensions are better separated right away. There may be many of them on the drawing, but there is no need to drag all of them into statistics. If a dimension does not affect the part’s function, does not participate in mating, and does not create problems in production, ordinary control is enough.
In practice, it looks simple. Say a turning shop is machining a bushing. The outer diameter for fit and the length that affects clamping in assembly are worth calculating. A chamfer, a free dimension with no strict link, and a reference radius are not. That kind of selection saves time and gives numbers you can actually use to change the process.
When the index says almost nothing
The index is useful only where the process repeats in roughly the same way. If the part is a one-off, the batch is a trial run, and the setter is still choosing cutting conditions and offsets, Cp or Cpk do not mean much. They describe not the process, but a short stretch of setup.
This happens all the time in turning. You make 8 parts, adjust the offset twice, change feed, bring the size in after the first check, and end up with a nice Cpk. On paper, everything looks calm. On the shop floor, that is not statistics, but traces of manual correction.
There is also no point in calculating the index for dimensions with a wide tolerance if the scrap risk is low. Suppose a size is used for a rough fit or does not affect assembly at all. If the machine holds it easily, the calculation only takes time away from the operator and inspector. That time is better spent on a critical diameter, runout, or a size that drifts because of tool wear.
In most cases, it is better to postpone the calculation in four situations:
- the batch is too short and the process is still not stable
- the tolerance is wide and an out-of-tolerance part is unlikely
- the operator adjusts the size on almost every part
- the measuring system itself has noticeable spread
The third point is the one that most often ruins the picture. If the operator adjusts the offset after almost every part, you are no longer looking at one process. You are mixing several states: before the adjustment, after the adjustment, after warm-up, after a tool change. The average may look decent, but it hides the real problem.
Measurement is another reason to stop. If the inspection method is noisier than the process itself, the index loses its meaning. This happens when parts are measured hot, the gauge is too coarse, or different people get different results on the same part. If two readings of the same part on a 0.03 mm tolerance differ by 0.01 mm, the first thing to check is the measurement, not Cpk.
First make sure the size is truly important, the process is repeatable, and the measurement is stable. Only then does the index start helping. Otherwise it is just a neatly formatted number that gives the foreman nothing useful for the next shift.
What amount of data makes sense
If you take 6 or 8 measurements, you can already calculate Cpk. It is too early to trust it. That sample often catches a random piece of the process: the machine is still warming up, the operator has just tightened the offset, or the tool has not yet settled into its normal state.
For a first assessment, 25–30 consecutive measurements are usually enough. But they should not be taken right after startup, but after the process has stabilized. Then you can actually see how much the size moves and whether the average is drifting toward one of the tolerance limits.
If the index is meant to support a process decision, the sample should be larger. A practical range is 50–100 measurements over a normal shift. That way the data includes not only the smooth stretch, but also what happens every day: a small adjustment, natural tool wear, pauses in work, batch changes.
The rule is simple: the more serious the decision, the longer the observation. For a quick conclusion like “the process roughly holds the size,” 25–30 parts are enough. For the conclusion “this process can be trusted in series production,” it is better to look at 50–100.
If measurements are collected on different days, that is not a problem, but they cannot be mixed without notes. A Monday morning startup and a Thursday evening shift are not the same stretch of process. If you put them in one table, the index becomes muddy: you can no longer tell what is normal variation and what changed in the conditions.
The same applies to equipment and fixtures. You cannot combine data from two machines, two different tools, or after a program change. On the drawing, the size is the same, but the process is already different.
It helps to record not only the size itself, but also the time of measurement, tool number, reason for adjustment, and machine number if there is more than one in the shop. Those notes save more time later than it may seem.
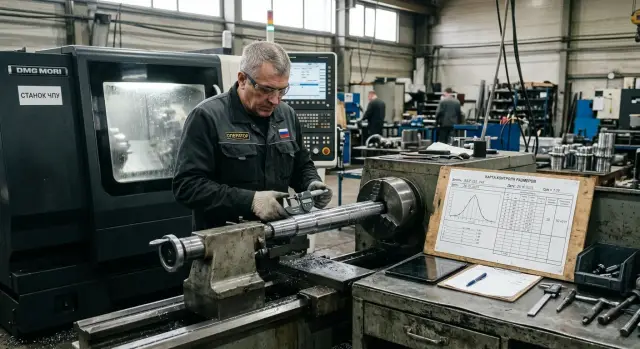
A simple example: on a CNC lathe, the fit diameter of a shaft is checked. First, 30 parts are measured in a row after warm-up and the first correction. Then another 40–50 measurements are collected during the shift, noting when the insert was changed and why an offset was introduced. After that, Cpk can be discussed seriously.
How to collect data without unnecessary fuss
To keep the calculation from turning into a meaningless number, remove random noise first. For one calculation, use one size and one measuring point. If the diameter is measured sometimes near the chuck and sometimes near the tool exit, the sample gets mixed and the index starts lying.
Open the drawing and check the tolerance. Then look at the measuring device: a micrometer, caliper, or bore gauge must be in good condition and easy for the operator to use. If the gauge itself drifts by a few hundredths, the calculation will be precise, but useless.
On a lathe, measurements should not start right after startup. The spindle, chuck, tool, and the part itself need to reach normal thermal state. Otherwise the first parts show not the process, but warm-up. This is a common trap: in the morning, five parts are measured, then another ten in the evening, and everything is thrown into one table, only to be surprised by the spread.
For the calculation, parts should be taken consecutively, without selecting “nice” values. If two suspicious parts are skipped, the statistics are already ruined. A good sample is usually boring: one operation, one tool, one mode, and one measurement sequence.
What to note next to the measurements
Numbers alone are not enough. If something changed during the run, it is better to add a short note next to the measurement: was there a size correction, was the insert or holder changed, was there a long pause, was the blank batch or the operator changed.
Those notes make analysis much easier. If Cpk suddenly drops, the reason can be seen right away instead of trying to remember what was happening on the machine.
The index should be calculated only after you have a clean, uniform sample. If the table mixes parts before and after a setup change, parts with worn and new inserts, or parts after warm-up and after a cold start, the calculation will say little about the real machine.
The working scheme is simple: choose one size, check the tolerance and the measurement method, let the machine run in normal mode, take a consecutive series of parts, and honestly record everything that happened along the way. After that, statistics help. Before that, they only add extra work.
A simple turning example
Take a shaft diameter for a bearing: 40.000 mm with a tolerance of 39.990–40.010 mm. For such a fit, even a few microns matter, so the calculation is justified here.
Suppose the operator, after one setup, machined 30 consecutive parts on a CNC lathe. The material is the same, the insert is the same, and the cutting conditions were not changed. The measurements show this picture:
- minimum size 40.002 mm
- maximum size 40.010 mm
- average value about 40.006 mm
- Cp about 1.4
- Cpk about 0.6–0.7
At first glance, things do not look too bad. The spread is narrow, the parts do not wander across the whole tolerance band, and the machine cuts evenly. If you look only at Cp, you might decide the process is fine.
The problem is elsewhere: the whole series has shifted upward and pressed against the upper tolerance limit. The machine is not holding the center of the band, but a zone near the limit. That is why Cpk is noticeably lower than Cp. This example shows the difference clearly: Cp tells you about spread, while Cpk shows where that spread moved.
For the shop floor, the conclusion is simple. The machine itself can probably hold the size. The problem is not a chaotic process, but a shifted setup. Sometimes a 4–5 micron correction is enough to bring the average back closer to the middle of the tolerance.
After such an adjustment, it is more useful not to build new tables right away, but to check two things: what tool wear looks like and whether the average returned to the working zone after the next few parts. That is exactly where the calculation really helps. It does not replace setup, but it quickly shows where to look for the cause.
Common shop floor mistakes
Problems usually start not with the formula, but with data collection. If parts before a tool change and after it ended up in one table, the calculation is already mixing two different process states. The number looks tidy, but it does not describe much.
The same happens after a setup correction, a batch change, or a program edit. The index only makes sense when the process is running in one mode. Otherwise you are not calculating machining stability, but a set of different causes accidentally thrown together.
Another common mistake is keeping only the “nice” points. On the shop floor, this happens more often than people like to admit: a difficult measurement is treated as a one-off and then simply removed. That is bad for Cp and Cpk. If a part was in the flow, its result should be in the sample too, unless there was a clear measurement or recording error.
There is another trap: calculating the index from data after manual sorting of scrap. If the operator has already removed all out-of-tolerance parts, Cpk almost always looks better than it really is. To make a decision, you need the original flow, not a “cleaned” picture.
People also rush the measurement. If a micrometer, bore gauge, or stand itself creates noticeable spread, the statistics start describing the instrument and the operator’s hands, not the machine. First you need to check the repeatability of the measurement. Only then should you calculate the index.
This is especially easy to see in turning. Suppose the diameter is held closer to the middle of the tolerance in the morning, and two hours after warm-up it slowly drifts by 8–10 microns. If all the measurements are put into one column, the calculation will show extra spread. The cause is not random process variation, but thermal drift.
It is worth stopping and rechecking the data collection if the sample mixes parts before and after a tool change, some measurements were removed without a clear reason, scrap was already sorted by hand, nobody checked measurement repeatability, or a cold and a warmed-up machine were included in one calculation.
First separate the data by process state. Then check the measurement. Only after that will the index start helping instead of confusing the line.
A short checklist before calculating
The index should not be calculated for every dimension in a row. It is needed where the result can drive a process decision, not just add another line to a report.
If in doubt, check five things:
- the size affects assembly, fit, or part life
- the machine produces it on its own, without manual touch-up on every piece
- the measurement repeats, and the same part does not “jump” around in the results
- you have a series of at least 25 consecutive parts
- you know what to do if Cpk turns out low
If the first point is not true, the calculation is often unnecessary. There is no point wasting time on a secondary dimension that does not change how the unit works and does not affect the customer’s scrap risk.
If the operator constantly adjusts the offset after every couple of parts, the index will not say much either. It will show a mix of machine work, human actions, and random corrections. Better to take a stretch of the process that runs steadily, even if only for a short while.
Check the measurement separately. Sometimes the shop argues about Cpk, while the real problem is the micrometer, the way the part is placed, or different force during measurement. If the gauge does not give a repeatable result, the statistics start lying even before the calculation.
The question “how many measurements for Cpk” usually comes down to a minimum of 25 consecutive parts. It is not ideal, but it is already a workable base for a first conclusion. Five or ten pieces almost always give a picture that is too noisy, especially in machining, where size can drift because of heat, tool wear, and clamping.
And there is one very practical filter. If Cpk turns out low, what will you do on the next shift? Check tool wear, clamping, offset, cutting conditions, machine warm-up? If there is no answer, it is too early to start the calculation. You need an action plan first, then the numbers.
What to do next
If the calculation gives a low Cpk, do not argue with the number and do not recalculate it in circles. First check the things that most often ruin the picture on the shop floor: setup, tool condition, part clamping, and the measuring method itself. A worn insert, a shifted datum, or different approaches from two inspectors will break the index faster than any math.
After that, it helps to follow a simple order. First make sure everyone measures the same size in the same way. Then see how the size changes after the machine warms up. After that, check offsets, referencing, and the moment of tool change. Only then collect a new sample and calculate again.
If the index is good, there is no need to calculate it for every dimension in a row. It is needed where scrap is expensive, the tolerance is tight, or the operator, setter, and QA keep arguing about the size. Chamfers, secondary radii, and dimensions with plenty of tolerance usually do not require that level of work.
It helps to keep a very simple template for repeat parts: date, machine, operation, tool, batch number, several dozen measurements for one size, and a short note about insert changes or adjustments. That sheet saves time better than any polished report. After a couple of runs, it is already clear where the size drifts steadily and where the problem was only one-off.
Statistics in machining are not for the report folder. They are there to reduce scrap, cut unnecessary checks, and stop arguments about whether the machine, the tool, or the measurement is at fault. If a size has been stable for years and lives within a wide tolerance, it is better left alone. If assembly, fit, or unit life depends on it, the calculation makes sense.
If the issue is not only inspection, but the machining process itself, these questions are better discussed before the series starts. EAST CNC at east-cnc.kz works with CNC lathe selection, startup, and service, so tolerance requirements, setup, and ongoing control can be tied to the real production task from the start. Then statistics do not get in the way of work — they help keep the process under control.
FAQ
Do I need to calculate Cp and Cpk for every dimension of a part?
No. Calculate the index only for sizes that affect fit, assembly, service life, or expensive scrap. For secondary sizes, ordinary inspection is usually enough.
For which dimensions are Cp and Cpk really useful?
Use it for dimensions with tight tolerances, frequent QA comments, and a direct impact on how the part works. If one machine makes the size with one tool and no manual touch-up, the calculation usually brings value.
When does the index say almost nothing?
Do not rush into the calculation on a trial batch, with frequent correction changes, or with unstable measurement. In that case the index describes setup and measurement noise, not the process itself.
How many measurements are needed for Cpk to make sense?
For a first conclusion, 25–30 consecutive measurements after warm-up are usually enough. If you want to decide whether the series can be trusted, it is better to look at 50–100 measurements over a normal shift.
Can I calculate one Cpk from data from different machines or shifts?
No, that is not a good idea. Different machines, tools, operators, and settings already mean a different process, and one combined number will only blur the picture.
What should I check before calculating Cp and Cpk?
Start simple: choose one dimension, one measuring point, and one measuring method. Then check the tolerance, the condition of the gauge, and let the machine reach its normal thermal state.
What does a high Cp and low Cpk mean?
This is a common situation. It usually means the spread itself is not too large, but the average has moved toward one side of the tolerance band. First check the correction and thermal drift, not the table again.
Why does a good Cpk not always mean everything is fine on the shop floor?
Because the number itself does not fix anything. If the chuck is out of true, the insert is worn, or people measure differently, a good Cpk only hides the cause until the process leaves the tolerance.
How can I collect data without unnecessary fuss and mistakes?
Do not throw out suspicious points and do not take only the convenient parts. Record the whole flow in order and note any setup change, insert change, work pause, or blank replacement.
What should I do if Cpk turns out low?
First check the measurement, clamping, referencing, tool wear, and offsets. Then take a new clean sample in normal operation and use that to decide whether control frequency needs to change or the process needs adjustment.