Training a CNC Operator: Plan for the First Eight Weeks
CNC operator training for the first eight weeks: how to organize setup, part measurement, working with corrections and actions for common failures.
Why an operator gets lost after startup
After commissioning, the machine is technically ready, but for the operator this is only the beginning. They must keep the part clamping, zeros, the tool, measurements, corrections and the machine's behavior during cutting in mind all at once. On a new machine a mistake on the first part is especially stressful. Because of that, the person starts to rush where sequence is needed.
The problem usually isn't that the operator "doesn't know how." More often they simply haven't organized the work into a clear routine. Setup, measurement and correction blur into one stream. The size comes out of tolerance, and then the panic begins: measure again or adjust correction immediately, check the datum or change the insert, call the technician or try to fix it yourself.
In the first shifts haste almost always produces scrap. Production needs a pace, and the newcomer tries to speed up too soon. They measure control checks less often, may skip a simple clamp check, or enter a correction "by eye." One wrong step quickly leads to another.
A typical situation looks like this. The operator turns a shaft, gets a size 0.08 mm over nominal and decides it’s the tool correction. They change the value without rechecking the micrometer and without confirming the part has cooled after cutting. The next part goes the other way, and confidence disappears completely.
Most often a newcomer gets confused by three things: not separating setup from normal cycle work, mistaking a measurement error for a correction error, and trying to save the process by guessing instead of checking.
Without a mentor this happens in almost every shift. When there’s no one nearby to say, "Stop, measure again first," the operator starts guessing. Guessing at the machine is expensive: time, tools, material and calm are lost.
In the first weeks what’s needed is not a general briefing but a repeatable rhythm of actions. Where the setup technician hands over the machine to the shift clearly, people begin work noticeably calmer. They fuss less, check themselves more often and understand faster why a dimension moved and how to bring the process back to normal.
What the operator should be able to do by the end of week eight
By week eight the operator should do more than press "Start." They run the shift without chaos: prepare the machine, check tooling, monitor the key dimensions and stop before scrap or a crash if they see a risk.
You can see this in simple actions. Before the shift they don’t skip basic checks: they inspect the chuck and jaws, coolant level, cleanliness of the workspace, correct program, zeros and the current tool offset table. They don’t act from memory but follow the established sequence on the floor.
There should be no rush with the tool either. The operator loads it per the card, checks the pocket number, projection, insert condition and tightness. If something doesn’t match, they don’t run the machine "to try" — they stop and find the cause.
By this time a firm habit of measurement is required. The operator takes the appropriate gauge for the dimension, measures at the same point and writes the result down immediately. Relying on memory across a run fails too often, especially mid-shift.
A good sign is if the person can briefly explain why the dimension moved, what correction they entered, what will change after that adjustment and when to measure the part again.
This isn’t about complex setups. By the end of week eight the operator should confidently make simple corrections when the cause is clear: a small dimensional drift, insert wear, or a repeatable deviation after several parts. If the reason is unclear, they don’t guess.
Another often underestimated skill is stopping the machine in time. A strange noise, chips winding, questionable clamping, a sudden dimension shift, or a mark where there shouldn’t be one — any of these is reason to stop the cycle. If after two months the operator still hesitates to press "Stop," the training has missed the point.
Weeks 1–2: order at the machine and basic setup
In the first ten shifts speed is not needed. What’s needed is a clear sequence of actions before every start. For a newcomer this is more useful than trying to reach full output immediately.
First the operator must learn to look at the machine in one route, not with a quick glance. On a lathe they check the chuck and jaws, clamping condition, coolant flow and cleanliness of the cutting area. Even a small thing like chips under a jaw or a weak coolant stream later causes runout, poor surface finish or an insert break.
Before start it helps to fix a short ritual: clean the chuck and work area, check the stock setup, confirm coolant flow and compare part zero and tool zero with the setup card and the control screen.
Zeros must be checked every time until the hands remember the routine. The operator must clearly understand the difference: the part zero defines the stock location, the tool zero defines the actual position of the cutting edge. If either is mixed up the program may be correct but the part will still be scrap.
Walk through the program to the first cut separately. Not the entire code line by line, but the dangerous spots: tool call, spindle direction, rapid moves, approach to the chuck, and retract after machining. Fifteen minutes of review is better than later changing a tool or checking whether the chuck was damaged.
After that do a dry run. No cutting, low feed, with a hand near the Stop button. The operator watches not the screen but the real trajectory: where the cutter goes, whether there is enough clearance to the jaws, and whether the tool comes too close to the part on a rapid move.
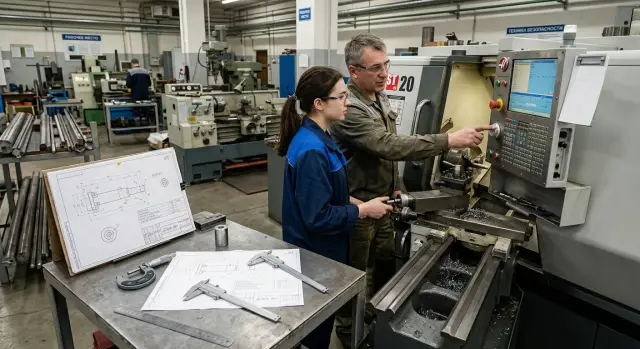
The first part a novice makes should be done with a mentor nearby. The mentor does not substitute but observes how the person completes the whole cycle: loads the stock, checks zeros, starts the program, listens to the machine and stops if something is wrong. If after a tool change the cutter is a couple of millimeters closer than expected, the operator should not guess. They must immediately stop the cycle and recheck offsets.
By the end of week two a normal result looks like this: the operator keeps order at the machine, does not skip basic checks and does not fear interrupting a start when in doubt.
Weeks 3–4: measurement without confusion
Confusion often starts not at the machine but at the measurement point. The operator measures the diameter at the face once, another time closer to the chuck, then uses a different gauge and gets a different number. In the end it’s unclear whether the dimension drifted or the check method changed.
In weeks three and four introduce one strict rule: for the first part the operator checks only a few preselected dimensions. Usually four or five positions are enough. If the part is simple, there’s no point chasing every number on the drawing.
Typically you choose the outer diameter with the tightest tolerance, overall length or length from the datum face, groove width or shoulder depth, a hole size if present, and one size that typically moves after the machine warms up.
Each dimension must be measured at the same point and by the same method every time. If you control diameter with a micrometer 10 mm from the face, do that every time. If you check length with calipers from the datum surface, don't change the datum. Otherwise the records will be noisy and the operator won’t understand what’s actually happening to the part.
Train the measuring process itself. Calipers suit quick checks and dimensions with wider tolerances. Use a micrometer where hundredths matter. Before the shift the operator wipes the gauge, checks zero and makes several trial measurements on one blank until the result stabilizes.
Right after the check compare the number to the drawing. Not at the end of the shift and not from memory. The operator looks at the nominal, the tolerance and immediately marks whether the measured value is high, low or near the middle of the tolerance band.
A simple inspection log works well. Five columns are enough: time, size number, nominal, measured value and deviation. That record takes less than a minute but quickly shows when the dimension started to drift.
For example, when turning a shaft the operator got 30.02 mm on the first part and 30.05 mm twenty minutes later. If both values are recorded with the check times, it’s easier for the foreman to see what’s happening: machine warming, insert wear, or a mistaken correction.
Weeks 5–6: tool change and working with corrections
By weeks five and six the operator should not change a tool by memory. A clear sequence is essential. On a lathe haste almost always ends the same way: a missed check, a wrong correction and scrap on the first part.
First the operator learns to tell the difference between insert wear and insert breakage. Wear comes gradually: the dimension slowly drifts, the finish worsens, the edge cuts with more effort. Breakage looks different: the size jumps suddenly, a strange sound appears, obvious marks show on the part and the chips behave differently than a minute earlier.
Next practice the replacement itself. The sequence is simple: safely stop the machine, remove the old insert or tool, clean the seating, install the new element, check clamping, verify position and only then run the machine. If any step was missed, start over.
The rule for corrections is one: measure first, then enter values in the control. No adjustments "by eye." If the diameter moved by 0.04 mm the operator must first ensure the measurement was correct and only then enter the needed number.
After every tool change the first part is fully inspected. Not only the previously drifting dimension but the whole group of sizes related to that tool. In practice this saves time: it’s better to spend a few minutes on control than to sort a batch later.
A simple working example helps. Suppose after installing a new turning tool the diameter again reads high. The operator measures, enters a small correction, runs the part again and measures once more. If the size does not hold a second time, the issue is likely not one single offset.
This is not the time to play hero. Call the setup technician or process engineer immediately if the tool breaks repeatedly, the dimension floats after a correct correction, the program and actual tool do not match, a new vibration appears, or the required correction is unusually large for normal wear.
By the end of week six the operator should calmly change tools, not touch corrections without measurement, and not try to solve issues alone that need a more experienced person.
Weeks 7–8: common failures and step-by-step actions
By week seven a dangerous overconfidence often appears. The operator already knows some things, and that is precisely why they begin to take risks. During this period training should focus not on speed but on a calm response to failures. The goal is simple: don’t push the cycle at any cost, stop the machine in time and find the cause.
Start with correction errors. On a lathe this is a frequent cause of crashes: the operator entered the wrong sign, mixed up the offset number or did not verify the new value after a tool change. It helps to show a safe training example where a size drifts after a correction and ask the trainee to explain what will happen on the next pass if the error is not noticed.
Then move to workpiece clamping. A slipped part shows in different ways: the stock shifted in the jaws, there’s a mark from rotation, the dimension jumped, the cutting sound became choppy. The operator must see the link between a weak clamp and scrap, not blame everything on the tool or the program.
Practice insert breakage on a roughing cut separately. This happens due to excessive feed, wrong depth of cut, incorrect projection or an already tired insert. If the operator hears a sharp pop, sees a spark in the wrong place or notices a sudden load spike, they do not argue with the machine. They stop the cycle.
One routine for any emergency
To avoid panic, use the same sequence every time: stop, inspect, record, report to the foreman.
After stopping the operator looks at the part, the tool, the chuck, marks and the screen message. Then they record at which frame or transition it happened, which tool was in use, which dimension moved and what they heard before stopping. Such a record greatly reduces the time to find the cause.
What the operator should notice on their own
By the end of week eight the person should catch early signs of trouble without prompting. Higher-than-normal noise, the start of vibration, darkening of the surface, or a slow dimension drift from part to part — any of these is reason to stop before a crash or a run of scrap.
A useful practice for the shift is once a day to review one real failure from memory: what was noticed first, where time was lost, and what should have been checked immediately. If the operator can calmly walk through this out loud, the skill is embedding into their work, not just their talk.
How to run training each shift
Training works better when each shift follows the same rhythm. Don’t try to close all gaps in one day. If you give someone setup, measurements, corrections and failure analysis all at once, they will remember separate pieces but not the overall routine.
Each shift is best built around one task. Today the operator learns to set up a tool after a change. Tomorrow — perform the first independent measurement of a part. Along with the task name one risk of the day should be stated. If the topic is setup, the risk might be a correction sign error or touching the chuck.
The working scheme is simple. At the start the mentor gives one task and names one risk. Then demonstrates the operation and explains steps aloud. After that the trainee repeats the same action without haste. As soon as the first part appears both immediately measure and compare the result to the drawing. At the end of the shift the trainee writes down one mistake and one takeaway for tomorrow.
This order removes confusion. One new skill at a time produces better results than a long list of topics. If the mentor shows insert change, correction entry and fault finding in one shift, the trainee will be tired before they understand the logic.
Review the first part immediately. While the control screen, tool and part are still in front of you, it’s easier to find the error. Often it’s simple: the wrong surface was used as the datum, the sign of the correction was reversed, or the micrometer was set incorrectly.
One more useful rule: the trainee should not only repeat the action but briefly explain it in their own words. That lets the mentor quickly see the difference between "the hands remembered" and "the person understands what they’re doing."
If training spans several shifts, keep a shared log. In shops where operators need to be brought to normal speed after commissioning, this is especially handy: the next mentor immediately sees what is already working, where the trainee is confused and which risk surfaced again today.
Example using a simple part
For the first four days use a simple shaft with two diameters and one shoulder rather than a complex housing. On such a blank the operator quickly sees the link between setup, zeroing, size and tool behavior. Mistakes are easier to analyze because they show up immediately rather than after a long program.
This example is good because you don’t need to remember dozens of operations. Attention stays on the datum: how to clamp the stock, how to check projection and how not to miss a simple setup mistake.
Four days on one part
On day one the trainee does not rush to cut metal. They mount the blank, check the jaws, verify projection, state the datum and run the program dry. First on the screen, then on the machine with a safe retract. The day’s goal is to understand where the tool will reach the part, where it will retreat and at what point an error becomes a crash.
On day two they take the first part and perform all checks themselves: both diameters, the shoulder length and runout if it affects the result. The mentor does not give the answer but asks first to name the expected size and then compare it with the fact. The operator begins to see that size drifts have specific causes.
On day three add a normal work task: replace an insert and apply one correction for size. One correction, not five at once. If after the change the diameter moved by 0.08 mm, the trainee should calculate which correction to enter and explain why.
On day four practice an alarm without a crash and without panic. For example, the sensor tripped, the program halted, the tool didn’t reach position or an unusual message appeared on the screen. The operator must take three steps: stop, read the alarm text, move to a safe point and only then make any manual changes.
If the trainee completes these four days without confusion they already have a foundation. They no longer just press buttons but understand what they do and why size depends on their actions.
Where mistakes happen most often
The most expensive mistake starts not at the part but in the training schedule. A newcomer is left alone too early: the shift is busy, the plan is tight, the machine is running so "they’ll figure it out." Usually they don’t. They learn random actions instead of a routine and then repeat them even where a different step is needed.
A bad start is easy to spot. The operator is left without a mentor in week one or two, keeps sizes in their head or on scraps of paper, changes corrections after the first deviation, treats a strange sound as normal and reviews a failure at the bench instead of at the machine.
Many see a size and correction log as unnecessary bureaucracy. In fact it’s the simplest way to find the cause. If a diameter drifted by 0.06 mm, it isn’t enough to tweak the correction. You must understand whether it’s a one-time drift, warm-up, insert wear, weak clamp or a measurement error. Without records the operator begins turning numbers at random.
The same goes for measuring. A novice measures, sees a deviation and immediately changes the correction. But first check how the part sits, how the measurement was made, whether the base is clean and whether chips got under the reference. Very often the person fixes a symptom and not the cause.
Minor vibration and unfamiliar noise are often ignored. Sound seldom changes without reason. First a slight tremor appears, then surface quality worsens, then the insert chips and finally the machine is down. If the operator does not stop in time and check the clamp, tool projection, feed and insert condition, a small problem quickly becomes a crash.
After a failure many limit themselves to a conversation. That is not enough. The operator must once more go through the same steps at the machine: where to stop the cycle, what to check first, what to record and who to call when a restart is not allowed. Until hands do it themselves, the knowledge hasn’t stuck.
What to check before working alone
By the end of week eight the operator should start a shift without prompts. They prepare the machine, check the cleanliness of the work area, the chuck condition, the tool, the clamping, zeros and perform the first dry spin. If the person skips any of these steps, it’s too early to let them work alone.
A good sign is simple: the operator not only performs the action but can explain it in their own words. This is most noticeable in measurement and corrections. If they confidently pick the right gauge, measure three key dimensions in a row and record the results without confusion, the foundation is in place.
Minimum for independent work
Before letting someone run a solo shift, check concrete actions rather than a general "level":
- the operator prepares the machine the same way every time and doesn’t skip checks;
- unaided, they measure the three dimensions that most often cause scrap on this part;
- they explain why they enter each correction and in which direction they change the value;
- they know first steps in an emergency: stop the machine, preserve the scene, inform the foreman, check the tool, clamp and program;
- they know first steps for scrap: isolate the part, recheck the dimension, find the cause, not just randomly tweak the correction.
If there is a failure on any point, don’t expand their parts range yet. Better to practice the same scenario another week than to get a series of identical errors in production.
How to lock in the result
After week eight place the operator on one typical part. Not the easiest, but clear and repeatable. On that part you can easily see whether they hold size, keep setup order and how they behave after the first failure.
Then introduce a short morning check of 10–15 minutes: what did they verify, which sizes hold, which corrections were made yesterday and why. Habit grows from repetition, not long lectures.
If the company is commissioning an EAST CNC machine, agree on a proper handover from the setup technician to the shift from the start. EAST CNC provides delivery, commissioning and service, so use that transition fully: the sooner the operator receives a clear routine, the less time is spent guessing and repeating errors at the machine.
FAQ
Why does an operator often get lost right after commissioning?
Because after commissioning the operator must immediately keep grip, zeros, tools, measurements and the machine's cutting behavior in mind. Without a simple routine to follow, the person starts to rush and tries to fix everything at once. Usually what helps is not a general lecture, but one repeatable route: check the machine, do a dry run, make the first part, measure, then correct.
What should an operator be able to do by the end of the eighth week?
By this time the operator should calmly prepare the machine for the shift, check the chuck, zeros, coolant and the tool without prompting. They should confidently measure the part, record the result, apply simple corrections for clear causes and stop the cycle if there is a risk. If the cause is unclear, they do not guess but call a more experienced person.
What to focus on in the first two weeks?
At the start, teach order at the machine, not speed. The operator should clean the work area, check the chuck, the workpiece, coolant feed, part zero, tool zero and the setup card. Also in these weeks reinforce the dry run habit and keeping a hand near the Stop button on the first start.
How to avoid confusion when measuring the first part?
Pick a few dimensions for the first part and always measure them at the same point using the same method. If today you measure the diameter at the face and tomorrow near the chuck, you create confusion yourself. Record each measurement immediately and compare it to the tolerance. Memory in the middle of the shift often fails.
When is it appropriate to change a tool correction?
Change corrections only after a proper measurement. The operator must first recheck the dimension, make sure the part has cooled, the base is clean and the right tool was used to measure. If the cause is clear, apply a small correction and check the part again. "Eyeball" adjustments almost always cause new scrap.
How to tell if the error is in measurement, not correction?
Don’t rush to change numbers in the machine. First repeat the measurement with the same gauge, check its zero, ensure the part isn't hot and measure at the same point. Very often the fault is in the measurement itself: a chip on the reference, a different micrometer or a different control point.
When should you immediately call a foreman or setup technician?
Call the supervisor or setup technician immediately if the dimension keeps fluctuating after a correct correction, the insert breaks repeatedly, a new vibration appears or the program does not match the actual tool. Another sign is a correction size that is too large for normal wear. In such cases it’s better to stop early than spoil a whole batch.
What to do when you hear a strange noise, feel vibration or get an alarm?
Stop the cycle at once. Then inspect the part, the tool, the chuck and the machine screen message, and write down at which step it happened and what you heard before stopping. Do not move the machine randomly or restart until you understand the cause.
How to run training each shift so it actually helps?
Give one task per shift rather than mixing all topics. The mentor demonstrates the action aloud, the trainee repeats it slowly, and after the first part both immediately measure and compare the result. At the end of the shift it’s useful to record one mistake and one takeaway for tomorrow. This way the routine establishes faster.
How to tell if an operator can be left to work independently?
Look at concrete actions, not total experience. The operator must prepare the shift in the same order, measure several key dimensions unaided, explain each correction and name first steps for scrap or an emergency. If they skip any basic check, they are not ready to work alone. It’s better to train the same scenario for another week than to manage a repeating series of identical errors later.