Cleaning Parts After Machining: Manual or Automatic
Cleaning parts after machining isn't always required, but in some operations it reduces the risk of hidden defects, saves assembly time and simplifies inspection.
Why a part straight off the machine is often not ready
A part can look finished when it leaves the machine: dimensions are set, the program completed, and the surface appears even. But almost always coolant, fine swarf and dust remain. Because of that a "finished" part is often only a semi-finished item.
The main problem is simple: dirt hides defects. Under an oil film it’s easy to miss a fine scratch, a chip on an edge or a burr in a hole. Right after machining the eye tends to catch the metal’s shine, not the small flaws. After cleaning the surface is revealed as it really is.
Defects often hide in holes, grooves and pockets. A blind hole may hold swarf, a thread can contain a mix of oil and metal dust, and a thin burr can cling to an edge. On a clean, dry part such issues are visible right away. On a dirty part they easily pass to the next step and only appear at assembly, during purging or even at the customer.
There’s a second problem: contamination doesn’t stay on one part. It moves through the shop with pallets, the operator’s hands, measuring tools and packaging. The next operation then gets extra work. Sometimes mating surfaces, seals and places that should not see swarf get contaminated.
Then the same part costs time twice. Before assembly or inspection it’s picked up again, wiped, blown out and rechecked. For one piece this is hardly noticeable. For a batch of 50 or 100 parts, hours add up that nobody planned for.
So after the machine not only dimension matters. Part cleanliness directly affects quality, time and the number of internal returns.
What remains on a part after machining
A part may look clean, but appearances deceive. On surfaces and inside cavities you typically find emulsion, fine swarf, abrasive dust, moisture and fingerprints.
Emulsion rarely disappears on its own. It lodges in threads, pockets, blind holes and internal channels. Outside a part may seem dry while a film remains inside that later mixes with dust and thickens. On housings you can often see it when you blow the part: a dirty droplet or a fine suspension comes out from inside.
Fine swarf usually clings to sharp edges, chamfers and corners. An oily film helps it stick. Sometimes the swarf is barely visible, but even a single small chip at a fit can cause problems: the part seats crooked, scratches the mating surface or gives a wrong result at re-measurement.
A separate issue is abrasive dust from grinding or deburring. It packs into fits, grooves under seals and contact zones. If that dust mixes with oil residues, it forms an abrasive paste. That’s bad for an assembly: seals wear faster, fits lose precision, and extra friction appears at first assembly.
Moisture and fingerprints aren’t trivial either. If a part is taken from the machine, left on a rack and residues are not removed, corrosion can start within hours. Steel shows rust spots, aluminum gets stains that are hard to remove with a simple wipe.
Cleaning is therefore not for looks. It removes what the eye often misses, and the next operation won’t forgive those traces.
When cleaning should be placed on the shop floor
Cleaning shouldn’t always be left to the end of the route. In many cases it’s better placed next to the machine or immediately after a group of operations. That makes it easier to remove what would later interfere with measurement, assembly and handover.
This is most visible after drilling and threading. Holes and channels keep swarf, and small particles plus coolant accumulate at the bottom. Outside the part may seem fine, but internally there’s a risk: fasteners will bind, threads will seat crooked, and swarf may travel further down the route.
Cleaning is also needed before precision inspection. An oily film prevents accurate measurement. Micrometers, gauges and probes give incorrect readings when a thick emulsion or sticky grime remains on the surface. On tight fits and threaded joints that error quickly causes trouble.
Don’t postpone cleaning before assembly, welding or painting. Oil and emulsion worsen fits, interfere with welds and damage coating adhesion. If a part moves to another area then returns for cleaning, time is lost twice.
In series production this is especially noticeable. Where CNC lathes and machining centers run, parts go in batches and extra transfers quickly cause downtime. The simple logic: machine, clean, inspect, pass on.
Typically cleaning is placed next to the operation in four cases: after drilling, countersinking and threading; before precision inspection; before assembly or painting; and on serial output where each extra transfer disrupts the rhythm.
A simple example: a housing was drilled and threaded and immediately sent to inspection. Dimensions were within tolerance, but swarf remained in one blind hole. At assembly a bolt didn’t seat and the team blamed the thread. Five minutes of cleaning at the machine would have avoided that.
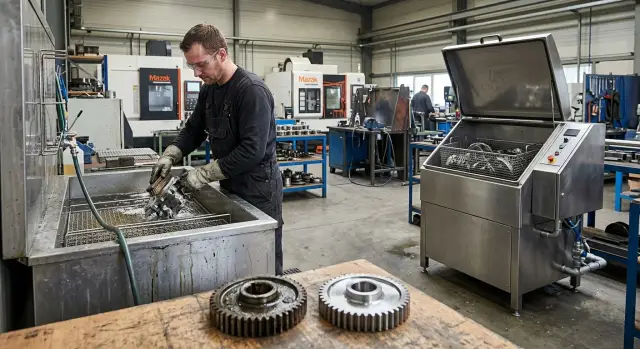
Manual vs automatic cleaning in practice
The difference is clear even in the first shift. When volumes are low manual cleaning looks easiest: the operator uses a spray gun, brush or tank, cleans surfaces quickly and passes the part on. But as soon as a series grows, the same operation starts to eat the station’s rhythm.
Manual cleaning suits single parts, setups and urgent rechecks. The operator can quickly remove swarf, wash the outside and immediately check for burrs or tool marks. That’s handy for one-off parts after turning or milling rather than sending an entire batch through a separate cycle.
The weak point of manual cleaning is that the result depends heavily on the person. One operator will thoroughly clean grooves and threads, another will only do visible areas. If a part has blind holes, intersecting channels or internal cavities, manual cleaning often leaves fine swarf and coolant residues there. From the outside the part looks clean while the problem appears later at assembly or inspection.
Automatic cleaning gives a more even result across a batch. The machine keeps one regime: cycle time, temperature, solution feed and spray pressure. For series production that’s a big advantage. Parts exit with predictable cleanliness and inspection doesn’t catch variability between shifts.
The difference is most noticeable on complex geometry. Automatics usually handle internal pockets, deep holes, intersecting channels and critical fits better.
Automatics have limits: they won’t help if the part is badly loaded, the wrong program is chosen or the chamber is overloaded. Even with those limits, for series production automatic cleaning more often keeps the process steadier than a manual post.
If a station produces 5–10 parts a day, manual cleaning can still work. When counts reach tens or hundreds, automatic cleaning almost always wins on time, repeatability and the risk of missing hidden dirt. That’s why manual cleaning is usually kept for exceptions, not the main flow.
How to integrate cleaning into the workflow
If you clean everything, the station will be clogged with extra work. If you don’t clean what’s needed, swarf and coolant residues travel down the chain. Cleaning should appear in the route not by habit but by a simple rule.
First, split parts into two groups. The first group includes parts where residues after machining really interfere: parts with blind holes, threads, pockets, thin channels, bearing fits, seals or coating areas. The second group contains simple parts that will be reworked later or where coolant traces don’t affect the next step.
Where to place the operation
Place cleaning right after the machine where swarf likes to hide. This often applies to housings, flanges and parts with many holes. The operator takes the part, washes, blows and passes it on without accumulating stock at the machine.
Before inspection cleaning is needed when contamination interferes with measurement. Before assembly it’s almost always required if no oil or swarf should remain inside the part. You can skip a separate cleaning when the next operation will remove a layer of material anyway.
What standard is needed
Long regulations usually don’t help. To start, a few simple checks are enough: no visible film or clumps of emulsion on the surface, holes clean after blowing, no metallic dust in threads. If the part goes to assembly add one rule: after drying on a wipe there should be no dirty residue.
It’s important to measure the whole time, not only the wash cycle. The bottleneck is often in drying, moving racks and waiting for inspection. Manual cleaning may take two minutes, but another four go to blowing and moving parts between posts. Count the full cycle.
For the first batch assign one responsible person. They check several parts in a row, see where dirt remains and immediately adjust the process. Otherwise the plan looks fine on paper but parts still pass through under-cleaned.
If the flow is already busy, don’t rebuild the whole area at once. Start with one problematic part and watch the result. This quickly shows whether manual cleaning is enough or it’s time to move to automatic.
Common mistakes
Errors are usually not about cleaning itself but about the habit of judging cleanliness by eye. A part seems clean and is sent on, then it turns out swarf stayed in a hole, emulsion sits in a channel, or dirt builds in a thread.
The most frequent slip is cleaning only what’s visible. The outer surface shines while the bottom of a blind hole or a channel still holds contamination. For housings that’s dangerous: fine swarf appears at assembly and coolant residues enter the assembly.
One-size-fits-all approaches don’t work either. Steel, aluminum and cast iron behave differently. A stiff brush may scratch soft materials, and the wrong solution will fail to remove oil or leave a film. The result is wasted time and unstable cleanliness.
Another common error is not allocating drying time. After cleaning a part may look ready, but moisture stays in threads and cavities, causing streaks, dark spots or oxidation. If such a part is boxed or sent to inspection, you create rework for the shop.
Mixing containers is also frequent. Clean and dirty parts end up in the same box or on the same pallet. That ruins the previous work: surfaces pick up swarf, dust and oil from neighbors.
Before passing a part on, check not only the appearance but also internal channels, blind holes, threads, grooves and pockets, full dryness and the container the part will go into. If you look only at the shine, the problem zones remain ignored.
Short checklist before handing the part on
Before inspection, assembly or packing these five checks usually suffice:
- No sticky oil film or clumps of emulsion on the surface.
- No swarf left in holes, pockets or threads.
- The part is completely dry, including hidden cavities.
- Clean containers are separated from those for parts straight from the machine.
- Inspection after cleaning checks not only dimensions but cleanliness of hidden zones.
A simple trick that almost always works: look at areas where fasteners, probes or seals will contact. Those are where fine swarf most often causes trouble.
On a housing this looks familiar: the operator washed and wiped the outside and sent it on. The outside is clean, but a short spiral swarf remained in a side hole and a drop of emulsion sits in a thread. Dimensions pass inspection and the problem appears at the next stage.
If this checklist hangs by the cleaning station or the receiving point, disputed situations become much rarer.
Example with a batch of housings
A batch of 120 housings left milling and drilling at the end of a shift. The outside looked fine: faces even, edges deburred, no obvious swarf. But small particles remained in pockets, blind holes and channel intersections.
The operator chose manual cleaning because it was faster to clear the outside and hand the parts on. In a few minutes they cleaned outer faces, ends and open holes. Visually everything looked clean. But blind holes were not cleaned thoroughly and some emulsion mixed with swarf remained at the bottom.
This surfaced at assembly. When the fitter began fitting fasteners, swarf came out of two holes. One screw went in crooked, another didn’t reach the required torque. Work had to stop, the part was rewashed and the thread rechecked. The machining dimension was within tolerance, but the dirt caused a return and extra work.
With automatic cleaning the result is usually steadier. Yes, you need to start the machine, load the basket and wait for the cycle. For one urgent part this may feel like lost time. But the whole batch goes through the same regime and the outcome is more consistent from the first to the last piece.
The practical conclusion is simple: manual cleaning is faster for a few urgent parts, automatic cleaning performs better on series where repeatability and fewer assembly returns matter. Many shops split the flow accordingly: single urgent parts go to manual cleaning with extra checks of holes and threads, while serial batches go to an automatic washer.
What to do next on your shop floor
Don’t argue about which method is better until you have your own numbers. Choose one part family where cleaning already affects acceptance, assembly or reinspection. It can be a housing, a bushing or a batch with internal cavities where swarf remains most often.
Measure basic things: how long cleaning, drying and post-clean inspection take. Don’t rely on memory — measure over several shifts. Manual cleaning can seem quick until you discover that blowing, moving and rechecking add another 15–20 minutes per batch.
Record a few metrics: how many parts passed through cleaning, minutes spent on cleaning, drying and inspection, what defects were found before the next operation, and how many parts would be returned without this step. These records quickly show where the shop loses time.
If you plan a new cell, discuss cleaning together with the machines and the part route, not after launch. Otherwise the tank or chamber will end up in an inconvenient place, parts will wait for carts, and operators will bypass cleaning during a busy shift.
Look at the whole process. EAST CNC supplies CNC lathes, machining centers and automated lines, and supports selection, commissioning and service. So consider cleaning and part flow already at layout stage, not after equipment placement.
A good first step is simple: pick one problem part, collect data for a week, and decide based on facts.
FAQ
Why clean a part if it already looks finished coming off the machine?
Because after machining parts often still carry coolant, fine swarf and dust. Under that grime it’s easy to miss a scratch, a burr or a chip on an edge. If cleaning is skipped, the defect usually appears later — at inspection, assembly or even after shipment.
What typically remains on a part after machining?
Most often there are coolant residues, fine swarf, abrasive dust, moisture and fingerprints. Dirt holds best in threads, blind holes, pockets and internal channels. From the outside a part can look clean while a film of oil and metal particles remain inside.
When should cleaning be done on the shop floor rather than at the end of the route?
Place cleaning next to the operation when swarf hides inside the part or the contamination interferes with the next step. This is usually needed after drilling, countersinking, threading and before precision inspection. Don’t delay cleaning before assembly, welding or painting either — it’s better done close to the source than at the end of the route.
When is manual cleaning an acceptable option?
Manual cleaning is convenient for single parts and setup work. An operator can quickly remove swarf and wash the outer surfaces to check for burrs or tool marks. But when parts have blind holes or intersecting channels, manual cleaning often misses hidden spots.
When is it better to switch to automatic cleaning?
For series production automatic cleaning almost always gives a more consistent result. Machines keep the same cycle time, temperature and spray regime, so cleanliness depends less on the operator. It’s most useful for batches where repeatability and clean internal cavities matter.
Why does a dirty part cause problems during inspection?
An oily film and sticky grime distort measurements. A micrometer, gauge or feeler may give misleading readings if the surface still has thick emulsion or tacky residue. On tight fits and threaded joints this quickly causes rework.
What should be checked after cleaning before passing the part on?
Check more than just the visible surface. Make sure there’s no tacky oil film, no swarf in holes and threads, and that the part is completely dry. Also check the container: placing a clean part next to dirty parts undoes all the work.
Where do shops most often go wrong with part cleaning?
The most common mistake is cleaning only what’s visible. Outer faces can shine while the bottom of a blind hole or a pocket still holds swarf and coolant. Other frequent errors: using one brush, one liquid and one regime for all materials, which can scratch soft alloys or fail to remove oil from others, and not allowing parts to dry.
Do parts need to be dried after cleaning?
Yes. Without drying, moisture stays in threads, grooves and internal cavities, then causes streaks, marks or early oxidation. If a part goes to assembly or storage still wet, drying must be complete — not just the outside.
How should we start if the shop doesn’t yet have a cleaning station?
Start with one problem part family and measure the facts for a week: how many parts go through cleaning, how many minutes are spent on cleaning, drying and inspection, and what defects are caught before the next operation. From those numbers you’ll see whether a manual station is enough or an automatic system is justified.