Clamps in 5-axis machining: access and rigidity
Clamps in 5-axis machining: how to open tool access, keep rigidity, and choose a fixturing setup for housings and plates in one setup.
Why tool access disappears so quickly
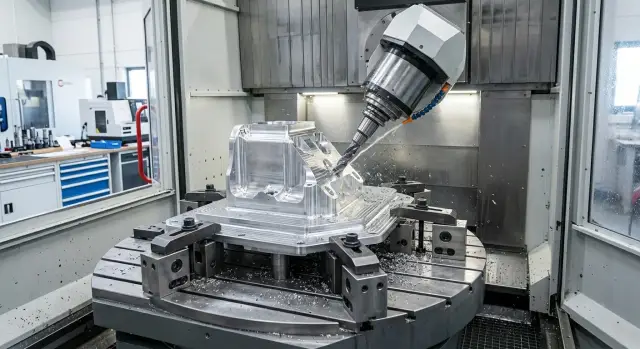
On a 5-axis machine, the problem is often not the cutter, but the clamp blocking the tool’s path to the part. When the table is straight, it feels like there is enough room. But once the part is tilted, a side wall, top edge, or pocket corner can suddenly end up in the danger zone.
This is especially noticeable on plates and housings. A clamp that holds the workpiece from the top and does not interfere with roughing can still block the edge during finishing. Even more often, it is not the cutting part that gets in the way, but the holder, collet, or spindle body.
Clamps in 5-axis machining have to be evaluated not in one position, but across the entire motion of the machine. The tool approaches the part not straight from above, but at an angle. Because of that, a safe clearance in one position can disappear as soon as the table tilts by just a few degrees.
There is a temptation to solve the problem with extra tool stick-out. Formally, access appears: the cutter reaches deeper and goes around the fixture. In practice, vibration increases, rigidity drops, and surface finish suffers first. If you add 20-30 mm of stick-out, that is often enough to turn a calm cut into chatter and marks on the wall.
The challenge becomes even tighter with one setup. The part has to be held so that almost all sides can be machined, while still keeping support. The more access you open up for the tool, the fewer points remain that hold the workpiece firmly.
On a housing, it looks simple: you need to machine an internal cavity, cut the top face, and reach the side surfaces. If you clamp too high, the clamp blocks the cavity opening. If you move the clamps too far toward the edge, the part can start to flex under side load.
Plates are similar. From above, you want as little fixture as possible so you can cleanly cut the contour, holes, and chamfers in one setup. But as soon as there are too few supports, or they sit away from the cutting zone, the plate begins to behave like a sheet: it chatters, and accuracy is lost even without a heavy cut.
So tool access does not disappear on its own. It gets eaten up by axis rotation, fixture size, and the attempt to solve two things at once: open almost all surfaces and keep the part rigidly clamped.
What to check before choosing a setup
A clamping scheme can fail right on the drawing if you do not first sort out which surfaces define the size. Start by marking the datums you will measure from after machining. If the dimensions are taken from the bottom face and two side walls, those are the surfaces you must not accidentally distort during clamping.
On a 5-axis machine, it is not enough to simply hold the workpiece. Clamps in 5-axis machining must give the tool access to different sides of the part, while the part itself must not vibrate under load. Before choosing the fixture, it helps to divide the part into zones: top, side surfaces, pockets, ends, and internal cavities. That way you can immediately see where the clamp gets in the way and where it actually helps dampen vibration.
Next, write down the axis rotations for each machining zone. Not in general terms, but operation by operation: where the table turns, at what angle the spindle approaches, and from which side the long tool enters. Often the problem is not the clamp itself, but the fact that on one of the rotations the chuck, holder, or pin enters the tool path.
Where the part is weak
Weak spots are better found before the first setup. Thin walls, tall ribs, long shelves, and narrow bridges can shift even under moderate clamping force. If a housing has a deep pocket and a thin side wall, a top clamp may hold the workpiece firmly, but after machining the wall can spring back and the size will move.
At this stage, it helps to make a simple note directly on the sketch:
- which surfaces can be safely clamped
- which areas must not be touched by a clamp
- where a support is needed from below or from the side
- where the part should be supported during roughing
Another common mistake is forgetting about the probe and tool changes. If the machine measures the part during the cycle, the probe needs free access to the datums and control points. The same applies to safe tool changes: a long cutter or holder must not pass too close to a clamp during an axis rotation.
For plates, this is usually checked quickly. For housings, it takes more time because they almost always have hidden areas that the tool enters at an angle. At EAST CNC, with parts like these, people usually do not start with the clamp itself, but with an access map: which surfaces are machined in one setup, where the axes move, and which supports keep rigidity until the end of the cycle. This order helps avoid reworking the fixture after the first test part.
How to choose the clamping scheme step by step
On a 5-axis machine, the clamping setup affects more than rigidity. It immediately decides whether the tool can reach the needed surface without hitting the clamp, spindle, or holder. A mistake here is expensive: the program has not even started cutting yet, but access is already lost.
Usually, I would start from the tool path, not from the table. First, look at where the cutter has to go in every operation: from above, at an angle, from the side, during axis rotation. After that, mark the areas where clamps should not be placed at all. If you place them "where it is convenient" first, you may end up having to change both the fixture and the route.
Then a simple sequence helps:
- Mark no-go zones for the tool and holder. Consider not only the cutting part, but also the holder and spindle body when tilted.
- Bring the clamping force as low as possible. The lower the clamping line sits relative to the part, the less the part is pulled and the more stable it holds size.
- Place supports under the areas that take the main cutting load. Random supports in the corners often look good on paper and produce a poor part after machining.
- Rotate all table positions before starting the program. Check the extreme axis positions, not just the convenient starting view.
- Run a dry test above a safe height. Five minutes without chips often saves a full day of rework.
A good rule of thumb is this: clamps in 5-axis machining should hold the part, but not fight the tool for space. If there is already a fight, the clamp does not win — the setup has to be redesigned.
On a simple plate, this is easy to see. Say you need to machine the top, side, and an angled surface in one setup. If you clamp the plate from above near the edges, the top area looks open, but on the tilt the holder body can quickly hit the clamp. If you lower the clamp and bring the supports closer to the cutting zone, access usually improves without losing rigidity.
This order also works well for housings. First you open the path for the tool, then you restore rigidity with supports and clamping height, not the other way around.
Setup for plates
For a plate in 5-axis machining, a simple logic usually works: place the blank on flat, low supports and do not raise it without a good reason. The lower the plate sits above the base, the shorter the lever arm and the calmer the cutting. Tall stands give the tool more freedom, but often take away rigidity before you notice it.
If the part has many pockets, windows, or lightening pockets inside, clamp the plate along the outer contour. The inner areas are already weakened, and pressure near them can easily distort the face. The outer material usually keeps its shape better, and the tool can enter the center more easily without the clamp ending up in the tool path.
A small machining allowance at the clamping points often helps. In practice, you leave extra material where the clamp will press, and then remove that area in a separate pass at the end. This is useful when there is almost no room on the finished side and a standard clamp gets in the way of one-setup machining.
With a thin plate, it is better not to save on support. If it is supported only at a few points, the clamps can locally press the workpiece in, and once the force is released it can spring back and the size will shift. A full backing plate or a well-made support plate reduces this effect. It is especially noticeable on long aluminum plates and steel parts with large pockets.
There is one common mistake: the operator tightens the clamps harder to make sure it is secure, and the plate bows into an arc. From the outside everything looks fine, but after milling and part removal, the flatness is gone. Check the shape not only before startup, but also after tightening.
A short check will do:
- sweep the top face with a dial indicator before tightening
- tighten the clamps in the order you will use during machining
- sweep the same points again with the indicator
- compare the difference at the center and at the edges
If the center rises or drops, change the setup. Usually, lower supports, a wider clamp contact area, or a full backing plate help. That is the whole point of good clamps in 5-axis machining: open the tool path and do not bend the part before the first cut.
Setup for housings
With housings, the mistake is obvious right away: the part is clamped comfortably, but the tool already has too little room. If the housing rests on thin ribs or walls, it starts to flex. If you place a clamp over a pocket, the cutter loses a proper approach, and you end up needing a longer tool. Rigidity drops even more.
For a housing, it is almost always better to look for support in solid areas. These are the bottom pads, thickened sections, outer lugs, and a thick base. Thin ribs can be used for orientation, but not as the main datum. Clamps in 5-axis machining give good results when the force goes through a thick section of the part, not through a wall only a few millimeters thick.
A typical working setup looks like this:
- the housing sits on three rigid supports at the base pads
- top clamps press on outer lugs or temporary tabs
- tall walls are supported from the side so the part does not move under lateral load
- access into pockets and to angled surfaces stays open for a short tool
If the blank has no convenient clamping points, it is often easier to add temporary tabs in advance than to fight vibration and long tool overhang later. After machining, the tabs are cut off. For housing parts, this is a normal and honest approach.
Also think through the finishing pass near the clamps themselves. A common mistake is to leave those areas "for later" with no room to reposition. It is much better to build in a backup clamping point from the start. Then you can do roughing and semi-finishing, move one clamp to a free tab, and clean up the open area without a second setup.
A good example is an aluminum housing with a deep pocket and a tall side wall. It is placed on bottom pads, clamped from above by outer tabs, and supported from the side at the wall. As a result, the tool enters the pocket without extra overhang, the angled surfaces stay open, and the size holds more consistently. That is how you can approach one-setup machining without unnecessary risk.
Example part in one setup
If a housing needs pockets, holes from several sides, and clean datums, extra repositioning usually eats accuracy. On a 5-axis machine, this is often handled more simply: the part is placed so the tool can see as many surfaces as possible, while the clamps stay out of the working area.
Housing
A practical housing example looks like this: the blank is placed on three supports, and then clamped from above with two low-profile clamps on the flange. The supports create a clear datum, and the low-profile clamps do not interfere with spindle tilt. That is exactly the point of the phrase "clamps in 5-axis machining": hold the part rigidly without blocking the tool path.
Then the sequence is as follows:
- First, machine the top face.
- Then rough the pockets.
- After that, tilt the part and finish the side areas.
- In the same setup, machine the ends and holes.
This scenario works if the fixture does not stick up higher than necessary. Otherwise, the tool will hit the clamp before it reaches the required angle, and the whole point of one setup is lost. For that reason, tall step-like arms are usually worse here than short, low-profile clamps.
Between operations, it is useful to quickly check the datums with a probe. It only takes a few minutes, but it immediately shows whether the part has settled, whether the flange has moved, and whether the zero point logic changed after roughing.
Plate
The thinking is similar with a plate, but the support is around the edge. The center is kept free for pockets, windows, or deep milling. If you clamp a plate closer to the middle, it often starts to "work" after material removal, and finishing cannot save it.
In practice, the plate is machined from the top first, then the machine tilts the part for the side elements and chamfers. If the edge is clamped low and cleanly, you can machine holes and ends without repositioning. For parts like this, the fixturing for 5-axis machining should not be complicated — it should be predictable. The fewer protruding parts around the blank, the smoother the whole cycle runs.
This approach is especially good for production housings and plates, where one extra repositioning can create variation that later has to be chased during assembly.
Common mistakes
On a 5-axis part, it is easy to make the clamp "too safe" and then end up with vibration, marks, and dimensional drift. These mistakes are rarely visible in the program. They appear on the machine, when the table tilts, the tool goes deeper, and the rigidity margin runs out quickly.
The most common mistake is clamping on a finished surface. The part stays put, but after machining you are left with scratches, dents, or a clear imprint on the surface. For a plate, this is especially unpleasant: the mark can end up on a datum or on an assembly face, and the part can no longer be considered clean.
An overly high clamp causes just as many problems. If the clamping point sits too far above the support, the clamp starts acting like a lever. From the outside everything looks secure, but under load the part rocks slightly. On a finishing pass this turns into a wavy surface, and on roughing it becomes chatter and extra noise.
Supports are often placed too far from the cutting zone. People do this for easier access, but get the opposite effect. The tool reaches in freely, yet the part itself flexes right where the metal is being removed. For a housing with a deep pocket, this is a typical scenario: the bottom is not fully opened yet, and the wall has already moved by several hundredths.
Another trap is checking only the clamp positions at zero. On a 5-axis machine, that is not enough. When the table tilts or the head rotates, axis travel may run short, and then the tool, holder, or spindle comes too close to the clamp. Sometimes there is no collision, but the operator has to cut the path short and loses the access that the setup was meant to provide.
A too-small allowance near the clamping points also often creates problems. While the part is clamped, everything is stable. Once the force is removed, the area near the clamp relaxes and the geometry shifts. You can see this on thin flanges, covers, and plates with windows.
Before startup, it is useful to quickly check five things:
- whether the clamp touches a roughing area or an already finished surface
- whether there is a short path from the clamp to the support
- whether the support is close to the cutting zone
- whether the full axis tilt clears the fixture
- whether the allowance at the clamping point is enough until the very end of machining
If even one point raises doubt, it is better to move the setup on paper, not on the finished part.
Quick checks before startup
On 5-axis machining, a clamping error is often not visible on the screen, but only at the first dangerous tilt. That is why it is better to spend 10 minutes on a dry check before startup than to later change the clamp, chase vibration, or lose the datum after re-clamping.
If you have clamps in 5-axis machining, do not look only at whether they hold the part. You also need to check whether they interfere with the tool, the probe, and the machine’s own kinematics. On paper the setup may look fine, but in a real head or table rotation, one corner can immediately
What to do next
A clamping setup that is too complex often gets in the way more than it helps. If the scheme holds the part "like a rock," but the size drifts, the tool overhang grows, or access to one area disappears, simplify the clamping and check the result again. In 5-axis machining, one extra clamp often creates more problems than benefits.
It helps to honestly compare three things: what is actually limiting the process the most. Sometimes the fixture is the problem because it blocks access. Sometimes the machine does not have enough travel in the required position. And sometimes the machine itself is fine, but the long tool starts to flex and ruins the surface.
If you need to quickly understand where the bottleneck is, three checks are enough:
- Remove one clamp in the model and see whether the area opens up without a higher vibration risk.
- Run the tool path through the axes and check where travel or rotation limits appear.
- Shorten the tool overhang by at least 10-15 mm and compare whether machining stability changes.
After that kind of check, it is usually clear where to go next. For example, a plate may be machined well in one setup not because you found the "perfect" clamp, but because you moved the datum points and removed the tall support near the edge. The part is the same, the cutting conditions are the same, but access becomes simpler.
Sometimes the problem is not the clamping setup at all, but the machine type. For the same part, another machine layout may make tool access easier. In some cases, a 5-axis center with a different kinematic arrangement works better; in others, it makes more sense to look at a horizontal or vertical machine for the specific geometry of the part and fixture.
If you have already reached this level of decision-making, it is better to evaluate the machine and the fixture together. At EAST CNC, you can discuss a selection for this kind of task: the company works with 5-axis machining centers and helps with equipment selection, delivery, commissioning, and service. For series production, that is especially useful. If service and startup are planned in advance, the shop spends less time reworking the setup after the machine goes into operation.