Chuck Marks on a Finished Base and the Risk During Assembly
Chuck marks on a finished base are not always critical. We explain how to check tolerances, contact, repeatability, and the clamping setup before a production run.
Why marks on the base become a problem
The finished base defines the part’s real position in the assembly. If the chuck left a dent, scratch, or local bulge on it, the part no longer rests the way the designer intended. The drawing still shows the same datum, but in the metal the contact point has shifted.
That is why chuck marks on a finished base are dangerous even when the measured dimensions still pass. A caliper, micrometer, or CMM may show tolerance, but during assembly the part may sit crooked, the gap may shift to one side, and extra stress may appear when the fasteners are tightened. The problem is not only about size. It is about how the part actually touches the mating surface.
Usually the trouble starts small. The chuck clamps the blank securely, machining goes smoothly, the operator sees normal geometry, and the batch moves on. Then at assembly one part fits tightly, the next needs extra tightening, and a third will not sit on the datum at all without shimming or re-lapping.
Most often the failure looks like this:
- the part rocks on a flat surface even though the height is within tolerance;
- the holes are formally in the right place, but the axis shifts after tightening;
- the mating part seats with force and ends up tilted;
- the assembly goes together, but later it makes noise, runs hot, or wears faster.
Shallow marks are especially tricky. If you only look at surface finish and linear dimensions, they are easy to dismiss as a cosmetic flaw. But a base works as a support, and even a small imprint changes the contact patch. Sometimes just a few hundredths are enough for the assembly to start behaving differently.
That is why the issue often shows up only after production starts. The first part may look acceptable, but in a run the spread in clamping force, jaw condition, and stock allowance makes the marks vary. In the end the assembly starts to become unstable, even though machining believes everything is fine.
If the base is used to locate a housing, cover, flange, or seated joint, do not treat these marks as a minor issue. One chuck imprint may not ruin the size, but it can easily ruin repeatability in assembly.
When the mark starts affecting assembly
The problem does not begin when you can simply see an imprint on the part. It begins when the finished base stops working as a continuous support surface. The part no longer lies flat across the whole plane and instead rests on isolated spots. From the outside this looks minor. In assembly, that small issue quickly turns into tilt.
If a flange, cover, or ring only seats after being pulled down by the fasteners, the base is already questionable. The assembler tightens the bolts harder, the part seems to settle into place, but the defect does not disappear. It simply hides until the next operation, a runout check, or the first hours of operation.
Chuck marks on a finished base usually start causing trouble in four cases:
- a local gap appears between parts even though the drawing dimensions seem to be within tolerance;
- after re-clamping, runout increases even though the part was running true before;
- when the fasteners are tightened, the plane drops suddenly and the seating becomes uneven;
- the assembly only goes together at a higher torque than usual.
A simple rule of thumb helps: if the mark changes the real contact between surfaces, it is no longer cosmetic. The situation is especially bad when the imprint lands in the support zone under a ring or under a small-diameter flange. There, even a small bump or dent changes the part position more than the individual dimension suggests.
In practice, it looks like this. After turning, the part passes inspection. The diameter and thickness are fine. Then it is removed, re-clamped, and sent to assembly. After the cover is tightened, runout rises from 0.01 to 0.04 mm. The cause is not the cover and not the fasteners. The plane is not supported by the full base, but by the chuck marks, and the assembly itself seeks a new position under load.
This often appears in production runs. The first part still goes together reasonably well, but then the picture starts to drift: one assembler tightens less, another more, one assembly passes, the next goes back for rework. If that has already happened on a batch, it is worth looking not at assembly first, but at the part clamping setup and where the chuck is actually leaving its mark.
A good sign of a usable base is simple: the part seats without having to be tightened for alignment, and runout does not increase after tightening.
What to check on the drawing and in the process
First, separate a "pretty" surface from a working one. A chuck mark by itself does not decide anything yet. The problem starts where that same surface sets the part position in the assembly, maintains concentricity, or takes clamping force during assembly.
On the drawing, find the datums that actually work after machining. This may be a face that seats into the housing, an outside diameter used for centering, or a shoulder used to measure the runout of an adjacent surface. If the mark is not just on a finished base but on the contact area used in assembly, the risk rises sharply.
Then check the requirements for that zone. Look at more than size: check flatness, roundness, runout, and surface finish. A small imprint on a loose-tolerance surface may be acceptable. On a base with a tight fit or a small runout requirement, the same mark can shift the part during assembly or create tilt when tightened.
It helps to go through four questions:
- Which surface locates the part in the assembly, and which one is merely finished.
- What tolerance applies exactly in the area where the mark may appear.
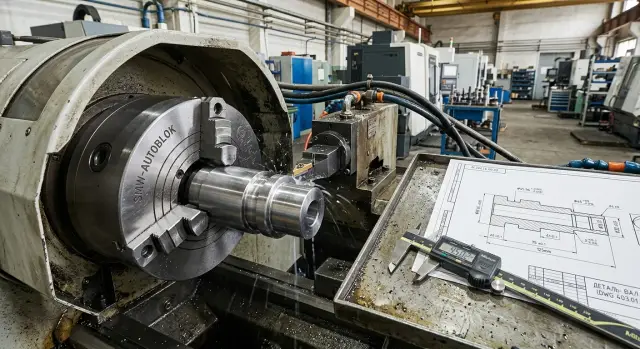
- Where the jaws contact the part now, how wide the contact patch is, and how deep the clamping is.
- How much margin remains between the contact patch and the working zone of the base.
The last point is often underestimated. In the process plan, the jaw contact zone looks narrower than it does on the shop floor. Jaws wear, the setup changes the overhang, and the blank varies slightly in stock allowance. As a result, the mark shifts by fractions of a millimeter or becomes wider. If there is very little clearance between the mark and the working base, the run will quickly show variation.
It is useful to mark not only the clamping point on the operation sketch, but also the no-mark zone. Then the setter sees a concrete boundary instead of an abstract datum. For example, if the face later presses against a mating plane, the chuck marks on the finished base cannot be judged by eye. You need to measure where the jaw contact ends and where the real contact zone in assembly begins.
If, after this check, the margin looks doubtful, it is better to stop before the run starts. An hour spent checking the clamping setup is almost always cheaper than reworking a batch at assembly.
How to check the risk before the run
Before production, do not debate the marks by eye. Make a short check under the same conditions the part will see in use: the same material, the same chuck, the same jaws, and the same clamping force. If the issue is chuck marks on a finished base, one trial part is often misleading. You need at least 3-5 pieces.
The idea is simple: you are not only looking at the imprint itself, but at whether it changes seating, concentricity, and part behavior after re-clamping. Sometimes the mark looks rough but does not affect assembly. Sometimes the opposite happens: the patch is small, yet the assembly later pulls to one side.
What to check on the trial batch
Make several parts with the current clamping setup and record the same set of data for each one:
- clamping force
- mark depth
- contact patch width
- dimensions before and after re-clamping
- runout on the base or on the related dimension
It is better not to mix parts from different blank batches. Otherwise you will not know whether the problem is material-related or clamping-related.
Mark depth is usually checked with an indicator, a profilometer, or by carefully measuring from a nearby clean area. The width of the patch matters too. A narrow and deep mark is often worse than a wider but shallower one, because it locally dents the base.
Assembly check
Then assemble one or two parts with their mating component without fitting or hand-finessing anything. Do not grind, do not loosen the fit, and do not try to "help" the assembly seat. If a real trial assembly shows tilt, needs extra tightening, or gives an unstable gap, the risk is already there.
After that, it is useful to compare size and runout before and after re-clamping. If the chuck mark changes the part position by even a few hundredths, the spread will almost always grow in production. This is especially noticeable on thin-walled parts and on bases that later go into precise assembly.
A good rule of thumb is this: if results vary from part to part at the same clamping force, the issue is not measurement but the clamping setup itself. In that case, it is better to stop before production and change the support, force, or jaw contact shape. A couple of hours of checking usually saves a lot of scrap and hand fitting at assembly.
A simple shop-floor example
A flange from one batch was turned on the outside diameter in a standard three-jaw chuck. The blank sat securely, the diameter came out fine, and after the finishing pass the operator removed the part for inspection. At first glance everything looked fine except for three light imprints on the base where the jaws had held the part.
On the inspection table, the part passed. The outside diameter was within tolerance, thickness was fine, and runout stayed within the control chart limits. Because of that, the marks were not counted as scrap. This happens often: if inspection looks only at dimensions, a small imprint is easy to miss.
The problem appeared at assembly. The flange was placed on the mating plane and tightened, and the part began to rock slightly. At first it looked like a coincidence, but the same thing repeated on several pieces. The mating part shifted by a few tenths of a millimeter, and the holes had to be pulled into place with the fasteners, although they were not supposed to be.
The cause was simple. The chuck marks on the finished base were shallow, but they sat exactly in the support zone. While the part lay on the inspection plate, this had almost no effect on size. In the real assembly, the base behaved differently: when tightened, the load went through three local points, and the plane no longer gave a flat seat.
What changed
The part clamping setup was reviewed without major rework. Instead of a hard clamp in standard jaws, soft jaws were installed, bored to the part diameter, and made to grip more evenly. The support point was also moved so the working base no longer took the clamping imprint.
After that, the flange was sent back to inspection and then to assembly again. The dimensions stayed the same, but the rocking disappeared. The assembly became stable, and the mating part stopped shifting.
This case shows one important thing: if the base takes part in the seating, checking only the tolerance is not enough. Even three light imprints can create a real assembly risk, although the part looks acceptable at first inspection.
What to change in the clamping setup
If chuck marks on a finished base are already out of tolerance or create tilt during setup, the cutting mode is not what needs changing first. The part holding setup itself needs to be changed. The problem is often simple: the jaws are pressing exactly where a precise support is needed later in assembly.
The first solution is almost always the most useful: move the clamping off the finished base and onto the stock allowance or a separate machining land. Even a 2-3 mm special clamping zone often solves the problem better than long trial-and-error with force. If that land can be removed in the next operation, the base stays clean and predictable.
Soft jaws also help a lot when the part is thin-walled, short, or has an awkward profile. They are bored to the shape of the part, so the contact is not a narrow line but a wider surface. Pressure is spread more evenly, and the risk of dents drops sharply.
What is changed in practice
- Move the clamping point to stock, a collar, or a temporary land.
- Use soft jaws instead of standard hard jaws.
- Reduce clamping force and check whether the part still stays put during cutting.
- Separate rough and finish clamping into different operations.
- Use a mandrel, collet, or support ring if the part shape allows it.
Reducing force does not always work, but it should be checked. In shops, parts are often clamped "with margin," and then dents, ovality, or datum shift appear. It is better to start with less force and check whether the part actually holds under cutting load, not just a theoretical worst-case load.
A useful method is to separate rough and finish clamping. During rough machining, the part can be held more firmly and on less important surfaces. Then it moves to another setup where the finished base is no longer touched by the jaws.
For bushings, rings, and thin cups, an internal mandrel or collet often works better. For flanges and disks, a support ring helps: it removes some deformation and keeps the part from "sinking" under jaw force.
If you are running a batch, do not change everything at once. First move the clamping zone, then test soft jaws, and only then adjust the force. That makes it easier to see which change removed the assembly risk and which one only changed the chuck mark.
The most common mistakes
Chuck marks on a finished base are often underestimated because the dimension may still fall within tolerance during inspection. But assembly does not live by size alone. If the base rests on separate points instead of a full plane or contact band, the part starts to seat crooked.
The first mistake is simple: people check diameter, height, or runout and never verify the actual seating. On paper the part is fine, but in the assembly it rocks, shifts along the axis, or needs extra force to seat. The finished base should provide support, not just pass the numbers.
The second mistake is just as common. One part is checked after setup, everything assembles fine, and the batch starts. That is not enough to judge assembly risk. You need repeatability on at least a small set, because mark depth changes with jaw wear, chips, stock variation, and heat.
When the part starts to move, many operators immediately increase clamping force. That is understandable, but it usually makes things worse. The mark gets deeper, the thin wall shifts, and after release the geometry drifts even more. If the part is creeping, the clamping setup is usually at fault: not enough grip length, the wrong support shape, the wrong soft jaws, or an overly aggressive mode.
Another mistake comes from convenience. The finished base is placed under the jaws because it is faster and easier to set up. As long as stock is even, the problem may not show up. As soon as a blank batch with variation arrives, one jaw leaves a deeper mark than the others, and assembly becomes a lottery.
Worst of all is trying to fix the problem at assembly. The joint does not seat, and the fitter simply pulls it down harder with the bolts. That does not correct the base; it bends the mating parts and adds stress to the joint. In the shop that might still pass, but at the customer’s site the assembly can start behaving unpredictably.
Usually a short check helps:
- look at the contact patch, not only the dimension;
- compare several parts in a row, not just one;
- check the mark under the real clamping force;
- see whether the finished base can be moved out of the jaw zone;
- judge whether soft jaws will help or a different setup is needed.
If the base was put under the jaws for convenience, that is almost always a bad trade. It is far cheaper to change the part clamping setup before production than to pull the assembly into shape with extra tightening and then deal with returns.
Quick check before the run
Before launching a batch, it is better to spend 15 minutes on a quick check than later untangle misalignment at assembly. If the trial part already has chuck marks on the finished base, do not focus only on the fact that the mark is there. Look at where it is, how deep it is, and whether it repeats.
The simplest approach is to take the first 3-5 parts from one setup and check them using the same scenario. That quickly shows whether the imprint is random or a systematic part clamping issue.
Check five things.
- Chuck marks must not land in the zone where the part later actually rests in the fixture or in the assembly.
- The trial assembly should go together without tilt, without bolt pulling, and without trying to "draw" the part into place.
- After re-clamping, runout must stay within tolerance. If it grows noticeably, the base is already unstable.
- Inspection should look at more than the drawing dimension: it should also check the contact itself, whether support is even, and whether the part is hanging on a local mark.
- The setter should record which soft jaws were used, what clamping force was set, and what support scheme held the part.
One practical test often shows the problem right away. Measure the part after machining, then re-clamp it exactly as in the cycle and check runout and the base dimension again. If the numbers drift, the cause is usually not measurement but the fact that the mark changes how the base seats.
It is better to do a trial assembly on at least two parts, not just one. One may accidentally pass. The second one shows whether the result is repeatable. If you feel even slight rocking, a gap, or the part only seats with extra force, the process should not go into production yet.
This short check is more useful than arguing at the machine about whether the mark is "deep" or "normal." When you have a record of the jaws, force, and support, the cause is found quickly and without guesswork.
What to do next
If chuck marks on a finished base are already showing up on trial parts, do not leave it as a verbal note between shifts. Before production starts, the issue can still be closed calmly, without rushing or scrap.
First, lock in a safe part clamping setup in the operation sheet. You need more than a general phrase: specify which base is allowed for clamping, which soft jaws to use, what force to hold, and where the operator must check the imprint after the first part. Otherwise the next batch can easily drift into a different scenario.
Save the results of the first check. It is best to take the mark photo from the same angle and under the same light so the parts can be compared later. If there was a trial assembly, write down the result immediately: the part seated without force, needed fitting, or already showed tilt.
A short data set usually settles the argument faster than any discussion on the shop floor:
- a photo of the mark on the part
- the operation number and clamping method
- the jaw type and clamping force
- the result of the trial fit or assembly
This archive is not for reporting; it is for repeatability. A few days later memory can fail, but the photo and the note in the operation sheet remain.
If the assembly risk is still there, discuss not only the mark itself but the whole setup: tooling, sequence of operations, intermediate datum, jaw shape, and the machine itself. Sometimes the problem disappears after jaw rework, and sometimes it comes down to the rigidity of the setup or how the machine holds repeatability in a run.
For these tasks, it helps to talk to people who see the whole process, not just one part. EAST CNC supplies CNC lathes and helps with selection, commissioning, and service, so during batch preparation you can check in advance whether the current clamping setup will work or whether the tooling and approach should be changed.
Before the run starts, you should have an operation sheet with an approved clamping setup, a photo of the acceptable mark, and a clear result from the trial assembly. If any of that is missing, the batch is not ready.