Chuck Hydraulic System Pressure: Why Clamping Fluctuates
Chuck hydraulic system pressure fluctuates because of leaks, air, oil, and settings. We break down checks to make before changing jaws and common mistakes.
Why clamping starts to fluctuate
When the chuck hydraulic system pressure drops, clamping force drops too. The chuck still holds the part, but without any reserve. On a light pass, this can sometimes go unnoticed. On roughing, interrupted cuts, and long workpieces, the problem shows up quickly.
At first, the shift may be small. The part turns slightly in the jaws or moves along the axis by fractions of a millimeter. That is already enough for the size to drift. If the program is stable but the result changes from one identical part to the next, the cause is often not the cutting parameters, but the pressure.
The signs usually show up in two places right away: on the part surface and in the dimensions. The surface starts tearing, roughness becomes uneven, and shiny arcs or dark spots appear in the contact zone. The size tells a familiar story too: the diameter is sometimes within tolerance, sometimes out, the face shifts, and runout increases after re-clamping.
This is especially easy to see on a shaft or bushing. The first part comes out fine, the second starts to taper, and by the third you can see that the blank is sitting in the jaws differently than it was at the start of the shift. At that point, it is easy to blame the jaws and waste time.
The picture usually looks like this:
- the size drifts from part to part with the same settings;
- after heavier stock removal, the part sits in the chuck differently;
- slip marks remain on the clamping surface;
- runout increases after re-clamping.
Weak clamping affects more than accuracy. The part can slip during cutting, ruin the finish, break the insert, and damage the jaws. In a serious case, the workpiece can come loose. That becomes a risk for both the machine and the people nearby.
That is why, when clamping starts to fluctuate, the first thing to check is pressure loss and leaks. The jaws and the mechanics are checked after that.
How to tell a pressure problem from jaw wear
If the part sometimes holds straight and sometimes shifts by a few hundredths for no clear reason, look at the hydraulics first. Jaw wear usually creates a repeatable error. The part shifts about the same way each time, the contact mark is easy to read, and runout changes very little after each clamp. A pressure problem behaves differently: one clamp is normal, the next is weaker.
There is a simple rule of thumb. If the error gets worse after warm-up, after several clamping cycles in a row, or under heavy cutting, it is more likely to be pressure-related. If the part always seats crooked in the same position, the jaws, mounting surfaces, or chuck mechanics are more likely to blame.
The contact mark is useful too. With jaw wear, it usually repeats. With fluctuating pressure, the marks vary: one time the part sits deeper, another time shallower, the mark on the jaws is uneven, and runout can change noticeably after re-clamping.
If you are unsure, do not take the chuck apart right away. First check the gauge through several identical cycles and compare cold and warmed-up machine behavior. This quick check usually shows which direction to investigate.
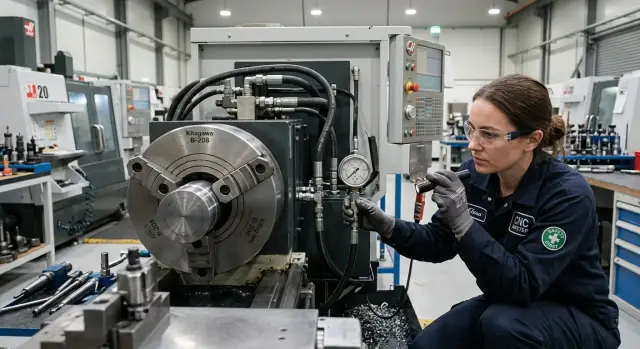
What to check in 10 minutes before changing the jaws
Before replacing the jaws, do a short check. If the pressure is fluctuating, new jaws will not solve the problem.
Start with the basics:
- Check the oil level and condition. Dark oil, foam, and a cloudy appearance often point to overheating, air intake, or old fluid.
- Note the gauge reading before clamping, during clamping, and 30-60 seconds later. If the needle drops, look for pressure loss.
- Inspect the hoses, fittings, and cylinder area. Even a thin oil film on a connection is enough to suggest a leak.
- Listen to the pump. A steady sound is normal. Humming, surging, and short drops often go with unstable supply.
- Compare cold and warmed-up machine behavior. If everything is fine in the morning but clamping force drops later, the cause may be the oil, seals, or heat in the assembly.
It is better to watch the gauge in a series, not just once. Clamp the same part three times in a row and write down the readings. If the spread is noticeable, changing the jaws is almost certainly too early.
Also check the cylinder area behind the spindle. A small seep there is easy to miss, but it is enough to reduce force under load.
Where pressure is lost most often
If the chuck hydraulic system pressure does not drop all at once but slowly, do not look only for an obvious leak. Often the system is just lightly sweating oil, and that is already enough for clamping to change from cycle to cycle.
First inspect the fittings and threaded joints on the hydraulic line. They often loosen after vibration, repair work, or careless assembly. Look for the sign not as a puddle on the floor, but as a thin wet ring of oil around the threads.
Then move on to the hoses. Old braid, small cracks, bulges, and stiff bends usually mean the hose is near the end of its life. Under load, it can expand slightly, and the gauge will show that as fluctuating pressure.
The next area is the seals in the chuck hydraulic cylinder. If oil is escaping there, the system loses pressure even without a visible external leak. That is usually where dust and fine chips stick first.
Do not forget the valve, distributor, and the gauge itself. A valve can stick, the distributor can leak internally, and sometimes the gauge is simply wrong. If the needle jumps or the readings are not repeatable, check not only the line but also the instrument.
A simple rule works almost every time: where oil collects dust and dirt, there is already a reason to inspect. A few minutes spent on this check often saves an entire shift.
How to look for leaks step by step
It is better to search for a leak starting with the oil, not the jaws. If old residue sits on the components, a fresh trace is hard to see. First wipe down the hydraulic unit, hoses, fittings, distributor, rotary union, and the chuck cylinder itself. After cleaning, any new film will show where the oil is coming from now.
Next, set a baseline. At idle, record the chuck hydraulic system pressure on a cold machine. Watch not only the number, but also the needle behavior. If it slowly drifts down even when nothing is happening, the problem is already there.
Then take the same part or a suitable blank and run 5-10 identical clamping and unclamping cycles. One cycle does not tell you much. By the fifth or tenth, you can already see whether the system is holding pressure as confidently as it did at the start.
A practical order is:
- Clean the components before checking.
- Record pressure at cold idle.
- Run a series of identical clamping cycles.
- Compare readings before and after warm-up.
- Follow the full oil path from the unit to the cylinder.
Heat often changes the picture. While the oil is cold, small leaks in the hydraulic chuck may barely show. After 15-20 minutes of work, the oil becomes thinner, and the weak spot becomes easier to see.
If everything looks dry on the outside but the pressure still drops, the leak may be internal. Most often, oil escapes through a cylinder seal, the distributor, or the check valve. In that case, changing the jaws will not help.
What else changes pressure without an obvious leak
Pressure can fluctuate even when everything outside looks dry. If clamping weakens without a visible leak, the cause is often oil, air, a filter, or a valve.
After a repair, a hose replacement, or even a simple top-up, air is often left in the system. Oil is hardly compressible, but air compresses easily. Because of that, the chuck starts to work softly: one cycle clamps normally, the next has a different force. If the circuit was opened recently, bleed the system first and check the oil level.
Old oil changes the picture too. It foams faster, holds viscosity worse, and reacts more strongly to heat. A viscosity mistake creates a similar effect: oil that is too thin on a hot machine loses pressure faster, while oil that is too thick on cold start slows the flow.
A clogged filter often looks like a more expensive failure. The pump seems to be working, but the system does not get enough flow during clamping and unclamping. Then the chuck reacts more slowly, pressure builds with a delay, and after several cycles the clamping gets weaker.
Another common cause is a sticking pressure relief valve. A little dirt, deposits in the oil, or wear on the seat prevents the valve from closing cleanly. Then pressure sometimes holds and sometimes escapes with no clear logic. On a cold machine everything may be fine, but after an hour the problem returns.
Check four things: whether there was a recent repair or oil top-up, whether behavior changes on a cold and hot machine, whether clamping and unclamping times have increased, and when the filter was last changed. If even part of that matches, it is too early to touch the jaws.
Mistakes that lead to unnecessary jaw changes
The jaws are often blamed first, even when the problem is not in them. The most common mistake is simple: the operator does not look at the gauge before disassembly. If the pressure is already fluctuating, replacing the jaws will not fix anything.
Another mistake is judging from one cycle. A machine may work normally once, but by the third or fifth cycle the pressure starts to drop. That is why it is better to repeat the check several times in a row, with the same part or at least the same setup.
People often check only on a cold machine. At startup, the oil is thicker, seals behave differently, and the system may seem fine. After warm-up, the picture changes. Internal bypass can increase somewhere, or clamping force can drop.
A bad habit is tightening connections on a dirty surface. Dirt and old oil film hide the real leak point. First clean and wipe the component dry, then let it run through several cycles and only after that look for where oil appears again.
And one more thing that is often overlooked: the part itself. Slip marks, shiny bands, smeared jaw marks, and different impressions at the three clamping points sometimes tell you more than a quick look at the tooling. If the part moved in the chuck, the cause may be pressure, dirty mounting surfaces, or incorrect clamping setup.
A simple shop-floor example
On a lathe, the first parts came out fine. The size held, and there were no slip-ups. By the middle of the shift, clamping in the chuck started acting strangely: the part was not coming loose yet, but the size was drifting and the surface showed signs of weak clamping.
The operator decided the jaws were to blame. That is a common assumption when everything was fine at the start of the shift and then got worse. But the gauge showed something else. On a cold start, the chuck hydraulic system pressure was normal. After warm-up and work under load, the needle slowly started drifting down.
The mechanic did not change the jaws right away. He opened the area near the chuck hydraulic cylinder, wiped the connections, and let the machine run a little. A few minutes later, a thin wet film of oil appeared on one fitting. Not a puddle and not a major leak, just a small trace that caused the system to lose pressure after warm-up.
They tightened the fitting, replaced the seal, and checked the gauge again cold and after warm-up. The pressure stopped fluctuating, the chuck ran through a full series calmly, and the jaws stayed the same.
What to do next
If the pressure is fluctuating, do not replace the jaws at random. First collect three numbers: the actual pressure, the oil temperature, and the moment the fault appeared. Note which part it happened on, after how long of a run, and under which cutting conditions. Even a short shift log often tells you more than a one-time check at the machine.
Then use a simple routine. Record the pressure at the start of the shift, after 30-60 minutes, and at the moment the problem appears. Note the oil temperature at the same times. Compare behavior on identical parts, not on different batches. After a repair, test the clamping not with one part, but with a small series. If the size stays put across five or ten identical blanks, there are no slip marks, and pressure does not drop, then you found the cause.
Do not delay on hoses and seals. An old hose may barely leak outward, but under load it can already change volume, and a tired seal may hold only on cold oil. That is why the chuck can work normally in the morning and then start drifting again after warm-up.
If doubts remain after your own check, it is better to bring in service support. EAST CNC helps with selection, commissioning, and maintenance of metalworking equipment, including CNC machines. EAST CNC and east-cnc.kz also have a blog with practical metalworking materials, so their advice can be a useful reference for initial troubleshooting.
The bottom line is simple: measure first, then keep a short log, then check a consistent series, and only after that change the jaws or tear into the chuck mechanism.
FAQ
How do I know the clamping is fluctuating because of pressure?
Look at repeatability. If the size holds on one setup but drifts on another, and runout increases after re-clamping, check the pressure first. Another common sign is slip marks on the clamping surface, uneven roughness, and shiny arcs in the contact area between the jaws and the part.
Should I replace the jaws right away if the part goes out of size?
Usually not. If the pressure is fluctuating, new jaws will not remove the cause. First check the gauge through several identical cycles, the oil level and condition, and only then decide whether the jaws need to be changed.
How do I tell pressure loss from jaw wear?
Wear on the jaws usually creates the same error every time. The part seats crooked in almost the same way, and the contact mark repeats. A pressure problem behaves differently: one clamp is fine, the next is weaker, and the spread grows after warm-up or heavy cutting.
What should I check 10 minutes before changing the jaws?
Start with the basics. Check the oil level, look at its color, and record the gauge reading before clamping, during clamping, and after a short hold. Then inspect the hoses, fittings, and cylinder area. Even a thin oil film is already a reason to look for a leak farther along.
Where is pressure lost most often?
Most often, pressure is lost at fittings, threaded connections, hoses, and hydraulic cylinder seals. Sometimes there is no obvious leak, only a light oily film. Also check the valve, distributor, and the gauge itself. Sometimes the issue is not the line, but the instrument or the component that is holding pressure unevenly.
How do I find a leak step by step if everything looks almost dry outside?
First clean the hydraulic power unit, hoses, fittings, distributor, rotary union, and the cylinder. On a dirty component, a fresh trace is easy to miss. After that, record the pressure on a cold machine and run several identical clamping cycles. If the needle drifts down after warm-up or the readings change noticeably, look for a leak along the whole line.
Can pressure fluctuate without an obvious oil leak?
Yes, it can. Air in the system, old oil, incorrect viscosity, a clogged filter, or a pressure relief valve are often to blame. If the circuit was recently opened, a hose was replaced, or oil was added, bleed the system first and check whether the machine behaves differently when cold and hot.
What is dangerous about weak clamping besides scrap?
A weak clamp hurts quality fast. The part can shift slightly, ruin the finish, throw off the size, and break the insert. In severe cases, the workpiece can come loose from the chuck. Then you are risking not only the tooling and the machine, but also the safety of people nearby.
What mistakes most often lead to unnecessary jaw replacement?
Do not draw conclusions from a single cycle, and do not look only at a cold machine. Many problems show up after warm-up and several clamping cycles in a row. Also avoid tightening connections on a dirty surface. Clean the area first, then let the system run and watch where the oil appears again.
What should I record to find the cause faster?
Write down three things: the actual pressure, the oil temperature, and the moment the fault started. Add which part it happened on and how long the machine had already been running. Then test the same workpiece in a small series. If pressure holds on several identical parts, runout does not grow, and there are no slip marks, you are heading in the right direction.