Chip Wrap When Turning Aluminum: How to Fix It
Chip wrap during aluminum turning ruins the datum, leaves scratches, and stretches cycle time. We break down the causes, settings, geometry, and quick checks.
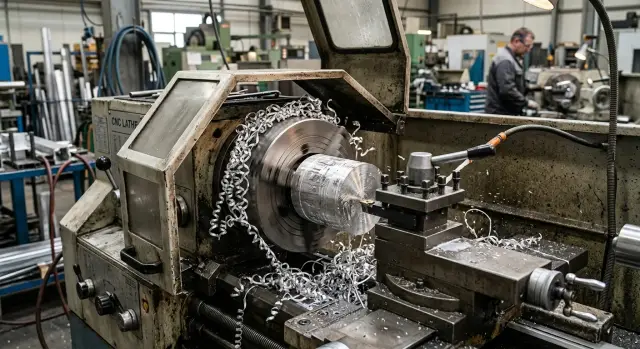
What happens when chips wrap
When turning soft aluminum alloys, the problem often looks harmless at first. The micrometer reading is still within tolerance, the tool is cutting smoothly, and the machine is not showing any alarms. But the long sticky chip is already starting to affect the datum, the part surface, and the whole pace of work.
At first, clamping suffers. Chips pack under the chuck jaws or remain on the part seating surface. The layer can be very thin, but it is enough to make the blank sit slightly differently. From the outside, this is almost impossible to see. After a reclamp or the next operation, it turns out that the datum has shifted by fractions of a millimeter, and the part starts to "drift" in runout or length.
The worst part is that the size at one cross-section may still hold. That makes it seem like everything is fine. In reality, the operator gets a part with a normal diameter but already with a compromised support point. Problems then start during re-clamping, boring, face turning, and assembly.
Then the chip starts hitting the part itself. Long curls catch on the chuck, spin with it, and whip across the surface. On aluminum, this shows up right away: scratches, matte streaks, and sometimes galling. It is especially frustrating when the finishing pass is already done and the surface gets damaged in just a few seconds afterward.
There is also hidden time loss. The operator stops the cycle more and more often, pulls off the wrap with a hook, cleans the jaws, blows out the cutting zone, and checks the seating. If this happens on every second or third part, the whole batch slows down noticeably. The loss is not in the cutting itself, but in the short 20- to 40-second stops. Over a shift, they easily add up to hours.
Chip wrap during aluminum turning should not be treated as a minor issue. Even when the size is still "alive," chips on the chuck already change the datum, damage the surface, and eat into cycle time. It is usually the first sign that the process is not fully dialed in.
Why soft aluminum produces long chips
Soft aluminum alloys cut easily, but that is exactly what creates the problem. The metal does not crumble; it stretches. Instead of short segments, you get a long ribbon, and wrapping can begin even when the part size is still within tolerance.
This material likes to deform ahead of the tool edge. The metal stretches into a thin strip and does not want to break on its own. If the feed is too low, the tool takes off too thin a layer, and the chip comes off narrow, flexible, and stringy. It does not get the bend it needs to break, so it comes off as a long ribbon.
The same thing often happens on finishing passes, when the feed is intentionally reduced for a nicer surface. On soft aluminum, that often has the opposite effect. The chip does not break, catches on the chuck, the part, or the tool, and then gets pulled back into the cutting zone and rubs the already machined surface.
Heat is another factor. Aluminum carries heat away well, but even on a thin continuous chip the edge still heats up quickly. Built-up edge starts to form. The tool loses its clean cut and begins to smear the material in places. After that, chip behavior gets even worse: part of it stretches into a ribbon, part breaks in jerks, and stripes and gouges appear on the surface.
A chipbreaker does not always save the day either. Many geometries work only within a certain feed and depth-of-cut range. If the process is too gentle, the chip simply slides along the groove and does not break. In theory, the insert is suitable for aluminum, but at that setting it is not doing what you expect.
Coolant is another separate issue. It is often aimed "toward the cutting zone" rather than directly into it. For steel, that sometimes works. For soft aluminum, even a few millimeters off can matter. The stream does not break the chip, does not wash it out of contact, and does not cool the hottest point near the edge. As a result, the long ribbon stays near the part and quickly finds something to catch on.
In practice, everything looks deceptively calm: the size is in spec, the machine is cutting, and there is no alarm. But the chips around the chuck and tool are already ruining the datum, leaving marks on the surface, and adding extra seconds to every cycle.
Where the real cause usually hides
When the part is still within tolerance, long aluminum chips can already be ruining the process. They change the support point, rub the finished surface, and force you to stop for cleanup. The cause is often not one setting, but a specific point where the first curl catches and never releases.
It is better to look not at the whole part right away, but at the spot where the wrap starts. If you do not find that spot, it is easy to start changing feed, speed, and coolant at random. Usually, one short run and an immediate inspection after stopping is enough.
The problem most often shows up in a few places:
- under the chuck jaws, where chips pack into the gap and lift the blank;
- near the machined diameter, where the first curl touches the part and starts rubbing the surface;
- on a long overhang, when the blank flexes a little and the chip does not move away;
- in the coolant delivery zone, if the stream does not carry the chip away from the cut but pushes it toward the chuck or tool;
- at a profile transition, in a groove, or at a chamfer, where the chip changes shape and starts catching.
It is also worth checking the chuck itself. Soft aluminum produces long sticky chips, and they easily pack under the jaws. From the outside, it looks like ordinary wrapping, but in reality the datum has already shifted. After that, size may hold for a few more parts, but runout increases, the surface dulls, and the chip mark appears more often.
It helps to note exactly where the wrap starts each time. If it begins in roughly the same spot, the search area gets much smaller. Then it is easier to see what is at fault: tool geometry, too much overhang, an unsuitable feed, or weak coolant flow.
How to find the source in 10 minutes
Do not wait until the chip makes a second loop around the part or the chuck. Stop the machine as soon as the first long curl appears. That is usually enough to see where the problem starts, before the chips hide the clues.
Many people lose time because they look only at the size. The part may come out within tolerance, but the long ribbon is already rubbing the jaws, filling the datum area, and catching on the surface. Then the operator removes the wrap by hand, the cycle gets longer, and the cause stays in place.
The check only takes a few minutes if you follow the steps in order.
- Stop machining as soon as the long chip appears and look at where it landed first. If the chip went straight to the chuck, look at chip flow, feed, or tool position.
- Inspect the jaws and the blank seating surface. Even a thin aluminum chip between the jaw and the part can create runout on the next clamp.
- Check the tool tip. On soft aluminum, a small built-up edge often forms. It dulls the surface, makes the chip wider, and causes wrapping faster.
- Make a short test pass, just 10-20 mm. Watch not only the sound and load, but also the chip form: does it come off as a smooth ribbon, a tight spiral, or short arcs?
- Change only one parameter at a time. First the feed, then speed, then depth of cut or coolant direction. Otherwise it will be impossible to tell what made the difference.
After each test, it helps to write down the result in a few words: "chip got shorter," "moved off the chuck," "built-up edge appeared," "surface got cleaner." A note like that is often more reliable than memory at the end of a shift.
There is a simple rule of thumb. If the chip is already hanging on the tool during a short test pass, first look at the insert for aluminum and the feed. If the cut starts clean but the wrap appears near a shoulder or at exit, check the tool path, tool runout, and coolant delivery.
Often there is more than one cause. For example, the feed is a little lower than it should be, the edge has already started to stick, and the coolant stream is missing the cutting zone. Each issue alone is still manageable. Together, they quickly lead to chips on the chuck, a dirty datum, and extra seconds on every part.
How to remove chip wrap step by step
Do not change everything at once. If chips are already wrapping around the chuck and tool, work one step at a time and watch what changes immediately. That makes it much easier to find the source instead of getting a lucky result on just one part.
First stop the machine and clear everything that has already wrapped. Chips often hide in the jaws, on the chuck face, and on the blank seating surface. The part size may still be in tolerance, but the datum is already dirty, and the next clamp is worse. That is where runout, surface marks, and extra cycle time come from.
Then follow this simple sequence:
- Clean the chuck, jaws, and seating surfaces completely. Do not leave a thin chip ribbon under the part for "later."
- Use an insert that is truly suitable for aluminum. You need a sharp geometry and a polished surface so the chip leaves more easily instead of stretching behind the tool.
- Increase the feed a little at a time and watch the chip shape after each step. Too cautious a feed when turning soft aluminum often gives a long ribbon instead of a proper break.
- Direct coolant straight to the chip evacuation point. The goal is not simply to use more coolant, but to hit the exact point where the chip separates from the tool.
- After every adjustment, check not just one part, but at least three in a row. The first one may look fine, but on the second or third part the wrap can come back.
Usually the strongest improvement comes from two things together: the right insert for aluminum and a slightly higher feed. Many people do the opposite: they lower the feed to make the cut "gentler" and end up with even longer chips.
If chips are still wrapping after these steps, check the tool path. Sometimes the issue is not the settings, but where the tool leaves the cut. On a finishing pass, the chip can catch on a shoulder, a jaw, or an already machined surface and get pulled back into the cutting zone.
Do not look only at part size. What matters is a consistent cutting sound, the shape of the first chips, and a clean clamping area after three parts in a row. If the third part is just as clean as the first, the process is close to stable.
What to check on the tool and holder
Even a good setup will not save you if the edge is already worn or the tool geometry does not suit soft aluminum. In that case, the chip stretches into a long ribbon, sticks to the insert, and then catches on the part or chuck. The size may still hold, but the surface and cycle time already suffer.
Start with the simplest thing: the sharpness of the cutting edge. For aluminum, a dull insert almost always creates built-up edge. That quickly changes the real tool geometry, starts smearing the metal instead of cutting cleanly, and triggers wrapping. If there is already buildup on the edge, it is better to replace the insert rather than try to stretch it for a few more parts.
For soft alloys, a positive rake angle often works better. Such a tool enters the material more easily, cuts more freely, and is less likely to drag a long sticky chip along with it. A heavy geometry with higher cutting resistance is better suited to hard materials, and with aluminum it often creates more problems than it solves.
Another common mistake is using a universal insert without a proper shape for non-ferrous metals. If possible, try an insert with a polished chip groove for aluminum and a sharp edge. The difference can be visible on the very first part.
The holder is simpler, but these details are often missed. Reduce unnecessary overhang, check that the insert seat is clean, make sure the insert is clamped firmly, and confirm that chips are not flying straight into the jaws. Also check that the tool tip is at the correct height.
A long overhang makes the tool less rigid. Chatter starts, the edge works in jerks, and the long chip breaks in the wrong place. Then it wraps around the chuck or lays across the machined surface. From the outside, it may look like the problem is in the settings, when the holder is actually to blame.
There is a simple rule that saves a lot of time: for aluminum, the insert is often changed before obvious chipping appears. The first scratches on the surface and a stable built-up edge on the cutting edge are already enough reason. That is cheaper than a batch of scratched parts, a repeat pass, and a machine stop to remove wrapped chips.
Which cutting conditions help break chips
With chip wrapping, the cutting conditions are often just as responsible as tool geometry. The part may still come out to size, but the long ribbon still catches on the chuck, rubs the surface, and steals time through stops and cleanup.
The most common mistake is cutting the feed too much in the name of a better surface finish. On soft aluminum, that often has the opposite effect. The tool no longer cuts confidently; it drags the sticky metal into a long chip. The part may look acceptable from the outside, but after a few passes the chips crawl over the jaws and settle under the datum.
How to adjust settings without guessing
Feed and depth of cut should be considered together. If you increase feed but keep the depth too small, the chip may get a little thicker but still not break. If you only increase depth while the feed stays too low, the result is often the same.
The practical logic is simple: first raise the feed a little, then check whether the depth of cut is enough, and after that adjust the speed carefully. After each step, look not only at the numbers, but at the chip shape. Keep the setting where the chips are shorter and come off consistently.
Speed also needs balance. Too high a speed overheats the edge, aluminum sticks more, and the chip stretches into a ribbon again. Too low a speed is not good either: the cut becomes rougher and the finish can turn torn. It is usually better to avoid the extremes and find the range where the tool cuts calmly, without sticking or squealing.
Watch the chip immediately after each change. If it becomes shorter, denser, and leaves the cutting zone without wrapping, you are moving in the right direction. If the ribbon is still hanging on the part or hitting the chuck, do not expect the problem to disappear by itself on the next blank.
You cannot judge the process by size alone. Being within tolerance does not mean the cutting conditions are good. Wrapped chips can easily ruin the datum on the next setup, scratch the finished surface, and add extra seconds to every cycle.
In practice, two or three small changes often work better than one big one. Raise the feed a little, change the depth slightly, then move the speed carefully. For soft aluminum, this approach is usually more reliable than a sudden jump in one parameter.
Mistakes that only make things worse
When the diameter is still within tolerance, it seems like everything is under control. But in that time the long chip is already doing other damage: packing the jaws, scratching the surface, catching on the tool, and adding extra seconds to every cycle.
Worst of all, many normal operator reactions have the opposite effect. The problem does not disappear; it just moves somewhere else. First the chip hangs on the tool, then it moves to the chuck, then it gets under the part datum.
A common mistake is to keep using an old insert for too long. Aluminum cuts easily, so wear is not always obvious at first glance. But the edge quickly loses sharpness, starts to smear the metal, and the chip stretches into a long ribbon. The size may still be fine, but the surface is already turning dull.
The second mistake is trying to solve everything with one speed change. The operator raises the spindle speed or, on the contrary, drags it down almost to the minimum and expects the chip to start breaking. For soft alloys, that rarely helps. If the feed is too low and the cut is too light, the tool does not cut confidently and does not break the chip. It smooths the material more than it removes it.
The same goes for finishing passes. When the allowance is made very small and the feed is low, the chip comes off long and sticky. Roughing may still look acceptable, but on finishing the chuck quickly becomes covered with a ribbon.
Another typical mistake is aiming the coolant nearby instead of into the cutting zone itself. Then the fluid cools the air, not the edge or the chip. The chip stays soft, stretches farther, and loves to catch on the tool.
The chuck is also often underestimated. If the jaws are only cleaned at the end of the shift, fine chips and aluminum dust have time to pack into the seating areas. After that, the part sits slightly differently, the datum is no longer the same, and the issue looks like random variation.
Usually several small things make the process worse at once: the insert is already dull, but it is left in for "a couple more parts"; the same setting is used for roughing and finishing; the coolant stream is aimed away from the edge; the jaws are not blown out between batches; and the finishing feed is set too low. Each one seems minor on its own. Together, they quickly destabilize the process.
A simple shop-floor example
A shaft made of a soft aluminum alloy was being turned on one station. After the roughing pass, the size was fine, runout was within tolerance, and at first it seemed like the process was already set up. The problem showed up on the finishing pass: the long chip would not break and lay directly onto the chuck jaws.
From the outside, the part looked almost normal. The diameter often stayed on size, so at first the operator thought these were random glitches. But after a few parts, another pattern became clear: chips were packing between the jaw and the blank, and the next part was being clamped on a different datum.
The losses showed up in several places at once. The surface got scratches because the chip dragged along the part. The operator stopped the machine and removed the wrap from the chuck and tool. Cycle time increased, even though the first size check might not have shown anything wrong.
Instead of a major rework of the setup, they started with two clear steps: they slightly increased the feed on the finishing pass and replaced the insert that was pulling a long ribbon. In its place, they fitted an aluminum insert with a sharper geometry and a polished chip groove.
The feed was raised only a little, for example from 0.08 to 0.12 mm/rev. That was enough to make the chip shorter and stop it from laying a continuous ribbon across the jaws. After changing the insert, the surface scratches went away as well: the tool started cutting cleanly again instead of rubbing the metal.
The result was very practical, and that is exactly what matters on the shop floor. There were fewer stops, the chuck no longer needed cleaning every few parts, and the datum became repeatable again. The size had been close to correct before, but only after those changes did the process stop failing for no good reason.
What to check before starting a batch and what to do next
Before a batch starts, make one trial run and look at more than just the size. A part may be within tolerance, but wrapped chips can still ruin the datum, leave marks on the surface, and add extra seconds to every cycle.
Before releasing a batch, it helps to check five things:
- chips should come off in short pieces, not long ribbons;
- there should be no sticky aluminum chips on the jaws;
- the datum should be clean, with no crumbs or fine debris;
- the surface after the pass should be even, with no signs of a second cut;
- cycle time should be stable, with no manual cleaning stops.
If even one item fails, do not launch the whole batch and hope for the best. On the first ten parts, the loss seems small. On a hundred parts, it becomes hours of lost time, datum-related scrap, and repeat inspection of dimensions.
It is useful to set a simple setup rule: check the jaws after the first part, the datum after the third, and the surface plus actual cycle time after the fifth. This short control quickly shows whether the issue has disappeared or just become less visible.
If the wrap comes back, recheck insert geometry, feed, speed, and coolant delivery. Sometimes the cause is not one setting, but a combination: a process that is too soft, poor chip evacuation, and coolant aimed away from the cutting zone.
In such cases, an outside perspective helps. EAST CNC supplies CNC lathes for metalworking and helps with selection, commissioning, and service support, so these problems are usually reviewed across the whole process chain rather than by one symptom alone. If the issue keeps repeating, it makes sense to compare the tooling, settings, and machining layout against practical experience instead of burning through a batch on guesswork.
FAQ
Why do chips wrap around the chuck and tool when turning aluminum?
Because soft aluminum forms long, stringy chips instead of breaking into short pieces. The usual causes are feed that is too low, an unsuitable insert, built-up edge on the cutting edge, and a coolant stream aimed away from the cutting zone.
Why is chip wrap a problem if the part size is still correct?
The danger is that chips can shift the datum before the size goes out of tolerance. They pack under the jaws, scratch the finished surface, and force the cycle to stop for cleaning, so the whole batch becomes less stable.
Where should I start looking for the cause?
As soon as the first long chip appears, stop the machine and see where it lands first. If it goes onto the chuck, check chip flow, feed, and tool position. If the chip starts at a shoulder or on exit, look at the tool path and coolant delivery.
Which setting should I change first?
Usually you increase the feed a little first and watch the chip shape. If the chip is still long, then check depth of cut, and only after that adjust speed carefully. Change one parameter at a time, or you will not know what worked.
Do I need a special insert for aluminum?
Yes, for soft aluminum this often solves half the problem. A sharp insert with aluminum geometry and a polished chipbreaker cuts cleaner, pulls less material, and moves chips away from the part more effectively.
How do I know when the insert is getting in the way?
Watch the cutting edge and the part surface. If a built-up edge appears, the surface turns dull, and the chip becomes a wide sticky ribbon, it is better to replace the insert right away instead of trying to get a few more parts out of it.
How should coolant be aimed so chips do not stick?
Aim the coolant stream not just nearby, but directly at the point where the chip leaves the tool. That way the coolant cools the edge, washes chips out of contact, and keeps them from laying on the chuck or back onto the part.
Why does chip wrap happen more often on finishing passes?
Because on finishing passes people often reduce feed too much and take a very thin cut. For soft aluminum, that setup is often worse than roughing: the chip does not break and instead stretches into a ribbon that rubs the finished surface.
When should I stop the machine and clean the chuck?
Clean it immediately as soon as chips start hitting the jaws or sitting under the part. If you wait, the chuck will clamp on a dirty datum, and you will get runout, surface marks, and extra time on every next cycle.
What should I check before starting a production run?
Make a trial pass and look at more than just the size. Chips should come off in short pieces, the jaws should stay clean, the surface should be free of scratches, and the cycle should run without manual stops. If even one of these does not hold for several parts in a row, do not start the batch yet.