Chip removal system: what to check before signing a contract
The chip removal system affects cleanliness, downtime and ease of maintenance. We explain what to check in the conveyor, collection box and cleaning access.
Why you should check the chip removal system in advance
Chips cause trouble faster than you expect. At first they simply collect in the work area, then they clog the tray, trail after the part, get under the tool and stop the cycle. One such incident easily costs 15–20 minutes. Over a shift that becomes a noticeable loss of time.
The problem is not just cleaning. If chips are not removed well, they return to the cutting zone, scratch surfaces and disturb steady coolant flow. That increases the risk of scrap: marks appear on parts, dimensions wander, and tools wear out faster.
In that situation the operator doesn't run the job as planned. They open the machine door, pull out tangled chips with a hook, clean the box and watch to see if the conveyor is overloaded. While doing this the machine isn't cutting metal.
The worst part is that this flaw is often noticed only after start-up. In a demo everything can look fine: short cycle, neat material, little visible chip, clean area. In a real shop the picture quickly changes, especially when parts are made in series and the material produces long chips.
That's why it's better to check chip removal before signing the contract, not after delivery. If you don't discuss it up front, you'll end up with frequent stops, manual cleaning and extra costs. Reworking this part of the equipment after commissioning is usually harder and more expensive than asking the right questions from the start.
When choosing a CNC machine you look not only at the spindle, guides and column. You need to understand how chips are evacuated in a normal shift: whether the system keeps the cutting area clear, whether the box volume is enough, how easy it is to reach for cleaning, and whether long chips wrap around in narrow places.
If equipment is selected through a full-service supplier like EAST CNC, these issues should be discussed during model selection and specification. It's easier than finding a workaround in the shop when the machine should be producing parts, not piling up chips.
Which conveyor suits your parts
You can't pick conveyor type from a catalog alone. It must be matched to the chips your parts produce, the metal you're cutting and how long the machine runs without pauses. The same system behaves differently on aluminum, stainless and regular steel.
A belt conveyor usually suits applications with large, heavy or high-volume chips. It handles short brittle chips and mixes with coolant well. But with fine, thin chips some waste can miss the belt or accumulate beneath it if the design is poor.
A scraper conveyor often works better with fine and medium chips, especially when they're wet and abundant. Scrapers push the mass along the box, which is convenient under continuous load. Problems arise where chips are long and spiraled: they form dense tangles, catch on edges and slow the movement.
An auger (screw) conveyor is used where a compact solution is needed and chips are not too long. It works well with fine free-flowing chips in certain operations. But long chips tend to wrap around the screw. After that the system can't evacuate waste properly and the operator spends time stopping the machine and removing the winding.
Where blockages usually start
If you turn shafts, bushings or parts made of ductile steel, chips often come out long and springy. In this regime screw and scraper systems require particularly careful checks. Look not only at conveyor type, but also at the box shape, bends, clearances and the discharge point.
It's better to ask for a check on a real part or at least on a similar material and cutting mode. If the supplier demonstrates the conveyor only with short dry chips, that demo proves little.
A proper check usually looks like this:
- take a part close to yours by material and geometry;
- see what chips appear at normal feed, not in a gentle demo mode;
- check for winding, bridging and hang-ups in the box;
- evaluate how quickly the system clears the cutting area.
This is not a minor detail. The wrong conveyor wastes time every day. The right one simply removes chips and doesn't interfere with work.
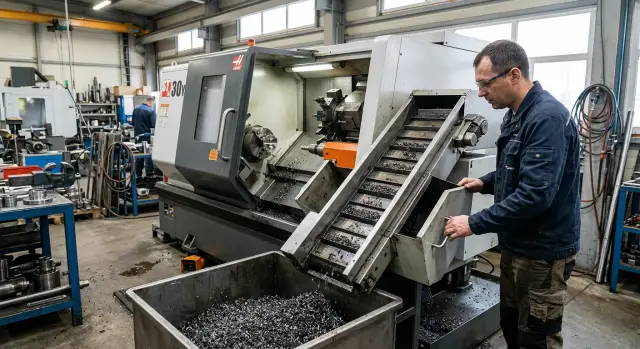
What to check in the box and along the discharge path
Boxes are often judged by photos, and then you get extra stops. Look at how chips flow through the channel and where they end up by the end of a shift — not just the overall appearance.
First check the channel width and the exit angle. If the channel is narrow, long or tangled chips form a knot before the box. If the angle is too shallow, chips won't slide off and will cling to the walls. This is common on lathes cutting ductile steel.
Calculate the box volume for your shift, not by eye. If the machine runs 8–10 hours without long pauses, a small box fills quickly. Then the operator spends more time removing chips than checking parts. A little extra volume saves many short stops.
Ask the supplier direct questions:
- how much chip volume the box accepts per shift on similar parts;
- how often an operator empties the box in normal work;
- exactly where chips discharge after the conveyor;
- whether there's a clear path for a cart or forklift.
The discharge path is often overlooked, though it affects the whole cell. If chips fall to the side and a neighbor is close, the operator will be cramped. If the box slides out to the rear and the machine will be placed near a wall, emptying becomes awkward. On a layout drawing this may look acceptable; in the shop it becomes annoying every day.
Ask to see the discharge on a running machine, not an empty one. Then you can see whether some chips fly past the box, snag on the edge, or whether there's enough room for safe removal. If the machine is selected for your cell through EAST CNC, it's worth discussing placement and the chip removal route before installation.
A sign of a good solution is simple: the operator approaches the box without extra moves, empties chips quickly and doesn't block the passage. If you need to move containers, open extra zones or walk around the machine, that's already a problem.
How convenient the system is to clean
Convenience of cleaning isn't visible in a catalog, but in how many extra moves the operator makes in a normal shift. A neat exterior guarantees nothing. What matters is whether you can reach dirty spots quickly, without removing half the assembly or stopping the machine for a long time.
Start with lids and protective panels. A good sign is that access opens with a couple of simple actions. A bad sign is when you must remove a hose, unscrew a neighboring cover or take out a tray that blocks access. Small inconveniences turn into constant time loss.
Then check by hand where you can actually reach. Chips often gather in unexpected places: corners of the box, at transitions, near scrapers and around drains. If a person can't reach those spots with a gloved hand or a standard hook, the area will clog quickly. That increases the risk of coolant overflow and unscheduled stops.
Also check access to the pump, filter and sump. The pump shouldn't be hidden so deep you need a flashlight. The filter must be removable without fiddling with many fasteners. The sump should slide out or open so it can be rinsed in one go, not cleaned in pieces.
At a demo ask not only to open the cover but to show a full routine cleaning. That's a reasonable request: open lids, remove the filter, show the sump and put everything back. A short operation like that reveals a lot.
Clarify four things:
- how many minutes a normal end-of-shift cleaning takes;
- what the operator removes first and what blocks access;
- where chips most often remain after work;
- how often the pump and filter are cleaned with your parts.
If the manager or technician answers vaguely, that's a bad sign. Convenient cleaning is usually obvious right away. When access is well thought out, an operator spends about 10–20 minutes on cleaning, not an hour with a screwdriver and a bucket.
How long chips behave in operation
Long chips rarely create a single small issue. They typically affect the whole cycle: catch on the tool, wrap around the chuck, clog gutters and force the operator to stop the machine more often for manual cleaning. This is especially visible with ductile steels and stainless.
If the supplier shows the machine only with short dry chips, that demo shows little. You need an example on material similar to yours: the same steel, comparable feed and depth of cut. Otherwise you can buy a machine that looks fine on paper but gives trouble in the shop on the first shift.
Don't look only at the conveyor. Watch how chips fall into the collection area and leave the work zone. If gutters are narrow, the angle is poor or there are sharp transitions, long coils get stuck and form dense knots. That then blocks the flow of new chips and the operator cleans everything by hand.
A useful question for the supplier is simple: how does this machine behave on stainless and ductile steels, not on an easy demo blank. A good answer is backed by a real example, not vague phrases. Even better if they can show work on a similar part or at least a close cutting profile.
Also check whether long chips wrap on the tool and chuck. This becomes visible after just a few passes. If coils remain near the cutting zone they scratch the surface, interfere with coolant delivery and sometimes destabilize the process. In that case even a good conveyor won't help because the problem starts before chips reach the box.
A short honest test is often more useful than a long contractual description. After it you quickly understand whether the machine will run quietly or demand constant operator attention.
How to check the system before signing the contract
Start from your parts, not the machine. The same conveyor can run fine on short chips from cast iron and fail on ductile steel, stainless or aluminum. If you skip this step, manual cleaning later will be more than you expected.
Follow a short checklist:
- Make a list of materials and typical parts. Include not only the metal but processing type: roughing or finishing, deep drilling, long passes, small runs or nearly continuous cycles.
- Match that list to conveyor type and box volume. If you often get long chips, ask to see how the system handles them without winding and hang-ups.
- Ask to see cleaning access. Check hatches, removable panels, zones under the conveyor, filters and places where chips usually gather.
- Discuss discharge and removal before the contract. Clarify how often cleaning is needed, what container volume is required and what happens with long drain chips.
- Clarify who will be responsible for start-up and setup: the supplier's engineer, the service team or your staff after instruction.
After the demo ask a simple question: what will the operator do manually in a normal shift and how long does it take? If the answer is clear, the supplier understands how the machine behaves in real work. If you get generalities, dig deeper.
Mistakes that cost dearly
When choosing a CNC many focus on power, travels, spindle and turret. That's natural: those figures are obvious. But chip evacuation often moves to the background and later causes downtime, extra cleaning and operator complaints in the first week.
The first common mistake is nobody counts how much chip the machine will produce per shift. One part may produce little, but in series the box fills fast. If box volume is too small, the operator stops the machine more often to empty it and chips start gathering where you don't want them.
The second mistake is trusting the catalog. Buyers see that a conveyor is included and assume the issue is solved. But the same conveyor type behaves differently with fine dusty chips, short brittle chips and long spirals. Results differ on aluminum, stainless and carbon steel.
Frequently costly oversights include:
- selecting a conveyor by picture rather than for the actual chip type;
- not checking zones where fine chips collect and access for cleaning;
- not asking how much the box holds before regular unloading;
- not requesting a test on your material;
- not checking what long chips do during a continuous cut after 20–30 minutes.
Also inspect hidden cavities. If they are hard to reach with a brush, hook or a gloved hand, dirt will accumulate constantly. Then cleaning time grows, chips return to the work area and coolant carries fine particles through the whole system.
With long chips the list of mistakes grows. A short demo can look fine while in real parts coils start wrapping, catching on edges and forming lumps at the discharge window. So discuss the test specifically on the operation that produces the heaviest chips.
If the supplier handles selection, commissioning and service, resolve these points before the contract. After launch changing the chip evacuation scheme is noticeably harder and more expensive.
A simple shop example
In a small shop in Kazakhstan they turned long steel shafts in small series. The part was simple but chips came out long and springy, so the production rhythm quickly broke.
At first run everything looked fine only at the start of the shift. Then long chips began to collect in a narrow channel, catch on edges and pile up at the exit. The conveyor technically worked, but it evacuated unevenly.
As a result the box filled poorly. Some chips stayed inside, some hung at the outlet, and the operator had to stop the machine more often for cleaning. Each pause was short, but over a shift the lost time added up.
The worst part was access. The operator pulled long ribbons of chips with a hook, checked corners and cleaned spots that a hand couldn't reach easily. Routine machine cleaning turned into repetitive manual work.
The shop then changed the configuration: they installed a conveyor that handles long chips more calmly, increased the box volume and improved cleaning access. The machine didn't cut faster, but downtime dropped noticeably. It was visible per shift.
This example shows a simple fact: chip removal may seem minor when choosing a machine, especially if you only look at specs and price. In practice this unit often determines whether the machine will run a series smoothly or spend time on cleaning.
What to check before deciding
Before signing, go through this short list:
- does the conveyor type match your material and chip shape;
- is the box volume sufficient for your work rhythm;
- can you quickly reach cleaning zones without extensive disassembly;
- how do long chips pass bends, drops and the discharge point;
- who will commission the machine, train staff and handle service after delivery.
If the supplier avoids these questions, that's a bad sign. A proper discussion starts from your parts, material, cutting modes and actual chip volume per shift.
If you already have drawings or a clear list of materials, discuss these points in detail with EAST CNC specialists. One focused conversation before signing usually costs far less than daily battles with a clogged conveyor after launch.
FAQ
Why is it better to check the chip removal system before purchase?
Check it before signing. After delivery you're tied to the machine layout, and any rework costs more in money and downtime. If the system fails to evacuate chips properly, you get manual cleaning, stops and extra wear from the very first shift.
How do I know the conveyor doesn't fit my parts?
Look at your chips, not the catalog picture. If the material produces long spirals and the box has narrow spots, turns or low volume, the conveyor will clog and the operator will stop the machine often.
Which conveyor handles long chips best?
There is no single universal solution for long chips. First request a test on a similar material and cutting mode, then check whether chips wrap, form lumps, or whether the system clears the cutting area without manual help.
What should I look for in the chip box?
Don't judge by overall dimensions only. Check how much chip volume the box actually accepts per shift, whether it overflows early, and whether it can be emptied without awkward maneuvers around the machine.
How to properly test the system at the supplier?
Ask for a short realistic test on a part close to yours. Have the supplier run in normal cutting mode, show the conveyor under load, the chip path to the box and a full cleaning cycle — not just an open cover on an idle machine.
How to assess ease of cleaning?
Open everything an operator would use in a shift. Check lids, filter, pump, tray and corners where chips tend to gather. If removal requires a lot of disassembly or the operator can't reach dirty spots, cleaning will be a constant problem.
Why are long chips dangerous in everyday work?
Long chips cause multiple problems at once. They catch on the tool and chuck, scratch the part, disrupt coolant flow and block channels. The result: less cutting time and more manual cleaning.
How to check that chip discharge won't interfere with the workshop?
Compare the machine layout with your shop immediately. Find out where chips fall after the conveyor, whether there's room for a cart or forklift, and whether the box will hit a wall or a neighboring machine.
Who should be responsible for setting up chip removal at startup?
It's best to fix this with the supplier upfront. An engineer or service team should commission the machine, check the conveyor, explain cleaning and show what the operator does manually in a normal shift. Otherwise small issues will remain your team's burden.
What mistakes are most costly when choosing a chip removal system?
Common mistakes: choosing the conveyor by image and not for real chip type; failing to estimate chip volume per shift; accepting a short demo on an easy material and not testing your actual parts. These lead to daily stops and extra labor.