Built-up Edge When Machining Aluminum
Built-up edge when machining aluminum is often linked to insert geometry, cutting parameters and coolant. Practical, no-nonsense tips to prevent and fix it.
Why a built-up edge appears
The material sticking to the insert isn’t dirt or random chips. It’s particles of the aluminum itself. Under pressure and heat they adhere to the rake face and cutting edge. At first the layer may be barely visible, but even a thin deposit quickly changes the tool’s behavior.
Aluminum looks soft and easy to machine, and that’s the problem. It deforms easily, smears across the edge and clings to it—especially when the tool isn’t cutting decisively. The machine can run smoothly with no vibration, but the metal in the cutting zone already behaves sticky.
Usually it starts with excess friction. The tool no longer shears the material cleanly but partially presses and rubs it. Contact temperature rises, aluminum becomes more plastic, and a built-up edge forms. That layer then holds on or tears away in chunks, making the process unstable.
Most often, buildup comes from a dull or wrong edge, an overly cautious cutting mode, poor heat removal, bad chip evacuation and extra friction between chip and insert. These causes usually occur together rather than alone.
The worst part is that the deposit almost never stays the same. It grows unevenly, changing the actual tool geometry and making the insert behave like a different one. Part dimensions can drift even on identical passes.
Surface finish changes quickly too. Instead of a clean mark you get snags, matte areas and an irregular shine. Operators often look for causes in the chuck, runout or the blank, while the source sits right on the edge.
Tool life drops the same way. When a piece of build-up breaks off it often takes a micro-chip from the cutting edge with it. The insert keeps cutting but worse, heats faster and picks up more aluminum—creating a cycle: build-up, break-off, damage, repeat.
It’s not that aluminum is “bad.” The problem appears when metal sticks to the tool faster than the tool can shear it cleanly.
How to spot the problem in the first minutes
Build-up rarely appears completely out of nowhere. It usually gives several early signs already on the first trial pass, when the surface can still be saved without scrap.
Start by looking at the tool trace. After a proper cut, aluminum shows an even, bright finish. If you see a matte strip, smeared areas, or a surface that looks dragged, the metal is already starting to cling to the edge.
Check the chips next. In stable cutting they come out predictably and don’t hang as sticky ribbons around the part. If chips become long, gummy, catch on the toolholder or wind onto the chuck, the process is already going bad. This often appears before the dimension goes out of tolerance.
The sound changes quickly too. Instead of a steady hiss you hear a coarser, heavier cut and spindle load rises. On a CNC lathe this is often visible in the current or load indicators: the pass is the same but effort increased for no clear reason.
After the first stop, inspect the insert. You’ll often see a bright shiny spot or a small lump of aluminum on the cutting edge. It can be tiny, but that’s enough for the next pass to run with a different edge geometry.
Dimensions usually drift after a few parts. The first may still be within tolerance, the second near the limit, and then diameter or length begins to wander. If size drifts after 2–3 parts with no adjustments made, check the insert for build-up before dialing offsets.
A simple rule: in the first 10 minutes after startup check three things—surface, chips and edge. This control takes a couple of minutes and often saves a whole batch.
How to adjust the process step by step
Start with the insert that was in use. If the edge shows a chip, deformation or old build-up, don’t try to squeeze one more part out of it. Even a small defect quickly spawns new build-up, and then you fight consequences instead of the cause.
Next clarify two things: which aluminum alloy you have and what the tool is doing. Roughing, finishing, facing and boring behave differently. A soft, gummy alloy builds up faster than a harder one, so using the same settings for every part almost always creates trouble.
A practical order works well. First fit a sharp insert made for aluminum. Then check whether speed is too low. After that look at feed: if feed is too small the tool starts rubbing the material. Next evaluate the setup rigidity and tool overhang. Finally verify coolant feed and nozzle direction.
Mistakes often come in pairs. For example, an operator may install a sharp insert but keep speed low and feed cautious. It looks safe, but cutting becomes rubbing. After a few minutes the edge drags aluminum, the surface dulls and size starts to wander.
A working approach is simple: change one parameter at a time and watch chips, sound and surface immediately. If raising speed and using a proper feed make chips run truer and the edge stay clean after the first passes, you’re on the right track. If not, recheck the insert and coolant rather than only the program numbers.
Which insert geometry works best
Aluminum prefers a sharp, light geometry. If the edge presses the material instead of cutting it, buildup appears very fast. Therefore aluminum inserts are usually noticeably sharper than those for steel.
First check edge bluntness. Heavy chamfering or protective hone may suit other tasks, but on aluminum they often cause extra friction. Material then smears across the rake, heats up and welds to the edge. For clean machining a sharp edge without an excessive “safety” margin works better.
A polished rake face helps. Chips slide off it more easily and catch less on micro-roughness. The difference is visible on the first passes: chips flow more evenly, the surface is cleaner and the edge stays free of deposits longer.
Rake angle matters too. A positive geometry cuts more gently, reduces cutting forces and heats the contact zone less. On turning this is especially noticeable on thin-walled parts: the tool pulls less on the blank and aluminum is less likely to cling to the edge.
A coarse chipbreaker designed for steel often only interferes here. It breaks chips too aggressively and creates extra pressure near the edge, leading the insert to rub. For aluminum choose a geometry with a freer chip evacuation channel.
Even the right insert won’t help if the tool sticks out too far from the holder. Long overhang adds vibration, and vibration accelerates build-up. A rigid holder and minimal overhang sometimes have an effect comparable to replacing the insert.
Before startup quickly check: the edge must be sharp with no matte strip, chips or old build-up; no heavy hone; a smooth rake face; positive geometry; chipbreaker suited for aluminum; and overhang kept to a minimum.
If build-up decreased only partially after changing geometry, don’t blame the material immediately. Often the remaining issue is weak setup rigidity or an insert chosen by habit rather than for the specific task.
How cutting parameters affect build-up
Speed and feed dramatically change aluminum’s behavior. If speed is too low, metal doesn’t shear cleanly but smears across the rake and clings to the edge. That creates build-up, noise, a matte surface and dimensional jumps.
Feed tells a similar story. Very low feed looks cautious, but in reality the cutter rubs more than cuts. The edge heats the material, aluminum sticks faster, and chips become thin and unstable. If you then jump feed up sharply, build-up may drop but surface finish can degrade. You need a working window where the tool confidently cuts the material rather than skates over it.
It’s easier to proceed in short steps. First raise speed to the point where aluminum stops smearing. Then increase feed in small increments, not one big jump. After each trial check chips, surface and the edge. When you change one parameter, keep the others constant.
This method saves time. When an operator changes both speed and feed at once, you lose the cause-and-effect. If it improves, you don’t know which change helped. If it worsens, it’s harder to go back.
How to tell that the settings are close to correct
Usually it’s obvious. Cutting sound evens out, chips aren’t dusty or sticky ribbons, and the part surface looks cleaner after the first pass. There’s less shiny deposit on the edge visible even with a quick inspection.
Keep a short log after each run: speed, feed, depth, aluminum grade, chip type and surface condition. A couple of lines in a notebook is enough. After several startups you’ll have your own working table of settings instead of guesses.
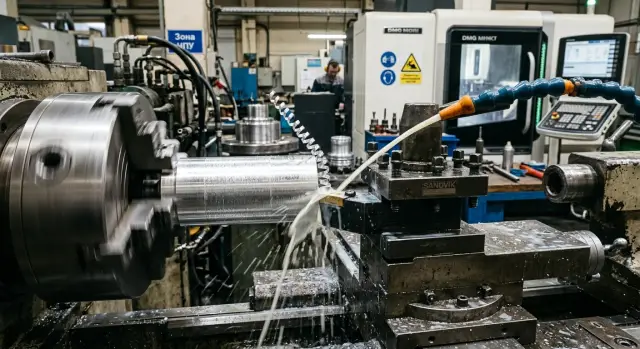
How to work with coolant without guessing
When machining aluminum the coolant must hit not “somewhere nearby” but the exact spot where chips leave the cutting edge. If the jet hits the holder, chuck or simply washes the surrounding area, coolant reaches the cutting face late and build-up returns even on normal settings.
Place the nozzle so the flow enters the cutting zone at a clear angle and doesn’t lose strength on the way. After adjustment don’t watch only the sump. Look at the cutting point itself: does the stream reach the area, does part rotation deflect it, and does chip flow block it?
Interruptions in coolant flow harm more than they seem. If the pump delivers a pulsed stream or the flow varies cycle to cycle, the edge temperature swings. That’s a common cause of build-up on aluminum. A steady, predictable flow is often better than a strong but unstable feed.
The coolant itself also needs basic discipline. Low concentration lubricates worse, and dirty fluid carries fine chips and abrasives back into the cut. A simple refractometer check and tank maintenance often help more than another try at parameter changes.
If the problem repeats, run a short checklist. Make sure the jet hits the edge. Check for drops in flow at the start or mid-cycle. Look at the coolant’s color, smell and sediment. Clean filters and the area around the tool of fine chips. And track where the coolant carries chips after contact with the part.
This last point is often missed. If coolant washes chips in a circle and returns them to the tool, the edge works in dirty conditions. On initial parts you’ll see small scratches and a matte finish instead of a clean shine.
A simple test helps. Keep the same tool and settings but correct nozzle direction, clean the filter and restore concentration. If the surface improves on the first part, the coolant was the cause.
A practical shop example
On one lathe line they machined aluminum parts in batches. The first batch ran fine, but in the second batch dimensions began to drift. The deviation was small at first, but after a few parts it became impossible to hold tolerance.
After stopping, the operator checked the insert. The edge had a noticeable sheen and chips were sticky and partly smashed. It’s a classic picture: aluminum built up, the edge cut differently, and size began to wander.
They didn’t change everything at once. First they replaced the insert with a sharper geometry for aluminum. Cutting got cleaner, but the problem didn’t disappear completely.
Next they adjusted the parameters. They raised speed and slightly increased feed so the tool would cut confidently rather than rub the material. For aluminum this often works better than trying to reduce load.
Then they redirected the coolant toward the cutting zone. Before that the stream hit nearby but not the actual contact point. When the flow was aimed correctly, chips flowed straighter and the edge stopped building up quickly.
After these changes the surface leveled out on the very first parts. Dimensions repeated from blank to blank and production ran calmer. Cases like this show a simple truth: build-up rarely goes away with a single action. Usually a combination of three steps works—sharper insert, active cutting parameters and precise coolant targeting.
Mistakes that make build-up return quickly
Build-up usually comes back not from one big mistake but from several minor choices that seem harmless. Aluminum shows it fast: a slight stickiness appears, then finish deteriorates and then size drifts.
A common error is using an insert that cuts steel well and expecting the same behavior on soft aluminum. A universal or “steel” geometry often causes extra friction. Chips run heavier, metal clings to the edge and a clean pass becomes rough.
Another typical reaction is to reduce speed right after a squeal or unpleasant sound. On aluminum this often makes things worse. The tool rubs more than it cuts, contact temperature rises and build-up accelerates. First check chips, the part trace and the edge—not just drop speed at random.
Penny-pinching on a dull insert is costly. When the edge is worn it doesn’t shear cleanly. It presses and drags the material. A few extra parts on such an insert often create scrap and afterwards you spend time resetting and reworking.
On finishing passes people often leave feed too low hoping for a better surface. In reality the tool starts to glide over the metal. For aluminum that’s bad: the edge doesn’t bite properly and build-up returns even after a successful roughing pass.
The coolant story is the same. If the emulsion lost concentration, became dirty or filters clogged, cooling and chip washing drop sharply. You might not see it immediately, but the tool notices first. Parts show snags and the edge shows a silvery aluminum film.
If a new insert produced a clean first part but the second made noise and the third looked dull, don’t expect the process to self-correct. Stop and check insert geometry, real edge sharpness, finishing feed, speed and coolant condition with filtration.
If two consecutive parts show the same build-up trace, the cause is already in the setup or the tool. It won’t go away on its own.
Quick checks before startup
Spend a couple of minutes on a short inspection before machining aluminum. Those minutes often save the insert, dimensions and surface on the first part.
- Inspect the cutting edge under good light. For aluminum the insert should be sharp, with no matte strip, chips or old build-up.
- Match the settings to the task. If feed is too low and speed is chosen with a large downward safety margin, the tool will rub more than cut.
- Check coolant flow on a dry run. The jet should hit the contact area directly.
- Evaluate chip evacuation. Chips shouldn’t wind on the chuck, holder or part.
- After the first passes measure at least 2–3 parts in a row. If dimension drifts immediately, the cause is often build-up on the edge.
Do a short trial pass and stop after 20–30 seconds. Inspect surface, chips and the insert. A clean surface, steady sound and bright chips usually mean the setup is close to working.
If you see patchy shine on the surface, chips pulling as sticky ribbons and a rasping sound, don’t continue the run. A quick pause before a series is cheaper than reworking a batch and chasing the cause after scrap.
What to do after the first trials
After the first 5–10 parts don’t immediately change everything. Compare two clear variants on a short run: one insert versus another, or two sets of parameters. This shows what really reduces build-up and what just happened to give a clean part once.
Make the comparison fair. Keep the same blank material, overhang, depth of cut and coolant. Change only one factor at a time. For example, first test a different insert geometry at the same settings, then return to the successful insert and compare two feed/speed combinations.
If one combination produced calm cutting, a smooth surface and a clean edge after a series, record it in the process card. Note not only the insert grade but the actual parameters, coolant type, feed pressure and blank material. After a month those small details are the ones most likely to be forgotten.
Even a good result should be rechecked when alloy or supplier changes. Material can look nearly the same but machine differently. Build-up often returns after such a change even if machine and tool stayed the same.
If the problem reappears, collect a short data set before the next correction: alloy and blank condition, insert type and edge wear, speed, feed and depth, coolant scheme and the moment when build-up appears. That’s usually enough to avoid arguing in guesses.
If the issue goes beyond parameters and into equipment capability, it makes sense to discuss it with the EAST CNC team. The company supplies CNC lathes, helps with selection, commissioning and service, and publishes practical shop materials in the blog at east-cnc.kz.
FAQ
What most often causes build-up on the cutting edge?
Most often a built-up edge is caused not by a single factor but by a combination of mistakes. A dull or inappropriate insert, too-low cutting speed, insufficient feed, poor chip flow and coolant missing the cutting zone quickly make aluminum stick to the edge.
How to notice the problem in the first minutes?
Watch three things from the first pass: the surface, the chips and the insert. A matte streak, long sticky chips, a rough cutting sound and a shiny lump on the insert usually mean build-up has already started.
Does lowering speed help against build-up?
It usually makes things worse. At too-low speed the tool doesn’t cut cleanly and begins to smear aluminum across the rake face, causing build-up. If you want to remove build-up, raise the speed in small steps while watching chips and surface finish.
Which insert works better for aluminum?
For aluminum, an acute insert with a positive geometry and a smooth rake face usually works best. That edge cuts the metal more cleanly and is less likely to pull aluminum along. A coarse geometry designed for steel often causes excess friction and collects build-up faster.
Why can a too-low feed make things worse?
Because with very low feed the cutter often skates over the metal instead of cutting it. The contact area heats up, aluminum becomes sticky and adheres to the edge, while surface quality drops even though the feed seems "gentle."
How to set up coolant correctly when machining aluminum?
Aim the coolant stream directly at the place where chips leave the cutting edge. If the jet hits the toolholder, chuck or just washes the surrounding area, the cutting zone receives coolant too late and build-up returns even at otherwise normal settings. Also check flow consistency, filters and concentration. A pulsing flow or dirty coolant quickly spoils the cut.
Can I continue working if a shiny deposit already appeared on the edge?
No. Stop and replace or closely inspect the insert. Even a small patch of aluminum changes the effective edge geometry, so the next pass cuts with a different edge. If you continue, fragments of the build-up can break off and take tiny chips out of the cutting edge, making the situation worse.
Does tool overhang really affect build-up?
Yes — a long extension reduces rigidity and adds vibration. That makes the edge cut less confidently, aluminum adheres more easily, and surface finish and size control degrade faster. If possible, shorten the stick-out to a minimum and check before changing cutting parameters.
What to change first: the insert, cutting parameters or coolant?
Start in a simple order. First fit a fresh insert made for aluminum, then check speed and feed, and finally aim the coolant precisely at the cutting zone. Don’t change everything at once. Changing one parameter at a time makes it easier to find the real cause.
Why does the dimension start drifting after two or three parts?
This happens when build-up grows and breaks off in chunks. Each break changes the actual edge shape a little, so the tool cuts differently from one part to the next. In that situation don’t rush to change offsets. First check the insert, chips, cutting parameters and coolant targeting.