Boring a Thin-Walled Hub Without Ovality After Removal
Boring a thin-walled hub requires precise clamping and a calm pass order. We explain why the part turns oval after removal.
Why the hub becomes oval
The problem usually starts not with the tool, but with how the part behaves under clamping. While the thin-walled hub sits in the chuck, the jaws slightly squeeze the wall. The boring operation follows the shape the part has at that exact moment. As soon as the force is released, the metal springs back partly, and the circle changes.
That is why a measurement in the chuck often gives false confidence. The indicator shows normal, the bore gauge gives the right diameter, but after unclamping the hole moves out of round. On the machine everything looked correct, but in reality the cut was made on a deformed part.
A thin wall under the jaws works like a spring. The thinner it is, the more it bends inward. If the clamping is strong and the support is short, the metal compresses locally. After removal, that distortion shows up outside the chuck. Most often it appears as an oval, although the shape can be more complex, especially when the jaws press unevenly.
The geometry shifts the most where the part lacks stiffness: at the free edge of the bored area, at wall-thickness transitions, near grooves and reliefs, opposite the clamping points, and in the thin band between the flange and the internal diameter.
Heat is the second cause. If the pass is heavy, the wall heats up and then cools down after unclamping. In that case the shape shifts even more. In practice, both factors often happen together: the part is clamped and heated at the same time.
The order of passes matters too. If you remove too much metal from an already weak area first, the hub loses the remaining stiffness before finishing. After that, even moderate jaw force creates noticeable deformation.
The simple takeaway is this: if the part is round in the chuck, that does not mean it will stay round on the inspection bench. For a thin hub, these are two different shapes, and the difference between them is exactly what creates the oval after removal.
What to check before machining
If the part becomes oval after removal, the cause can often be seen before the first cut. Start by looking not only at the diameter, but at whether the blank behaves evenly around the circle.
Begin with wall thickness. Check around the circumference at several points with equal angular spacing. If one sector is thinner by even a few tenths, that area will spring more. After unclamping, it will be the first to move out of shape, and the finishing pass will not help anymore.
Next, check runout before machining. Look not only at the outer diameter, but at the base you actually use to set the hub. If the blank is already sitting skewed, the tool will remove different amounts of stock, and the circle on the machine will stay round only while the part is clamped.
Also check whether the jaws work evenly. You can see this from the contact mark, from traces on soft jaws, and even with a simple paper test. If one jaw engages earlier than the others or has a smaller contact area, it pulls the wall inward more strongly. Then the problem is not the cutting mode, but the clamping itself.
Look at the support from the flange side as well. Chips, burrs, or too narrow a contact ring can easily create a tilt. The flange should sit on the full working surface, with no accidental contact points. Otherwise the chuck simply straightens the part by force, and after removal it returns to its original state.
Another point is the allowance for the finishing size. It must be even around the circle. If 0.35 mm remains on one side and 0.05 mm on the other, the finishing pass will not correct the shape. It will only repeat what the clamping and previous machining already created.
These checks take a few minutes, but they often save the entire batch. On CNC lathes, scrap often appears not because of the program, but because of uneven wall thickness, a skewed base, or too much jaw pressure that was not noticed before the start.
How to set the clamp without extra pressure
If you clamp a thin-walled hub like a solid part, the chuck will create ovality by itself. While it is in the jaws, the size may seem fine. After removal, the metal relaxes and the circle shifts.
The most common mistake is clamping on the thin band. That area deforms fastest and easily takes the shape of the jaws. It is much better to grip a stiffer zone, closer to the thicker body of the part or to an area where the wall can carry the load without visible bending.
Soft jaws and the real profile
Soft jaws are better machined not just approximately to the diameter, but to the real seating profile. If a jaw touches the part along a narrow strip, the pressure rises sharply and the hub moves even at moderate force. When the contact is wide and matches the shape of the part, clamping becomes gentler and more even.
In practice, this often helps more than changing feed or speed. Well-prepared jaws solve part of the problem before the first pass.
Another typical mistake is too much overhang from the chuck. The farther the part extends outward, the easier it is to flex under clamping and under the tool. If you can reduce the overhang by even 10-15 mm, stiffness usually increases noticeably.
If the flange is thin and springs by hand, it needs support. That can be a support ring, a flat shim, or a careful stop that does not pull the part, but only supports it. The idea is simple: the flange should not hang in the air while the jaws squeeze the body.
The setup itself should also stay simple and repeatable. Choose a clamping zone with greater wall thickness, machine the soft jaws to the real contact shape, seat the part deeper in the chuck if possible, and add support under the flange if it springs noticeably. Increase the clamping force only to the level where the part no longer slips.
This is where people usually overdo it. The operator worries about slippage, adds extra force, and then starts looking for the cause of the ovality. For a thin-walled hub, that extra force is usually more harmful than a moderate clamp.
A simple rule works here: if the part holds during the rough pass without crushing marks and without any noticeable size change after removal, the force is already enough. More is not needed. The chuck should hold the hub, not change its shape.
Pass order
Ovality after removal often appears not because of one bad pass, but because of the whole machining sequence. You should not try to go almost to size right away. First remove tilt, then even out the stock, and only then bring in the finishing geometry.
The first step is to correct the base. If the face or seating surface came in with a slight skew, the bore will look round only while clamped. That is why the process starts with removing a minimal amount from the base surface or making a light pass that removes runout and gives a proper support for the next operations.
The usual logic is this: first make an initial pass with a small cut to see how the wall behaves. Then do the rough boring with stock left for finishing and do not come too close to the final size. After that, let the part cool and check whether the allowance is even around the full circle. Only then do the semi-finishing pass, leaving a minimal and even allowance for the final pass.
The rough pass is not about surface quality. Its job is to even out the stock. If 0.25 mm remains in one area and 0.05 mm in another after roughing, the finishing pass will not save the shape. It will remove different amounts of metal, the wall will relax unevenly, and ovality will appear after removal.
Do not measure immediately after roughing. The part is hot, the tool is hot, and the chuck is holding the hub under load. It is better to wait a few minutes and check the size in at least two sections and at several angular positions. This is often when you see that the allowance is uneven, even though everything looked fine during machining.
The semi-finishing pass only makes sense when the allowance is already even. If it still is not, it is better to make another light corrective pass and measure again. It takes a little time, but usually saves the part.
The finishing pass should be very light. It is better to run it calmly, without stops, without extra feed, and without trying to correct the size with a series of empty passes. For a thin wall, one smooth pass is almost always better than several touches with an unclear load.
If the shape still shifts after removal, do not try to fix it only with speed or feed. Look at the operation sequence: where you came to size too early, where you measured a hot part, and where you left different stock around the circle.
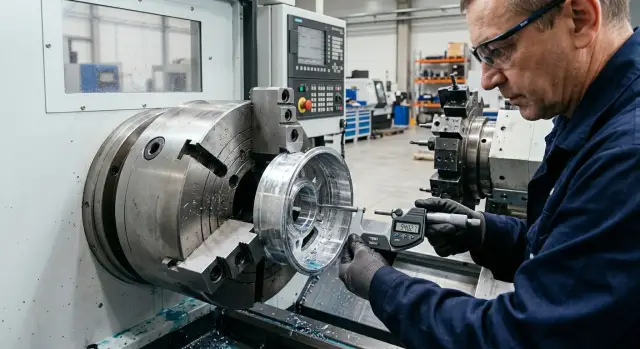
How to control the shape during machining
With this kind of work, it is not enough to watch only the size in the chuck. The part may be accurate while clamped and go oval as soon as it is released. That is why you always need to compare two states: the size while clamped and the size after release.
The most common mistake is simple. The part is removed, a bore gauge is applied quickly, a deviation is seen, and the tool is blamed right away. But much more often the cause is the clamping or the fact that the hub has not cooled yet. Warm metal almost always gives a false picture.
What to measure
You cannot check the shape at one point only. The diameter should be checked in at least two directions at 90 degrees. If one direction stays stable and the other shifts, that is no longer random scatter, but the beginning of ovality.
For the first successful part, it helps to keep a short measurement sheet: size in the chuck after the finishing pass, size 1-2 minutes after removal, measurement on two axes at 90 degrees, and the clamping force at which the shape stayed within tolerance.
These notes work well in series production. When a similar batch comes in, you do not have to search for the setup again. You can immediately see which clamping force already gave the right geometry.
How to control a series
The first part of the series should be checked more carefully than the rest. On it, look not only at the final size, but also at the difference between the measurement in the jaws and after removal. If the difference is noticeable, do not rush to correct the program. First reduce the clamping force, check the support, and repeat the finishing pass on a new blank.
The working order is simple: machine the first part, let it cool, take measurements in two directions, record the result, and only then start the series. If the part is thin, those 10-15 minutes at the beginning of the shift can easily save the whole batch.
It is useful to keep a separate card for the first good part. Record the size before removal, after removal, the clamping force, and the finishing allowance. If ovality appears later, that card quickly shows what changed: clamping, heat, or the machining order itself.
A shop-floor example
On one batch of hubs, the problem showed up not during machining, but right after removal. In the chuck, the bore looked fine: the size held, and the gauge did not show any obvious issue. But after unclamping, the circle turned into an oval. The ovality reached about 0.04-0.06 mm, and at the finished size that was already enough to create scrap.
The cause was found quickly when the team looked not only at the tool, but also at the clamping setup. The hub was held by a thin outer band. The jaws pressed into a narrow zone, the wall was squeezed, and the part in the chuck took a shape that was convenient for the machine, but not the one that stayed after release. So the in-chuck measurement looked reassuring, and after removal the metal sprang back and changed the geometry.
They did not change the cutting parameters first, but the setup itself. The jaws were re-machined so they supported a larger area. Pressure was distributed more gently, and the band stopped acting like a spring. After that, the rough pass was left with stock for finishing, the parts were allowed to rest after loading, and the finishing pass was done later with lower clamping force.
It took a little more time, but the result became predictable. For a thin-walled hub, separating roughing and finishing like this is often more useful than trying to hit size in one setup. The metal has time to release part of its internal stress, and the finishing cut corrects the real shape of the part, not the one temporarily imposed by the jaws.
After the clamping setup was changed and the pass order was adjusted, the picture improved. The size in the chuck was still within tolerance, as before, but now the shape stayed noticeably rounder after unclamping. The ovality did not disappear completely on the first try, but it dropped into a range that could already be corrected with allowance and clamping force adjustments.
Where mistakes happen most often
Usually the problem is not one big cause, but several small ones at once. The circle stays true only while the jaws press on the wall, and after removal all the accumulated mistakes become visible.
The first common mistake is trying to remove almost all the remaining stock in one finishing pass. On a thin wall, haste almost always backfires. The tool pushes harder, the metal heats up, the wall flexes, and the size in the chuck seems right even though the shape has already shifted.
The second mistake is overclamping before the final size. The part is removed, turned around, tightened harder for safety, and a different geometry appears. After that, the machine faithfully cuts the already distorted shape.
The third mistake is assuming the wall is the same all the way around. In practice, a hub often has thinner and thicker areas, even if the difference seems small. The thin sector compresses more, the thick sector holds more firmly, and ovality appears after removal.
A large overhang also ruins the result. When the part or boring tool works without proper support, the system starts to flex. One area cuts deeper, another shallower. You may not always see it on the indicator, but after removal the shape shifts right away.
Another trap is checking only the diameter. The diameter may be on size while the shape is not. It is better to check the bore at least at one end, in the middle, at the other end, and in two planes, for example 0° and 90°. If the difference changes from section to section, the problem is not in one number, but in the machining or clamping setup.
In the shop, it looks familiar: the test part is almost perfect, the operator starts the batch, and during assembly the hub fits with a tilt. Then people start changing cutting parameters, although the error appeared earlier - during clamping, overhang setup, and the order of passes.
A good rule is simple: do not clamp harder than necessary, do not leave too much stock for finishing, and always check not only the size but also the shape. A few extra minutes here are cheaper than finding the cause of scrap after removal.
Quick check before the series
Before starting a series, it is better to do a short check than to sort out scrap across the whole batch later. A couple of minutes is enough to remove the main risks.
First, look at how the jaws hold the part. They need a wide and even support surface. If the contact is almost a line, the metal compresses before cutting even starts, and after removal the shape releases that stress and changes.
Then check the clamping force. It should not be chosen by eye. If you find a working value, write it down and repeat it at every setup change. Otherwise today the operator clamps a little harder, tomorrow a little softer, and both size and shape will start to wander even with the same pass order.
Checklist for the first part
- The jaws support the part over a wide surface, not a narrow edge.
- The clamping force is recorded in the setup sheet and set the same way.
- The finishing allowance is even around the circle.
- The shape is checked both in the chuck and after removal.
- The first part is measured only after cooling.
An even allowance around the circumference often solves more than changing the tool. If 0.4 mm remains on one side and 0.1 mm on the other, the finishing pass will not correct that difference. It will only remove metal according to the already distorted pattern.
In-chuck checking is needed to see the effect of cutting. Post-removal checking shows what the clamping did. Both measurements should be compared together. If the bore in the chuck is almost round, but on the bench a difference of 0.04-0.06 mm appears on two axes, the cause is almost always the clamping setup, not the machine geometry.
And one more thing that is often ignored: the first hub must cool down. After machining, the metal can give a nice size while warm and move out of tolerance ten minutes later. That is a bad reference for series production.
What to do next
If you find a setup that keeps the hub round after removal, do not leave it only in the operator’s memory. Put everything into the operation sheet: which jaws are installed, where the part is supported, what clamping force is acceptable, how much is removed in each pass, and at which point the shape is checked. In a month, that record will save more time than any guesswork at the machine.
For this kind of part, it is not enough to record one final size. A hub may look fine at one diameter and still go oval along another axis. So it is better to keep measurements in at least two directions, for example 0° and 90°, and do this not only on the test part, but also on several parts from the batch. Then you can see not just the scrap itself, but the moment when the process starts drifting.
After changing jaws, re-machining them, or reinstalling the fixture, it is worth making a trial part right away. The contact changes more than it seems, and the old setup may no longer work the same way. One test hub is almost always cheaper than ten parts with ovality beyond tolerance.
A convenient sequence is simple: update the jaws or reset the clamp - machine one trial part, measure not one diameter but two axes, compare the result with the last successful batch, and only then start the series.
If the part runs regularly, it is helpful to keep a separate observation sheet. It should include not only dimensions, but also the material batch, the jaw set number, and the actual allowance before the finishing pass. These notes quickly show why the shape shifts after removal: because of clamping, material, or too aggressive a cutting mode.
If the problem is no longer about technique, but about the capacity of the machine or fixture, the task should be reviewed in a more practical way. The EAST CNC blog at east-cnc.kz publishes equipment reviews and practical metalworking materials. The company supplies CNC lathes, helps with selection, commissioning, and service when you need not a general tip, but a working setup for a specific geometry and production series.
FAQ
Why does the bore look round in the chuck but turn oval after removal?
The chuck slightly squeezes the wall, and the tool bores the part in that compressed state. When you release the clamping force, the metal springs back partly, and the circle turns into an oval.
Should the clamping force be reduced?
Usually yes, as long as the part does not slip during the cut. For a thin hub, extra clamping often hurts the shape more than it helps holding.
Where is the best place to clamp a thin-walled hub?
Clamp the part on a stiffer area, not on a thin band. The thicker the wall at the contact point, the less the hub deforms under the jaws.
Why machine soft jaws to the real part profile?
Because a narrow contact line presses hard on the metal and pulls the wall inward. When the jaw matches the seat and supports the part over a wider area, clamping becomes smoother and more even.
What should be checked before the first cut?
First check the wall thickness around the circle, the base runout, and the jaw contact pattern. Then see whether the flange lies flat and whether the remaining allowance is even around the circumference.
What allowance is best for the finishing pass?
Do not rush the size almost to zero right away. Leave a small, even allowance so the finishing pass removes the same layer around the whole circumference instead of correcting the roughing error.
Should you wait for the part to cool before measuring?
Yes, otherwise you will get a nice but false size. Let the hub cool for a few minutes first, then measure and compare the result in the chuck and after removal.
How should ovality be checked correctly?
Check the diameter in at least two directions at 90 degrees and, ideally, in several sections along the bore. If one axis stays stable and the other changes, the problem is already in the shape, not just the size.
Will changing feed and speed alone help?
Rarely. If the oval shape appears after unclamping, first review the clamping, support, overhang, and pass order, and only then adjust the cutting parameters.
What should be recorded after the first good part?
Record the clamping force, the support area, the jaw set, the finishing allowance, and the measurements along two axes after cooling. Then, when the next batch starts, you will quickly see what changed.