Aluminum and Cast Iron on One Shop Floor: How to Separate the Work
Aluminum and cast iron on the same shop floor need different tools, cleaning and cutting data. A simple step-by-step approach helps avoid scratches, extra wear and rejects.
Where the problems start
On a mixed-material area problems rarely begin with the program or the part itself. Usually the reason is simpler: dirt that wasn't removed in time. When aluminum follows cast iron, this small detail quickly turns into scratches, extra wear and rejects.
Cast iron almost always leaves a dry dust on the machine. It settles on covers, guides, around the chuck and near the jaws. An operator may quickly remove large chips and think it’s enough, but the abrasive dust stays in hard-to-reach places.
Aluminum brings a different issue. Its chips don't crumble like cast-iron chips. They stick to trays, brushes, gloves and the edges of guards. If not fully removed, they end up in the clamping area, under the tool or directly on the blank.
Often contamination isn't transferred by the machine but by fixtures. The same holder, arbor or even gloves easily carry cast iron dust into the next job. It may look harmless, but for aluminum that film acts like a fine abrasive.
Problems then appear from several sides at once. Parts get scratches, guides and seating surfaces wear faster, and tools start to perform worse. Later the reject is blamed on the program, the blank or the machine—when the real cause was poor cleaning after the previous run.
A typical scene is familiar to many. After a batch of cast-iron parts the operator changes the tool, mounts an aluminum blank and starts machining. There’s dust on the jaws, fine chips on the brush, and the holder is the same one used an hour earlier. The first part shows scratches, and by the second the cutting edge shows extra wear.
Cast iron and aluminum don’t forgive these habits. If the area doesn’t separate dirt, tooling and simple actions between jobs, problems accumulate before the first cut.
What to separate first
When aluminum and cast iron are mixed, confusion starts with small things. One brush with cast iron dust or one unlabeled cassette is enough for the next batch to get extra scratches, contamination or out-of-tolerance parts.
Start by separating what most often moves from job to job: cutting tools, fixtures and cassettes, cleaning supplies, and containers for chips and dirty rags.
Keep separate slots for inserts, drills and end mills. Not side-by-side on the same shelf, but in different, clearly visible places. If a cutter was used on cast iron, it shouldn’t be in the common area where aluminum tooling is kept.
The same applies to brushes, scrapers and rags. Cast iron dust clings to fabric and gets trapped in bristles, then transfers to the table, chuck, arbor and part. Keep separate chip containers as well, because during cleaning mixed containers quickly spread contamination around the area.
Labels should be simple. It’s better to mark items “Al”, “Cast iron”, “Only after wash” than use long codes nobody remembers. Labels on cassettes, arbors and measuring tools should be readable at a glance. If an operator needs to stop and decode a mark, the system is already inconvenient.
Store spare jaws and soft pads separately. Cast iron often leaves a fine dust that’s invisible at a glance, but enough to damage aluminum. A simple rule works best: anything that touches the blank lives in its own zone and is returned there immediately after use.
In practice this is usually enough. One cabinet holds arbors, jaws and tools only for aluminum; another holds everything for cast iron. Two different-colored brushes stand nearby and two separate containers for rags. It looks simple, but errors drop noticeably.
How to store tooling and fixtures
Storage order matters more than it seems. Problems often start not in the spindle or the program, but on the tool shelf. If a cutter, arbor or chuck lies anywhere, cast iron dust quickly moves into the next job.
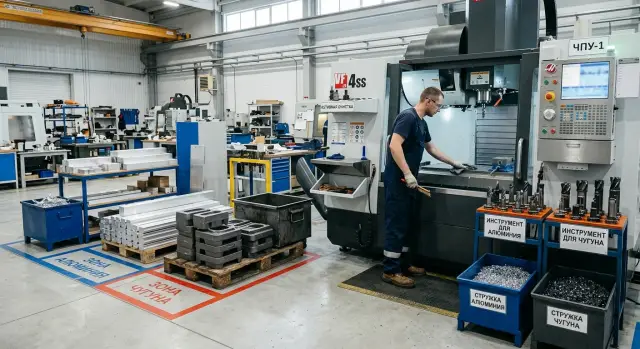
The simplest way to get order is a clear color code. You don’t need a complex scheme. One color for aluminum tooling and another for cast iron is enough. Use that color on the cassette, storage spot and tag in the cabinet. The operator sees the correct set immediately and is less likely to grab the wrong fixtures in a hurry.
Keep aluminum tooling in closed cassettes or boxes. Aluminum is sensitive to dirt on the cutting edge and seating surfaces. Even fine cast iron dust can scratch parts, worsen clamping and speed up wear. An open shelf is usually a poor idea for such tooling.
Don’t store clean arbors, collets and chucks near where cast iron chips and dust accumulate. Avoid placing them by the chip bin, blow-off area or workbench where dirty fixtures are cleaned. Better to assign a separate cabinet or at least a closed section. If the area is small, even splitting one cabinet—one side for cast iron, the other for aluminum—helps.
One more practical rule: only return tooling to the shelf after cleaning and inspection. The operator should remove chips, wipe seating areas, check runout, chips and signs of pick-up. Then tooling goes back. If in doubt, put it in a separate tray for inspection rather than into general stock.
In short: color-code tools and shelves, keep aluminum tooling closed, store clean arbors away from cast iron dust, and don’t return tooling without cleaning and inspection. These simple habits remove one of the most common causes of rejects.
How to clean the machine after cast iron
Cast iron leaves not only chips but a dry abrasive dust. If you run aluminum right after cast iron without proper cleaning, that dust easily gets on reference surfaces, in the chuck and on the part. Later people look for the cause of scratches, runout or stains, while the issue started in the previous batch.
On a mixed area, make cleaning follow the same order every time. That way you’re less likely to miss spots and won’t stretch the changeover by unnecessary time.
First remove large chips from the working area and the tray. Don’t blow them around with compressed air. Air just lifts cast iron dust and pushes it deeper into gaps, folds of covers and cable entries. For this job use a brush, a scraper and an industrial vacuum.
Then move to places where dust usually remains: the chuck, turret, inside covers and the door. These nodes often hold a thin layer of dust that is easy to miss, but that layer will transfer to jaws, tools and the blank.
Check difficult spots separately. Dust often hides in corners of the tray, folds of the guards and near cable entries. If the machine looks clean only in the center of the workspace, that’s not enough.
Finally wipe all surfaces that touch the part and tooling: seating surfaces, stops, reference planes, jaws, and toolholder seats. For aluminum this is especially important. Even a tiny amount of cast iron dust on a seating surface leaves marks where a clean contact is required.
A simple rule: after cast iron the machine must be clean at the contact points, not just “generally clean.” If a wipe still shows a dark layer, cleaning continues.
Keep a separate set of brushes, wipes and vacuum attachments for cast iron. That prevents the cleaning tools themselves from carrying dust into the next job.
How not to mix cutting data and settings
Confusion with cutting data usually starts from habit. Yesterday the machine machined cast iron, today it will run aluminum, and the operator takes the previous job as a base and only changes the program. That alone is enough to cause built-up edge, extra wear or the first bad part.
Keep two separate data cards. Not one general table “for similar parts,” but separate cards by material. That makes it clear that aluminum and cast iron differ in spindle speed, feed, depth of cut, coolant use and tool behavior.
A card should contain only the data actually used at the machine: material and operation, tool and insert, rpm and feed, depth of cut, offsets and notes on tool life.
The most frequent mistake is carrying over feed and depth of cut from the previous job by memory. It seems trivial, but those small details are what people spend half a day tracking later. If you leave cast-iron cutting logic for aluminum, the tool will cut too aggressively and the surface quality will suffer. The reverse—too soft settings after aluminum—reduces productivity on cast iron.
Record adjustments right after each batch. Not in a notebook “for later” or in memory, but directly on the card or in the site’s accepted form. If a particular insert lasts only 80 pieces on cast iron instead of 120, note it. If you had to reduce feed on aluminum because of vibration on a long overhang, that note will save time on the next job.
Before the first part always check tool offsets: length, radius, wear and any manual corrections left from the previous run. One quick check at the start of the shift usually saves more time than searching for the cause of rejects later.
New material needs a fresh check of data even if the part looks similar to the previous one.
Changeover sequence step by step
On a mixed-material area the changeover should follow a single scenario. If you act by memory and in haste, cast iron dust will quickly carry into aluminum, bringing scratches, extra tool wear and dimensional rejects.
A practical sequence is:
- Finish the current batch completely and remove chips from the working area. Don’t leave them in covers, on guides or in the tray.
- Remove tools and fixtures used for the previous material. Immediately place them in the labeled slots or cassettes.
- Clean the chuck, jaws, reference surfaces, probes and measuring area. Often the problem is one speck of dust on a reference or grime on a jaw.
- Only after this install the new toolset and the data card for the required material. Don’t rely on old offsets or the operator’s memory.
- Run a trial part. Check dimension, surface cleanliness and any signs of contamination or dark residue.
This order is especially useful on CNC lathes when several short jobs pass through during a day. In those shifts people rarely fail at the program; they fail in small details: forgetting to wipe the base, leaving the previous cutter, or not switching the data card.
A good rule is simple: the new material only starts after a clean zone, separate tooling and a trial part without issues. That’s a normal changeover, not an extra precaution.
Where mistakes happen most often
Most expensive failures on a mixed-material area start with small habits. When aluminum and cast iron run one after another, people more often slip on discipline than on complicated setup.
The first common mistake is one brush for the whole shift. It’s used to sweep up cast iron dust and then with the same brush someone cleans the aluminum area. The fine abrasive remains on the table, in the chuck and on covers, and ends up where it shouldn’t. Dimension may stay in tolerance, but the surface is ruined.
A common shelf for all tooling is just as bad. Clean arbors sit next to ones just removed from cast iron. The difference is not always visible, especially at the end of the shift. Yet even a thin dust film on a seating surface then leads to runout, marks on the part and time spent finding the cause.
Another typical mistake is in program and setup. The material changes but corrections, feed or speed stay the same. For cast iron and aluminum that’s a bad habit. The machine cuts and the process seems fine, but several parts are lost before the operator notices built-up edge, work hardening or unstable size.
Quality checks are too narrow, too. People often check only the dimension of the first parts and relax. But fine scratches, dark marks, adhesion and abrasive traces are not noticed immediately—customers usually spot them first.
Rushing through the changeover causes the most problems. After cast iron you need to clean not only visible spots. Dust hides in corners of the working area, in keyways, under covers, near the chuck and on fixture fasteners. If you skip these points, the next batch quickly shows that cleaning was only for show.
Before aluminum, separately check brushes, arbors, data and hard-to-reach spots. It takes a few minutes and often saves the whole shift.
Example: aluminum follows cast iron
A typical change goes like this: you finish a cast-iron batch, remove parts, quickly sweep chips and immediately mount an aluminum blank. The machine looks clean, but fine dust remains in the tray and a gray film on the jaws and in the chuck area.
The issue shows on the first part: tiny scratches on the surface and built-up edge on the cutter. The operator looks for the cause in cutting data or the blank, while the origin is simpler: cast iron residues in places they shouldn’t be.
Losses occur in several ways. The machine is stopped, the part removed, the tool checked, then a repeat cleaning is done. This easily takes 20–40 minutes, sometimes more if the first part already moved down the line and the defect wasn’t noticed immediately.
Most often the failure starts from a set of small misses: the tray and chuck weren’t cleaned completely, the same brush was used after cast iron, jaws and seating surfaces weren’t wiped, and aluminum was started without checking the first chips.
After a proper cleaning the picture usually improves fast. The tray is cleaned, jaws removed and wiped, the brush is swapped for an aluminum one, and the tool examined for built-up edge. If the edge is damaged, replace the insert right away. After cleaning and a fresh edge, the surface often evens out on the first or second part.
This shows why separate tooling for aluminum and cast iron matters. It’s not about shelf tidiness only; it’s about part quality and lost time. One missed cleaning leads to rejects, extra checks and downtime.
When these materials follow each other, cleaning should be treated as part of the changeover, not a quick formality. Spending an extra 10 minutes after cast iron on a full cleaning usually saves much more time than hunting for the cause of scratches and built-up edge later.
Quick check before start
Before a new batch, take 2–3 minutes for a short inspection. On such an area this pause often saves a part, a tool and the whole next job.
A short checklist to run through:
- Inspect the chuck, jaws, reference surfaces and the inside of the door. If you see dark dust, dry chips or oily dirt, remove it immediately.
- Verify the tooling against the current order. Required items should be in their cassettes or slots, with no accidental swaps from the previous run.
- Open the data card and confirm the material. You can’t use the same feed, speed and offsets for aluminum and cast iron by memory.
- Agree where chips will go and where the operator will put rags after the first cleaning.
Confusion happens most at the end of the day. Cast iron dust remains in the machine and the operator mounts an aluminum blank. If jaws and base weren’t wiped, the soft metal quickly picks up that dirt and you later search for the cause of marks and rejects.
Keep a short control card by the workstation. Not a long A4 instruction, but four short points visible at a glance. That way inspection doesn’t depend on memory and doesn’t fall apart when the shift is busy.
If even one point fails, delay the start for a few minutes. That’s almost always cheaper than a spoiled aluminum batch after cast iron.
What to do next
If aluminum and cast iron are mixed in your shop, don’t change everything at once. Start by locking in three things: where items are stored, how cleaning is done and what records operators use to set cutting data.
Begin with storage. Mark zones for each material with simple colors, no complex schemes. One color for aluminum tooling, another for cast iron. Put the same colors on shelves, drawers and carts. When labels are visible, tools are less likely to end up in the wrong place and fewer disputes occur.
Then standardize cleaning. The same cleaning order should hang at the machine and be used every shift, regardless of who’s at the equipment. A short sheet by the workplace usually solves more than a long manual in a folder. It’s enough to remind people of four actions: remove chips and dust from the working area, clean the chuck, covers and guides and the tooling area, check coolant and spots where cast iron dust accumulates, then wipe tooling before the next job.
Also separate cutting data by the two materials. On mixed areas old records often live longer than they should. Because of that an operator leaves the wrong feed, speed or offsets after cast iron. Keep one working table for aluminum and one for cast iron, and remove old sheets and random notes.
If materials alternate frequently, review the area layout. Sometimes the issue isn’t discipline but that the equipment, fixtures or maintenance scheme aren’t suited to the rhythm. In that case discuss the situation with EAST CNC. The company supplies CNC lathes and machining centers, helps with selection, commissioning and service, so the conversation will be practical rather than general.
A good next step is simple: pick one machine, apply color marking, hang the cleaning order and update the data cards. Within a week you’ll see where the area still confuses people.
FAQ
Why do scratches appear on aluminum right after cast iron?
Most often the culprit is not the program but leftover cast iron dust on the chucks, bases or tooling. For aluminum that residue acts like an abrasive and immediately leaves marks on the surface. Start by cleaning the contact points, not only the visually central areas of the machine. If a wipe still shows dark residue after cleaning, continue until it’s gone.
What should be separated first?
Begin by separating the items that most often move from job to job: cutting tools, mandrels and chucks, brushes and rags, and containers for chips. This usually removes the bulk of accidental contamination. Make labels simple and visible. Short tags and color-coding work better than long codes.
Can the same brush be used for both materials?
No. A single brush will quickly carry cast iron dust into an aluminum job. It may look clean on the outside, but fine particles remain in the bristles. Keep two brushes in different colors and never swap them. The same rule applies to rags and vacuum attachments.
How should mandrels, collets and other tooling be stored?
Store tooling by material and preferably in closed trays or boxes. Aluminum tooling is especially sensitive to dust on seating surfaces and cutting edges. Only put tooling back on the shelf after you’ve cleaned and inspected it. If in doubt, place it in a separate tray for checking rather than returning it to the general stock.
Why shouldn’t I blow the machine with compressed air after cast iron?
Because compressed air does not remove cast iron dust but spreads it around the machine. The dust gets pushed into gaps, under covers and near cable entries, and later returns to chucks, tools and parts. After cast iron, use a brush, a scraper and an industrial vacuum to actually remove the dust.
What should I check before the first aluminum part?
Check the chuck, jaws, reference surfaces and the inside of the door. Then verify the tooling against the current order and open the speed/feed card for aluminum. After that, run a test part and check not only the dimensions but also the surface. If you see dark residue, fine scratches or built-up material, stop and clean the machine further.
Do I need separate cutting data cards for cast iron and aluminum?
Yes. Keep two separate sets of cards. Aluminum and cast iron differ not only in spindle speed, but also in feed, depth of cut, coolant use and manual corrections. If an operator takes the last job as a template and changes only the program, mistakes happen quickly. Separate cards greatly reduce that risk.
What to do if the first aluminum part has scratches?
Stop the machining immediately and don’t run the next part. Clean the chip tray, chuck and jaws thoroughly, check the brush and tooling, and inspect the cutting edge for built-up material or damage. If the insert edge is already damaged, replace it right away. After a proper clean and a fresh edge, the surface usually returns to normal on the next run.
Is checking just the size of the first part enough?
No. Checking only the first part’s dimensions is not enough. A part can be within tolerance yet have fine scratches, dark marks or abrasive traces that show up later. On a mixed-material area you should check both surface quality and the condition of the cutting edge. This takes minutes and prevents most reject parts.
Where should I start if one machine handles both cast iron and aluminum?
Start with one machine—don’t try to reorganize the whole area in a day. Separate storage zones by simple colors, hang a short cleaning checklist at the machine and remove old notes for cutting data. After a few shifts you’ll see where people still mix things up. Then it’s easier to expand the same rules to other machines.