Air Leaks on the Machine: Where Money and Service Life Are Lost
Air leaks on a machine increase consumption, disrupt clamping, and interfere with automation. We explain where to look for losses and how to check the units without unnecessary downtime.
How to tell when air is already escaping
Compressed air usually does not escape all at once and loudly. Most of the time, it quietly costs money: the compressor starts more often than usual, while the machine still keeps running without any obvious breakdown.
The first clear sign is that the pressure does not hold between cycles. The machine finishes the operation, everything should stay calm, but the gauge needle slowly drifts downward. If the compressor builds pressure again after a short pause, air is escaping somewhere.
The second sign is the clamping action. The pneumatics on the machine should respond quickly and the same way every time. If the clamp sometimes grabs the part immediately, sometimes pauses, or sometimes holds unevenly, the circuit needs checking. On a lathe, a small issue like this quickly turns into runout, part movement, and extra scrap.
The situation with the protective enclosure doors is similar. If the door closes in jerks, does not fully seat the first time, or simply became slower, the problem is not always mechanical. Often air is escaping through a fitting, hose, valve, or cylinder seal, and the actuator does not have stable pressure.
The same thing happens with automation cylinders. If they used to move smoothly but now slow down, jerk, or do not reach the end, that is not just the "machine's character." Early leaks often look exactly like that.
Usually the symptoms appear together:
- the compressor starts more often without a higher load;
- pressure drops during pauses;
- the clamp engages with a delay;
- the door or cylinder moves unevenly;
- the same unit behaves differently during the shift.
There is also a simple rule of thumb. If the shop has not changed its operating mode and has not added new equipment, but air consumption suddenly increased, the cause is usually a loss of tightness. You should not wait for a clear failure at that point. A small leak today can easily become a shutdown tomorrow.
Where leaks appear most often
Leaks rarely sit in one place. Air usually escapes where a hose moves, a connection is taken apart often, or a seal works near dust, oil, and chips.
Start by checking fittings and quick couplings. It is easy to leave them slightly loose during assembly or to twist them a little when replacing a hose. Even a small leak in such a place quickly causes extra compressor starts and uneven pneumatic operation.
Then inspect hoses near moving parts. The areas around the carriage, turret, doors, and loader suffer the most. A hose there rarely bursts right away. More often it first wears through, hardens, develops a small crack at the bend, and hisses only in one position.
Special attention is needed for the pneumatic chuck and rotary union. These units work under constant load, and tiny chips and dirt can easily get inside. If the chuck holds the part worse than usual, the clamp engages with a delay, or pressure drops after the machine stops, the cause is often found there. These losses are especially unpleasant because they both increase air use and reduce machining repeatability.
Many people overlook cylinders and door stops. That is a mistake. Door seals wear out quickly, the rod collects dirt, and leaks often appear only at the end of the stroke. From the outside it looks minor, but the automation starts waiting an extra second and the cycle gets longer.
Another common source is valves and the air preparation unit. An electro-pneumatic valve may leak through the body or the silencer. In the air preparation unit, check the filter, regulator, lubricator, condensate drain, and threaded joints. If the pressure is normal at the inlet but unstable farther along the line, the problem is often there.
In practice, it is best to go from simple to expensive: first connections and hoses, then cylinders and doors, then the chuck and valves. This order usually shows more quickly where air is escaping every day.
What it costs the shop
Even a small leak quickly turns into a constant expense. The compressor starts more often, keeps pressure longer, and uses more electricity every day. At first, this is almost invisible, but after a month the shop is no longer paying just for air - it is paying for extra hours of the entire pneumatic system.
When the pneumatics lose air, the machine starts waiting for normal pressure before a cycle begins or after a unit is triggered. The pauses are short, but they add up. If each cycle loses even 2-3 seconds, you can easily lose 15-20 minutes of downtime during a shift.
Clamping takes the biggest hit. If pressure drops, the clamp engages late and holds less securely. The operator does not notice it right away: the part seems clamped, but the safety margin is already lower. That increases the risk of scrap, part movement marks, and an unplanned stop.
Doors and automation create another problem. A door cylinder or safety unit may not reach the end in time, and the machine throws an error. On the screen it looks like a random failure, even though the reason is often simple: the system does not have enough air at the right moment. As a result, people waste time restarting, checking sensors, and reviewing the program, when they should be looking for a leak.
Losses usually show up in several areas at once:
- air and electricity bills go up;
- the cycle gets longer and output drops;
- clamps and pneumatic actuators become less accurate;
- the automation gives false alarms more often;
- the compressor, valves, and seals wear out faster.
There is also hidden expense. The more often the compressor moves air, the higher the heat and the load on the dryer and filters. Valves click more often, seals age faster, and service is needed sooner than planned. So a leak is not a small issue in the category of "we'll look at it later" - it is a direct source of extra cost and unstable operation.
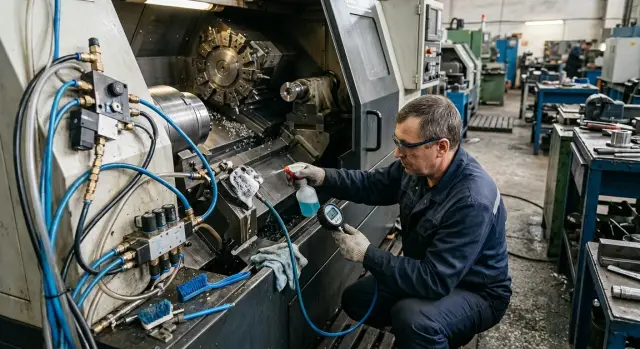
How to prepare for the check
It is better to start leak hunting with numbers, not with a spray bottle. First, compare the working pressure for each unit that uses pneumatics: the chuck, door, blow-off, cylinders, automatic shutters, and other actuators. If one unit needs 6 bar and another 4.5, a "by ear" check will get confusing fast.
Then note what actually activates in each cycle. On one machine, only the part clamp and the door use air. On another, blow-off, quill, workpiece feed, and part of the automation are added. It helps to go through a normal cycle step by step and write down what turns on during loading, what works during machining, and what activates during unloading. Then it is easier to understand where to look for losses and where a unit is not involved at all.
Before checking, stop the program and put the machine in a safe mode. The units should remain accessible for inspection, but without cutting or unnecessary motion. If possible, move the mechanism to a position where the door, clamp, and the needed valves can be switched on separately. That makes it easier to test each circuit one at a time instead of all at once.
You only need three things at hand:
- a pressure gauge to compare pressure;
- soapy water or a spray for finding small leaks;
- a marker to note suspicious spots right away.
People often underestimate the marker. After ten minutes of inspection, it is easy to forget which fitting was already hissing and which only looked suspicious. One mark saves time during the recheck.
It is best to do the inspection during a quiet period, when the compressor line, nearby machines, and blow-off systems are not all running at full load. In silence, leaks are much easier to hear, especially on doors and small valves. If the shop is noisy all day, set aside even a short window before the shift starts or after the line stops. Even 15 calm minutes are more useful than an hour of checking under constant noise.
How to find a leak step by step
It is better to search for a leak along one route, not at random. Otherwise, it is easy to miss a tiny spot that is almost invisible on its own but consumes a lot of air during the shift.
First, put the machine in safe mode and prepare a pressure gauge, soapy water, a marker, and a note sheet. If the machine is noisy, let it stand for a minute without movement. Hissing is easier to hear against a quiet background.
Inspection order
Start with the air preparation unit. Check the filter, regulator, lubricator, joints, condensate drain, and inlet fittings. If there is already a leak here, everything farther down the line will give you a misleading picture and you will only waste time.
Then move along the main line to the manifolds. Do not jump from one unit to another. Inspect hoses, quick couplings, tees, fittings, and places where the tube bends sharply or rubs against the frame. Old hoses often leak not at the joint but through a microcrack nearby.
Next, disconnect the units one by one. Close the branch to the clamp and see how the pressure holds. Put it back into operation and then disconnect the doors. After that, check the cylinders, blow-off, automatic part change, and other actuators in the same way. This order quickly shows which branch is losing the most air.
Watch not only for the pressure drop itself, but also for the speed of the drop. If the pressure holds noticeably longer after one branch is disconnected, the search area has already narrowed. It helps to time it: for example, without the unit the system holds pressure for 10 minutes, but with it the pressure drops in 2-3 minutes.
After isolating a branch, check it in a real cycle. Leaks on doors and clamps are often invisible at rest but appear while the cylinder moves, the door closes, or the clamp is under load. Manifolds also like to leak only in one position.
Mark every found spot immediately with a marker or tag. Do not rely on memory. By the end of the inspection, there may be five or six hissing points, and one is easy to lose track of.
If there are two suspicious points in one area, fix the larger one first and then check again. Small leaks often become audible only after the main air loss has been removed.
A shop-floor example
On one lathe, the machining area door started closing strangely. Sometimes it almost reached the end, then stopped and only went into the correct position on the second try. During the same shifts, the operator noticed another symptom: the pneumatic chuck worked unevenly, as if the system did not have enough air at the moment of activation.
At first, the door sensor was suspected. The logic seemed obvious: if the machine does not see the door closed, it will not start the cycle. The electrician checked the limit switch, connector, and cable. Everything was fine, but the error did not go away.
Then the technician looked not at the signal, but at the pneumatics themselves. The pressure gauge on the door line looked normal, but when the close command was given, the needle dropped noticeably. It lasted only a second or two, so without repeated starts the failure was easy to miss. At that point it became clear: the problem was not the sensor, but a loss of air before the cylinder or nearby.
They took the simple route next. Soapy water was applied to the fittings near the door cylinder and to a section of hose. Small bubbles appeared immediately at one connection. The leak was not loud, with no whistle, but it was constant. Over a shift, that tiny leak was enough to lower pressure in the line, and the door did not close on the first try. When the chuck engaged at the same time, the system had to split the air between two units, and the operation became even less stable.
The fitting was replaced, the hose was trimmed by a few millimeters, and the connection was remade. After that, the door started closing on the first stroke, without pauses or false stops. The chuck also began to work evenly.
Cases like this show well how a leak can disguise itself as a sensor or automation failure. If a unit behaves inconsistently only while moving, the first thing to check is what is happening with line pressure. Sometimes the cause is a tiny fitting, not an expensive control unit.
Mistakes that make it harder to find the cause
Many people look for leaks only by loud hissing. That is a trap. The most costly losses are often barely audible: a tiny seep at a fitting, a tired seal on the clamp, a small leak at the door. The machine keeps running, there is no alarm, so the problem is left until the first pressure failure or strange automation behavior.
Another common mistake is replacing the first suspicious unit without checking the whole chain. Someone sees that a cylinder reacts with a delay and immediately installs a new valve. A day later nothing changes, because the air was not escaping through the valve but through a hose, fitting, or cracked seal nearby. In pneumatics, neighboring parts often hide one another, and quickly replacing one part rarely gives a precise answer.
Checking only a cold machine is also misleading. In the morning, a connection may hold fine, but after an hour of operation it may begin to leak. Metal heats up, the hose softens slightly, the seal changes shape, and a tiny leak becomes visible. If the unit works in cycles, look at it in at least two states: right after startup and after normal load.
Many people skip the simple test after shutdown. If the air supply is turned off and the line pressure drops quickly, the leak is almost always near the actuators, doors, or clamps. This sign helps narrow the search much faster than randomly walking around the whole machine with soapy water.
The problem is often made worse by a mix of old and new parts. New hardware is installed, but an old seal, a hardened hose, or a worn fitting is left nearby. The unit is assembled, but it still is not airtight. This happens often after minor repairs, when only the obviously broken part is changed.
The cause usually gets missed because of a few common mistakes:
- listening only for loud spots;
- replacing the valve before checking the hose and fitting;
- inspecting the unit only once, without warming it up;
- not watching how pressure drops after shutdown;
- building a new unit next to old seals.
The working method is simpler: first check the pressure drop, then inspect the connections around the unit, then run the machine in working mode, and only after that replace parts.
A short checklist for each shift and each week
A small scheduled check helps catch a leak before it turns into downtime. With air, it usually works like this: consumption rises little by little, and it only becomes obvious when the clamp slows down or the compressor barely rests.
Every shift
Before startup, note the pressure at the line and at the machine. If the machine sat idle overnight, the difference from the evening readings often points to a leak better than any guess.
- Check how often the compressor starts under normal load.
- Listen near the doors, clamps, blow-off, and pneumatic cabinet.
- Quickly inspect hoses where they rub against metal or make a sharp bend.
- Note slow response from the chuck, doors, and cylinders.
If the compressor has started turning on more often, do not wait until the end of the week. Even one fitting that hisses during a shift can create noticeable losses and reduce the pressure reserve right when it is needed for clamping.
Once a week
One short inspection is more useful than an occasional big check. Usually 15-20 minutes is enough if you follow the same route every time: air inlet, air preparation unit, valves, hoses, fittings, and actuators.
- Go over fittings and connections with soapy water.
- Check door seals and the cylinders of automatic covers.
- Inspect hoses for signs of rubbing, cracks, and hardened sections.
- Record the leak location and the date the part was replaced.
- Compare air consumption with the previous week if you keep a log.
Records matter more than they seem. When the same leak comes back a month later, the cause is often not the fitting itself, but vibration, poor hose routing, or pressure that is too high in the circuit.
The routine is simple: the operator notes the sound, compressor start frequency, and pressure drop, while the setter confirms the findings once a week with soapy water. That way, losses at the chuck, doors, and automation do not build up for months and then appear on the busiest day.
What to do after the check
An inspection only makes sense when it leads to clear action. Right away, make a leak map by machine unit: chuck clamp, doors, air preparation unit, manifolds, hoses, fittings, cylinders, blow-off. Next to each unit, write down three things: where the leak was found, how strong it is, and how it affects operation.
This list quickly shows what needs immediate repair and what can wait until the service window. If air is escaping at the clamp, the door will not hold pressure, or a cylinder reacts with a delay, the repair should not be postponed. If a fitting on a secondary line is only leaking slightly and the machine is running stably, the work can be scheduled for the next stop.
It helps to divide the findings into four groups:
- fix immediately if safety or part clamping is affected;
- fix at the next stop if air consumption is rising and repeatability is falling;
- monitor until planned maintenance if the leak is weak and does not affect the cycle;
- replace the whole unit if it has already caused the same problem more than once.
On a problematic area, do not replace one small part at random. If the hose is hardened, the fitting is loose, and the seal has already worn in, it is cheaper and calmer to replace the consumables as a set. Otherwise the leak will come back a week later, only at a neighboring point, and you will spend time searching again.
After the repair, compare the numbers, not the feeling. Look at cycle time, compressor start frequency, line pressure, and air consumption per shift. Even a simple before-and-after note often shows that a small repair removed 10-20 seconds from the cycle or eliminated instability at the clamp.
If the problem keeps returning on the same unit, it is better not to delay proper diagnostics. In such cases, you can discuss an inspection with EAST CNC. The company works with CNC machines, handles selection, commissioning, and service support, so the conversation usually quickly becomes practical: what is wearing out, what should be replaced right away, and how to avoid the same leak after the next startup.
A good inspection result is simple: the leak map is updated, priorities are set, consumables are ordered, and the repair result is measured. Then the air stops escaping "little by little somewhere" and starts working for the machine again, not around it.
FAQ
How can I tell if the machine already has an air leak?
Watch how the machine behaves between cycles. If the pressure drops slowly, the compressor starts more often than usual, and the door, chuck, or cylinder works unevenly, air is already leaking.
Where should I look for a leak first?
Start with the air preparation unit, fittings, and quick couplings. Then move on to hoses near moving parts, doors, cylinders, and the clamping line.
Why does the pneumatic chuck engage with a delay?
Most often, the chuck does not have stable pressure at the right moment. Start with the clamping line, rotary union, fittings, and seals near the chuck.
Can a leak look like a door sensor failure?
Yes, that happens often. If the door closes inconsistently or the machine reports a limit switch error, first check the line pressure and the cylinder itself, then the sensor and wiring.
Why is a small leak dangerous if the machine still works?
Even a small leak makes the compressor run for extra hours and stretches the cycle. The shop pays for both air and electricity, while also getting more false stops and scrap.
What should I prepare before checking the pneumatics?
Stop the program, put the machine in safe mode, and prepare a pressure gauge, soapy water, and a marker. Then check which units actually work in the cycle so you are not searching at random.
How can I find a leak step by step without taking everything apart?
Follow one line at a time. First check the air inlet and regulator, then the main line to the valves, and after that disconnect branches one by one and compare how long the pressure holds.
Why is a leak not always audible?
Because the most troublesome leaks often hiss very quietly or only in one position of the rod, door, or hose. Check the unit not only by ear but also with soapy water, especially while it is moving.
How often should pneumatic components on the machine be checked?
In every shift, it helps to watch the pressure, compressor start frequency, and the speed of the door and chuck. Once a week, go through the same units with soapy water and write down what you find.
What should I do after I find a leak?
Mark the leak location right away and decide what needs immediate repair and what can wait until the next planned stop. If the problem keeps returning on the same unit, do not replace one part blindly - it is better to replace worn consumables as a set or call EAST CNC service.