90-Degree Part Rotation for Housings Without New Tooling
Let’s look at when rotating a part by 90 degrees through datum prisms keeps the datum, reduces changeovers, and simplifies the machining route for housings.
Why a 90-degree turn can fail
The problem usually does not start at the moment of the turn itself, but earlier - when the housing is moved as if it had the same reliable datum on every side. For most housing parts, that is not the case. One side may have a flat pad, while the other has a pocket, boss, recess, or holes. In the first position, the part looks stable. After rotation, the support scheme changes, and with it the behavior of the housing.
In the first setup, the clamp usually presses the part down and against a stop in a clear direction. After a 90-degree rotation, the clamping force follows a different path. A surface that used to hold the load calmly may now flex, slightly twist the housing in the vise, or pull it out of alignment in the prism. You can hardly see it by eye, but the dimensions start drifting right away.
This happens especially often with housings. Even if the blank looks rectangular from the outside, inside it often has cavities, windows, threaded areas, and thin walls. These remove rigidity where the operator expects solid support. As a result, after repositioning, the part no longer rests on a flat surface but on narrow ribs or near a recess.
Holes and pockets also change the picture. They shift the contact points and break even seating. After clamping, the housing tilts slightly, and the datum shifts by tenths of a millimeter. If in the first setup you machined one group of surfaces and in the second you expect to hit the size precisely from the adjacent side, that shift becomes visible quickly.
A typical case looks simple. A small housing is first milled on the bottom face and one side wall. Then it is rotated to machine the end face and side holes. If there is a pocket underneath and a casting boss on the side, the clamping now works differently. The machine and program are fine, but the holes still drift relative to the first datum.
There is another reason that is often forgotten: every new setup requires a new check. You need to verify the supports, choose the clamping force, check whether the fixture blocks the tool, and run through the indicator again. On one part, that seems like a small thing. In production, those small things turn into hours, rework, and arguments about where the error actually appeared.
When prisms really help
A prism is not useful by itself. It works when the housing already has clear support zones and you just need to use them repeatably without complex tooling. Most often, these are outer ribs, machined faces, or a cylindrical section that can sit flat and without rocking.
The first good sign is that the housing sits in the prism calmly and does not hunt for a new position when you press it lightly by hand. The second is that the clamp pushes the part down rather than pulling it sideways. If the housing catches on one point, rocks on the prism peak, or needs shims to “settle,” that setup should be reconsidered immediately. After clamping, it almost always causes drift.
Most often, a 90-degree rotation breaks the process in one place: the operator changes not only the position of the part, but the datum scheme itself. In the first setup, the housing sits on a face and rests against a wall. In the second, it is suddenly placed from a random edge or rib. A prism is useful exactly when it helps preserve the same logic between setups instead of inventing a new one.
When this is justified
For small and medium batches, datum prisms are often the most sensible option. Building a dedicated fixture for 20 or 50 housings does not always make sense. It is easier to build a clean process with standard elements, check a few parts in a row, and see whether the datum holds without fighting it.
A normal scenario looks like this: the housing has two clear support zones, the prism holds the part without rocking, the clamp presses it down, and the second setup repeats the datum of the first. If all four conditions are met, standard tooling is usually enough.
A good example is a small housing with a cylindrical outer section and two milled faces. In the first setup, the base face and one hole are machined. Then the part is rotated 90 degrees, the cylindrical section is placed in a prism, and the same support idea is kept: a stable line of contact plus a stop on a machined face. Here the second setup continues the first instead of fighting it.
Where the prism no longer helps
If the clamp noticeably pulls the housing out of position, the prism itself will not solve the problem. It only sets the position before clamping. After that, everything depends on where the clamp presses and how much force it uses. A clamp point that is too high, poor contact, or misaligned jaws can quickly erase any benefit.
The risk is even higher with thin-walled housings. The part may sit neatly in the prism, but then deform slightly under force. An indicator does not always show that immediately, yet the size shifts after machining and becomes especially noticeable once the clamp is released.
If you need shims every time, keep chasing the angle with a gauge, and readjust clamping force again and again just to keep the part stable, the standard scheme is no longer saving time. In that case, a simple dedicated fixture is often more profitable than constant manual adjustment.
What to check before the first setup
Before the first rotation, choose one surface from which all main dimensions will be taken. For a housing, this is most often an already machined face that sits firmly in the prisms and does not rock. If the datum is questionable, saving on tooling quickly turns into a loss of accuracy on the very first part.
Next, check how the part sits in the prism after rotation. Look not only at the support width, but also at the new height from the table to the working side. That value immediately affects the Z travel, tool projection, and safe approach. On a small housing, even a difference of 8-10 mm already changes the setup.
Mark the stop and clamp positions separately. The clamp should press the housing down, not drag it sideways. The stop must not sit in the tool path, under the probe, or in the drill exit zone. If there is a thin wall nearby, check in advance where the housing flexes most under force. That is usually where the size drifts first.
Before starting, it is also worth reviewing the full tool path on the machine screen. A common mistake is simple: the part sits nicely, but the chuck, holder, or tall clamp blocks access to a pocket or hole. Then extra changeovers begin, even though the goal was to simplify the process.
And do not forget about chips. In a prism, chips like to collect in a corner and lift the housing by fractions of a millimeter. If the part is run in a batch, it is better to establish the same routine right away: wipe the prism, blow out the datum area, check the seating, and only then clamp. In practice, the datum is often lost not because of complex geometry, but because nobody spent two minutes on a small detail before the start.
How to build the process route
The process route works only if the first setup creates a clear and repeatable datum. If on the first side the metal was simply removed “as it came out,” the housing will behave unpredictably after rotation: dimensions will shift, holes will not match, and prisms will not fix the foundation.
Usually, the first setup is kept as practical as possible. First, the base face and one or two surfaces that will later define the part position are machined. After that, only the dimensions needed for the second setup are taken: height, stop position, and coordinates for setting the zero.
Then the housing is placed in prisms and clamped in one direction against one stop. The zero is taken from the already machined datums, not from a cast edge or a random corner. After rotation, operations tied to that datum are performed. Secondary surfaces, small recesses, and chamfers are better left to the end.
The most common mistake here is wanting to do too much in the first setup. It feels faster. In reality, it is better to stop at what is truly needed for a stable second position: one reliable face, a clear direction along the side surface, and a clear reference point along the length.
What to keep under control
If a 90-degree rotation is needed, the key is not the number of operations but the logic of the datums. After the first setup, there should be a simple answer to three questions: what the part rests on, what it is clamped against, and where zero is taken from.
A small example: a housing has a bottom face, a side wall, and holes on the adjacent side. First, the bottom and one side surface are machined. Then the housing is rotated, placed in prisms based on the finished datum, pressed against the stop on the machined side, and only then are the holes drilled and the seat milled on the second side. Chamfers and small features are done at the end.
This route is often simpler than expensive changeovers. It does not require a separate fixture for each side, but it does require discipline: one datum, one clamping direction, and one order of operations.
Example with a small housing
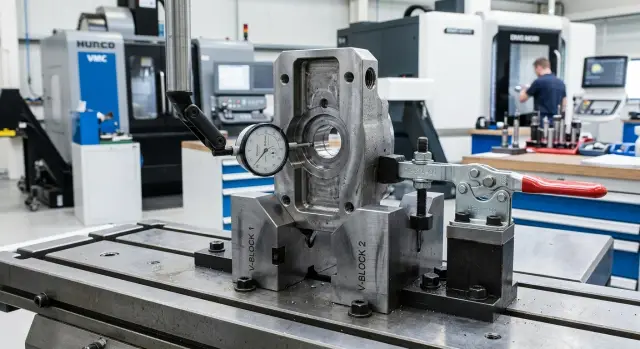
A small pump housing is a good typical case. Suppose there is a cast blank measuring roughly 160 x 110 x 80 mm. The task is to create a support face, then rotate the housing by 90 degrees and machine the adjacent wall so the holes keep their relative positions.
In the first setup, the housing is placed so that the first finished face can be taken off cleanly. In the same setup, two datum holes are made. They are placed not “for safety in general,” but exactly where they will help repeat the part position and will not interfere with the tool in the second setup.
That combination - one face plus two holes - already gives a clear reference. Before the part is removed, the operator has a support and two coordinate points that can be trusted in the next step.
What the second setup looks like
After rotation, the housing is placed in prisms. This is especially convenient when the outer surfaces of the blank are still far from ideal and a normal clamp on the plate creates tilt. Then the part is aligned to the already machined datum and clamped without excessive force. Over-tightening is dangerous here: a thin wall can shift by several hundredths.
Before cutting, it is enough to check a few things: the height of the support face relative to zero, the parallelism of the housing along the prism line, the absence of rocking from light hand pressure, and the position relative to the two datum holes. If these checks pass smoothly, the second side can be machined without a new plate, transition angles, or complex clamping schemes.
For a small batch, this approach is also convenient because it is easy to repeat. If the housing behaves consistently on the first two or three parts, the route is usually left unchanged, and then only the cutting parameters are refined, not the setup idea itself.
Where the datum is most often lost
The datum is more often lost not at the moment of rotation, but in the small details between setups. The housing looks fine from the outside, but after the second pass the hole shifts by a couple of hundredths, the face is no longer parallel, and the size starts varying from part to part.
One of the most common mistakes is using an outer edge after rough machining as zero. That edge has already changed: stock was removed unevenly, the angle may have shifted, and a tool exit mark may remain on the rib. If you reference that edge, the second setup inherits the first setup’s error. For a housing, it is safer to rely on predefined datum faces or on an already verified machined base.
Prisms also cause trouble when they are placed under the wrong area. A sloped section, casting skin, or burr does not give a proper line of contact. The part touches the fixture at random points, and after rotation that tilt shows up immediately in the dimensions.
A thin wall is easy to distort with a normal clamp. The operator pulls harder to make sure the housing does not move, and ends up deforming it by several hundredths. While the part is clamped, everything looks fine. After release, the wall springs back and the size shifts. In such cases, the clamp should be placed closer to a rigid zone, and the force should be kept as low as possible while still allowing cutting.
Another quiet mistake is mixing dimensions from different setups in one program. For example, holes are measured from the datum of the first setup, while a pocket is measured from the second. On screen it looks logical, but not on the part. Each setup should have its own zero, and the transition between them is better defined directly in the program than kept in your head.
And there is an even simpler cause: chips under the support. One chip on the plate or under a prism is enough to seat the housing crooked. After that, it is easy to start blaming the machine or the tool, when the first step should have been to clean the contact area.
Short check before the batch
Before the first batch, it is better to spend a few minutes on a dry check than to chase size drift on every second part later. If even one of these points is unstable, the datum is almost certain to move:
- the part sits on clean areas in the prism, with no chips, burrs, or scale;
- the clamp holds the housing firmly but does not pull it sideways or block the tool;
- the zero in the machine matches the drawing logic and the chosen datum;
- after repositioning, the indicator shows repeatable seating in the same control points;
- the blank does not rock or flex from light hand pressure.
There is one more useful check. Look at the route as a whole: it is better to machine the stiffest surfaces first and only then move on to walls, pockets, and areas where the housing loses rigidity. Otherwise, you weaken the part too early, and the next setup becomes less predictable.
On a small housing, this is visible right away. If you first machine a deep pocket and then flip the part in the prism to machine a side face, the seating is often already different. If you first create reliable support surfaces and only then move into less rigid zones, repeatability is usually noticeably better.
For batch production, it helps to keep the same check routine at the machine. The operator sets the housing, cleans the supports, checks the clamp, verifies the zero, looks at the indicator, and only then starts the cycle. This simple rhythm often brings more value than complex changes in the program.
What to do next
If the housing starts drifting by hundredths after rotation, look at the supports first. The program rarely fixes a part that did not sit evenly in the first place. One chip under a prism, a burr on the datum, or a weak stop creates more error than many compensation tweaks.
It is useful to check seating in the simplest way: mark the contact area, do a trial setup, and see where the part actually sits. If the contact is patchy or the housing rocks by hand, it is too early to change the program. First, the supports must be leveled and extra contact points removed.
If the tool cannot reach the needed area, do not rush to complicate the route. Often the problem is not the machine or the toolpath, but the setup layout. Prism height, stop position, clamping direction, and part projection affect tool access more than it seems. Sometimes moving the stop by a few millimeters or swapping the prisms is enough to open the needed side.
As the batch grows, it is important to calculate the whole cycle honestly, not just the pure cutting time. At the start and in small batches, a 90-degree turn through datum prisms is indeed convenient. But in a large batch, the extra minutes spent on seating, checking, and rechecking the datum quickly become more expensive than a better-designed fixture.
If the route still feels questionable, it helps to compare it with the practice of those who work with housing parts and metalworking every day. The specialists at EAST CNC, the official representative of Taizhou Eastern CNC Technology Co., Ltd. in Kazakhstan, handle equipment selection, commissioning, and service, and the east-cnc.kz blog publishes equipment reviews and practical advice for tasks like this.
And one more simple step that often saves a lot of time: record the successful setup in the setup sheet. Note which prisms were used, where the stop was, what projection worked, which clamp was used, and what corrections were needed on the first good part. Then the next start will go much more smoothly and will no longer depend only on the setup operator’s memory.
FAQ
When does it make sense to rotate a housing by 90 degrees without new tooling?
It makes sense for small and medium batches when the housing already has clear support zones and sits in the prism without rocking. If the second setup repeats the first datum, you save time and avoid building a new fixture.
Why does the size start drifting after the rotation?
The size drifts not because of the rotation itself, but because of the new support and clamping scheme. After repositioning, the part often no longer sits on a flat surface but on an edge, near a pocket, or against a thin wall, and the clamp twists it slightly.
How do you know if a prism is suitable for the second setup?
Check the seating before clamping. If the housing sits in the prism evenly, does not seek a new position when you press it lightly by hand, and does not need shims, the prism is suitable.
Where should the clamp go after rotating the part?
Place the clamp closer to the rigid area and direct the force downward, not sideways. If the clamp pulls the housing toward one side or presses on a thin wall, the datum will shift almost immediately.
What should you check before the first cut after rotation?
Before starting, check the support surfaces for cleanliness, the part height after rotation, tool access, and repeatability with an indicator. It also helps to make sure right away that the stop and clamp do not enter the milling or drilling area.
Do you need datum holes in the first setup?
Yes, if the holes really help repeat the part position in the second setup and do not interfere with machining. A plane plus two datum holes often gives a clearer reference than a random outer edge.
How do you avoid losing zero between the first and second setups?
Keep the zero from the already machined datums, not from a cast edge or a rough corner. In the program, it is also better to separate the datums of the first and second setups clearly so dimensions from different positions do not get mixed.
When are standard prisms no longer enough and a separate fixture is needed?
It is time for simple dedicated tooling if the operator has to keep finding the angle with a gauge, adding shims, and readjusting clamping force every time. In a batch, that manual tuning takes more time than making a simple fixture.
What most often throws off the datum in a batch?
The datum is usually lost by chips under the support, burrs on the contact surface, too much clamping force, or support on an area with a pocket or slope. These small things cause drift faster than programming mistakes.
How do you document a successful setup so it can be repeated quickly later?
After the first good part, write the setup scheme into the setup sheet: which prisms were used, where the stop was, what projection worked, and what clamping force held the size. Then the next run follows a clear plan instead of relying on the setup operator’s memory.